
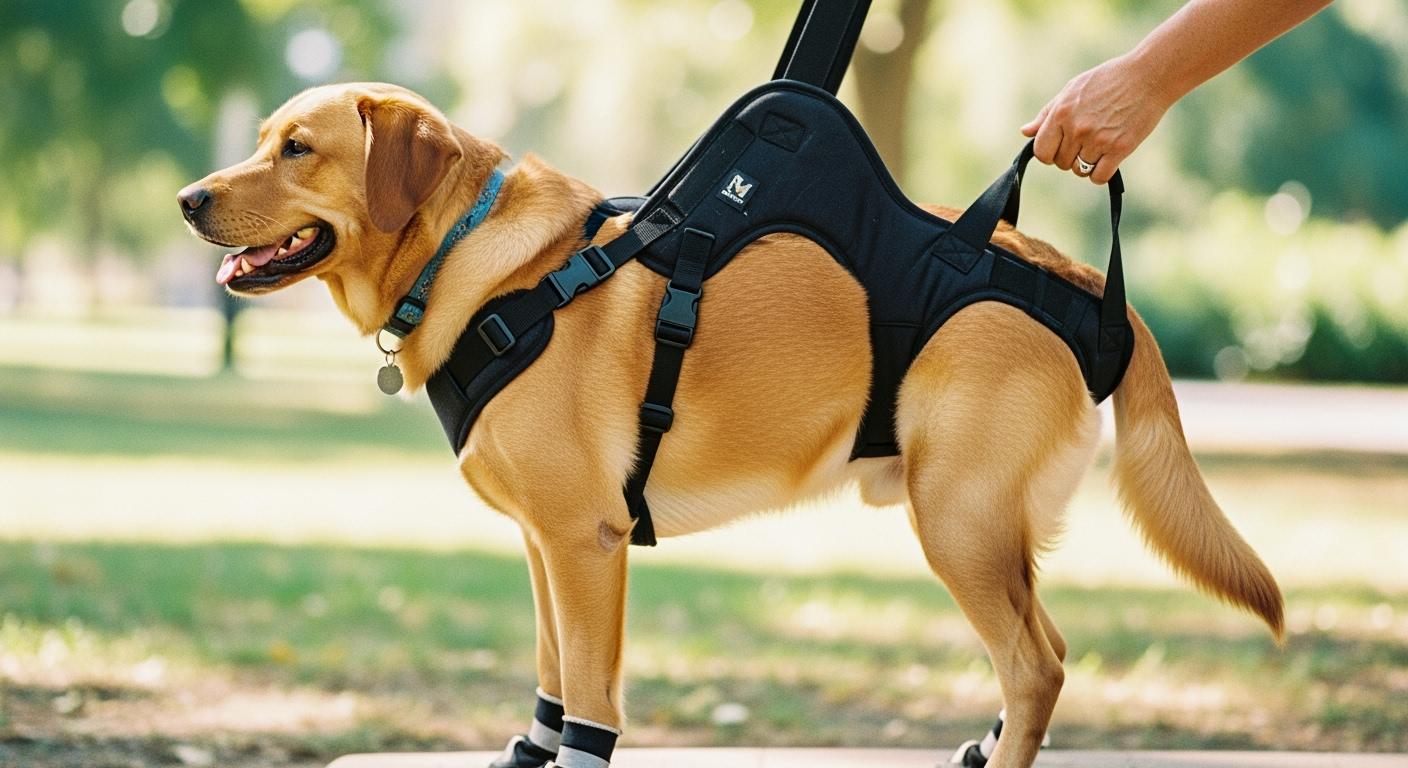
A dog sling for back legs can lift the rear, unload the hips, and get a weak hind end through a short walk. But lift alone is not leveling. The sling can cradle the belly and still let the hind paws scrape the floor. That gap — between “supported” and “cleared” — is where most rear slings fail in daily use.
Three things usually break rear clearance. The lift is too low and the hip drops. The support panel slides forward and leaves the rear zone. The handles are mismatched and the dog tilts sideways. Each failure looks similar from above — toes dragging — but the fix is not the same for any of them. This article walks through why each happens, what product details make the difference, and when a sling is the wrong tool entirely.
Why Toes Still Drag When a Rear Sling Is Used
The most common failure is straightforward: the sling supports the rear but does not lift it enough to level the hips. When the hip drops even half an inch, the leg’s swing arc shortens. The paw can no longer clear the floor at the lowest point of the stride.
Here is the causal chain that turns a low lift into a skin problem. A dropped hip rotates the femur backward relative to the pelvis. That changes the angle at which the stifle and hock extend during the step. The paw reaches the ground earlier in the stride cycle and stays in contact longer. Instead of a clean lift-off, the dorsal surface of the paw drags across the floor. Over 30 or 40 steps — a typical indoor test session — the repeated friction abrades the skin over the knuckles and the tops of the toes. What starts as a half-inch hip deficit becomes a raw, bleeding paw within minutes. The handler sees toe drag; the mechanics underneath are hip angle → stride truncation → extended ground contact → dorsal abrasion.
You can verify this directly. Walk the dog 10 slow steps indoors on a smooth floor, then run your hand over the top of each rear paw. Dry and cool is what you want. Warmth or any roughness means the paw top is making floor contact — the lift is not enough, even if the hips looked level from above.
The panel slides forward mid-stride
A second failure is less visible but just as common. The support panel starts under the rear end. Within five or six steps, it has migrated forward onto the belly. The rear loses support. The toes drop.
This happens because a narrow panel has no lateral resistance surface. When the dog’s hind legs push backward during propulsion, the panel experiences a forward shear force. Without enough width to distribute that force across the inner thigh and lower abdomen, the fabric rolls at the edge. Once an edge rolls, it acts like a bearing — the whole panel tracks forward with each subsequent step. A panel that stays wide and flat under load resists this. The difference is not subtle: a 4-inch-wide panel that rolls at the edges loses contact with the rear support zone within 10 steps on most medium-to-large dogs. A wider, reinforced panel that keeps its shape under shear holds position through a full indoor session.
In practice: Check panel position after the first 10 steps, not before. Place two fingers at the rear edge of the sling where it meets the hind leg. Walk the dog 10 steps, then check whether those fingers are still touching the sling’s rear edge or have drifted forward onto bare fabric. More than a half-inch shift means the panel is migrating.
Uneven handle pull tilts the dog sideways
Handles that differ in effective length — whether from a height mismatch between handler and dog, or from one handle stretching more than the other under load — create asymmetric lift. The hip on the shorter-handle side rises; the opposite hip drops. The dog compensates by leaning into the higher side, loading that leg unevenly. The lower paw then drags.
This is rarely a strength problem. It is a geometry problem. If the handler is 5’10” and the dog’s back is 18 inches off the ground, the handles need to bridge roughly 4 feet of vertical distance. A 2-inch difference in handle adjustment between left and right — barely noticeable by eye — produces a visible hip tilt at the dog’s end of the lever. The shorter the dog, the more a small handle mismatch magnifies at the hip.
Walk behind the dog for 10 steps and watch the gap between the inner thighs. If one thigh swings closer to the midline than the other, the lift is uneven. Adjust the lower side’s handle up until the thigh gaps look symmetric.
| Sling setup issue | What happens in motion | Product or fit direction |
|---|---|---|
| Low rear lift | Hips drop, paws scuff or drag continuously | Shorten handles until hips sit level from side view |
| Uneven handle pull | Dog leans sideways, one paw drags more than the other | Match handle length so hip heights are symmetric |
| Panel placed too far forward | Belly bears weight, hips unsupported, paws drop | Position the rear edge of the panel at the hind leg line |
| Narrow or rolling panel | Fabric twists, lift drops, panel creeps forward | Use a wider panel with reinforced edges that resist rolling |
| No non-slip inner surface | Entire sling slides forward within first 10 steps | Choose a sling with grip lining that holds fur, not just fabric |
| Dog still knuckling despite level lift | Dorsal paw surface scrapes floor regardless of hip position | Consider a toe-up brace; sling lift cannot correct paw placement |
| Signal | What the handler sees | Action |
|---|---|---|
| Green | Hips level, paws clear the floor, dog steps without hesitation, no redness after session | Continue; recheck fit before each use |
| Yellow | Light toe scuffing, slight hip drop on one side, panel shifts less than an inch | Adjust handle height and panel position; shorten session; monitor |
| Red | Repeated dragging, paw-top scraping, collapsing, vocalizing, cold paws, bleeding, or sudden refusal to move | Stop immediately; contact a veterinarian before using the sling again |
Sling Design Details That Improve Toe Clearance
Not all rear slings fail the same way, because not all are built the same way. Three design choices separate a sling that holds rear clearance from one that loses it within a dozen steps.
Handle adjustability and the handler-height problem
Fixed-length handles assume one handler height and one dog height. Reality is a 5’2″ person lifting a 14-inch-tall Corgi, or a 6’1″ person lifting a 24-inch-tall Shepherd. The vertical distance from hand to hip changes by more than a foot across that range. A sling with continuous handle adjustment — not preset notches — lets the handler tune the lift so the hip stays level regardless of the handler’s height. Without it, the handler stoops or lifts from the shoulder, both of which introduce uneven pull.
After adjusting handles, run a 20-step test. Check whether the dog’s hip line stays parallel to the floor. If it dips after 15 steps, the handles may be stretching under load — a material problem, not a setup problem. Some webbing materials elongate 3–5% under sustained tension. That elongation drops the hip by a quarter inch or more over the course of a short walk. Handles made from low-stretch webbing hold their adjusted length through the full session.
Panel width, edge reinforcement, and shear resistance
Panel width determines whether the sling stays under the rear or creeps forward. A narrow panel concentrates the dog’s body weight over a small contact patch. During propulsion, the hind legs push backward, and the panel experiences forward shear. With a narrow contact patch, that shear force exceeds the static friction between sling and coat almost immediately. The panel slides.
A wider panel spreads the same shear force across more surface area, keeping the force per square inch below the slip threshold. Reinforced edges prevent the panel from rolling at the perimeter — and edge rolling is what initiates most forward migration. Once an edge rolls, the contact patch shrinks, the shear force concentrates, and the panel tracks forward step by step.
The material on the inner face matters equally. A smooth nylon liner against dog fur has a low coefficient of friction. Any forward shear slides the panel. A non-slip inner surface — typically a rubberized grid or silicone dot pattern — raises the friction coefficient enough to hold position against normal walking shear. The combination of width, edge reinforcement, and grip lining keeps the support zone under the rear end through a full session.
Edge finishing and skin tolerance
The inner thigh and groin take the most contact pressure in any rear sling. A raw-cut or narrow-bound edge concentrates that pressure into a line — and a line of pressure across soft tissue produces redness, then irritation, then refusal to wear. A sling that the dog rejects after three minutes is failing at the material level, not the fit level.
Wider, rolled-edge or padded-bound finishes spread the same lift force across a broader contact band. During production, a rolled edge adds a sewing step but reduces the pressure per linear inch by roughly half compared to a narrow-bound edge. For dogs with thin coats or sensitive skin — Greyhounds, Boxers, short-coated seniors — that difference determines whether the sling is tolerated for a full rehab session or rejected outright.
Check the inner thighs after the first session. Press a dry paper towel against the area where the sling’s rear edge sat. Any moisture means friction heat built up — the edge finish or material is not managing contact pressure well enough for that dog’s skin type.
When a Rear Sling Is Not the Right Tool
A rear sling does one thing: it provides upward lift under the hindquarters so the handler can assist stride clearance. It does not control paw orientation, stabilize the stifle, or support the spine. When the problem is not lift — or not only lift — the sling is the wrong tool.
Paw-knuckling and toe-up deficits
If the dog’s paw folds under so the dorsal surface hits the floor — knuckling — no amount of rear lift will fix it. The sling lifts the hip; it cannot flip the paw. Knuckling is a neurologic or proprioceptive deficit. The dog does not know where the paw is in space and cannot right it. A lift harness supports the hip and rear weight, but paw placement requires a different mechanism — typically a toe-up brace or boot that physically holds the paw in a plantigrade position.
Front-end weakness or full-body instability
A rear sling assumes the dog can bear weight through the front legs and coordinate a stepping pattern. If the front end is also weak — common in advanced degenerative conditions or generalized senior decline — lifting only the rear creates a wheelbarrow effect: the front legs buckle while the rear is suspended. What looks like a rear-leg problem on video may actually be a whole-body stability problem that a rear-only sling cannot address. A full-body harness distributes support across the torso rather than concentrating it under the hindquarters, which changes the stability equation for dogs with multi-limb weakness.
Progressive neurologic conditions
Conditions like degenerative myelopathy and advanced IVDD produce deficits that evolve. A sling that worked last month for a dog with early-stage DM may be inadequate this month as hind-limb proprioception fades. The sling itself has not changed — the dog’s ability to use the lift has. Regular fit checks that include paw-temperature and skin-condition monitoring catch this drift before the dog develops abrasions from dragging that the handler assumed the sling was preventing.
Disclaimer: The fit checks described here assume a short-coated dog where skin redness and abrasion are visible. Double-coated breeds — Huskies, Malamutes, Shepherds, and similar — may develop pressure points and rub marks under the coat that are not visible from the surface. For these breeds, hand-check the inner thigh and groin skin by parting the coat after every session. If the dog has angular limb deformities or a very deep chest relative to breed norms, the standard sling support zone may not align correctly — the fit checks described here may miss pressure points specific to that conformation.
When to pause and reassess
Stop using the sling and seek a veterinary assessment if the dog shows any of the following during or after sling-assisted walking: sudden collapse, vocalizing, repeated paw-top scraping that does not improve with lift adjustment, cold paws after use, loss of bladder or bowel control during a session, or any increase in lameness compared to unsupported walking. These are not sling-fit problems. They signal an underlying condition that lift alone cannot address.
For dogs that need more than a rear sling provides, the next step depends on the deficit. Different sling and support types match different mobility gaps — a rear-only sling, a full-body harness, and a toe-up brace each solve a distinct problem. A support sling and a lift harness handle different scenarios, from flat-ground walking to stair transfers. Matching the tool to the specific deficit — not to the diagnosis label — determines whether the dog moves better or develops new problems from the wrong support. For product selection across the full range, rear lift harness designs vary in panel width, handle type, and inner surface material, and those differences change which deficits they can actually address.
Häufig gestellte Fragen
Why do my dog’s toes still drag when the sling looks level from the side?
A hip that looks level at a glance can still be low enough to shorten the stride arc. The visual difference between “level” and “dragging” is often under half an inch. Verify with a hand check: run your palm over the dorsal surface of each rear paw after 20 steps. Any warmth means the paw is grazing the floor. Adjust the handle up in quarter-inch increments until the paw tops stay cool and dry through a full indoor walk.
How tight should the sling fit against the dog’s body?
Snug enough that the panel does not shift, but not so tight that the inner thigh skin folds or reddens. If you can fit two fingers flat between the sling’s rear edge and the inner thigh at rest, and those fingers encounter resistance but not compression, the contact pressure is likely in the usable range. Check again after walking — panel migration changes this clearance, so a pre-walk check alone is not enough.
Can the sling be used on stairs?
A rear sling is designed for flat, controlled indoor surfaces. On stairs, the handler’s arm angle changes with each step, introducing handle-length variation mid-stride. The dog’s weight distribution also shifts on an incline, changing where the panel sits relative to the support zone. For stair transfers, a full-body harness with a top handle provides more predictable support geometry because the lift point stays centered over the dog’s center of mass regardless of the handler’s position.
How long can a dog wear a rear sling per session?
Start with 2–5 minutes on a non-slip floor and check paws and inner thighs immediately after. If the skin is cool, dry, and free of marks, extend to 8–10 minutes on the next session. Do not exceed 15 minutes without a veterinary-supervised wear plan. Muscle fatigue sets in faster during assisted walking than during unsupported movement because the dog is partially suspended and using stabilizer muscles differently. Longer sessions do not equal better rehabilitation — they equal higher risk of abrasion, pressure sores, and compensation patterns that outlast the walk.
