

You want your dog to recover quickly after surgery, so understanding the dog CCL surgery recovery timeline text is important. Most dogs are able to walk well within 12 to 16 weeks after TPLO or TTA procedures. According to the dog CCL surgery recovery timeline text, dogs can usually return to running and playing in about 4 to 6 months. Early, gentle rehabilitation is key to helping your dog heal, and following the dog CCL surgery recovery timeline text helps prevent complications. Always follow your veterinarian’s advice and make sure to schedule a vet checkup if needed. This guide is based on a 50 lb dog and follows 2024–2025 recommendations and the dog CCL surgery recovery timeline text. Remember, your surgeon’s instructions are more important than general timelines. If you notice anything unusual, call your clinic right away. Careful attention to the dog CCL surgery recovery timeline text gives your dog the best chance for a full recovery.
Key Takeaways
Know the recovery timeline. Most dogs walk well in 12 to 16 weeks after TPLO or TTA surgery. Listen to your vet for the best results.
Begin rehab early. Gentle exercises help lower swelling and stop arthritis. Start with passive range of motion exercises when your vet says it is okay.
Watch your dog’s incision. Check every day for infection signs like redness or swelling. Call your vet if you see anything strange.
Use a set exercise plan. Slowly raise your dog’s activity each week. Controlled walks and rehab exercises help build strength in a safe way.
Keep a healthy diet. Good food helps your dog heal. Change food amounts to stop weight gain during recovery.
Understanding CCL Injuries and Why Recovery Matters
CCL, CrCL, and ACL: What Do They Mean?
Your vet might say CCL, CrCL, or ACL about your dog’s knee. The cranial cruciate ligament (CCL) keeps your dog’s knee steady. In people, it is called the anterior cruciate ligament (ACL). These names mean the same thing. In dogs, the CCL stops the shin bone from moving forward. If the CCL tears, the knee gets wobbly. This causes pain, swelling, and makes walking hard. If not fixed, the joint can get arthritis.
Why Starting Recovery Early Helps
A torn CCL hurts every part of your dog’s knee. Starting rehab soon after surgery helps protect the joint. Gentle rehab helps the knee heal and keeps swelling down. It also lowers the chance of arthritis. Most dogs hurt their CCL for a few main reasons:
Trauma, like falling or twisting the knee.
Inflammation, which makes the ligament weak over time.
Joint shape problems, which make the knee less steady.
Some dogs have a bigger risk because of their breed, weight, or joint shape. For example:
Breed: Rottweilers and Labradors get more CCL injuries.
Joint shape: Some dogs have knees that are less stable.
Body weight: Heavy dogs put more pressure on their knees.
Making Good Recovery Goals
It takes time for your dog’s knee to heal after surgery. The joint needs weeks to get strong again. Healing from a CCL injury is not like other bone injuries. The table below shows how they are different:
Aspect | CCL Injury Recovery | Other Orthopedic Injuries |
|---|---|---|
Focus | Keeping the stifle joint steady | Depends on the injury |
Pain Management | Very important and uses special ways | Uses general pain care |
Needs careful and planned exercise | May not need a strict plan | |
Recovery Time | 8-16 weeks, sometimes 4-6 months | Can be very different |
Emotional Impact | Big because recovery takes a long time | Usually not as tough |
Set small goals each week for your dog’s knee. Always do what your surgeon says. Call your vet if you notice anything strange. Your vet can help change the plan if needed.
TPLO Surgery, TTA, and Other Repair Options
TPLO and TTA: How They Work
Your vet might suggest tplo surgery or TTA for your dog’s knee. These surgeries change how the knee works. This helps your dog walk again. TPLO means tibial plateau leveling osteotomy. The surgeon cuts and shapes the top of the shin bone. TTA stands for tibial tuberosity advancement. The surgeon moves part of the shin bone forward. Both surgeries help your dog put weight on the leg soon after surgery.
Here is a table that shows the main differences between tplo and TTA:
Feature | TPLO | TTA |
|---|---|---|
Invasiveness | More invasive with larger incision | Less invasive with smaller incision |
Incision Size | 20cm or more | 7.5-12cm |
Recovery Time | 10-12 weeks | Quicker recovery |
Weight Bearing | Walk within 24 hours | Quick to weight bear |
Complications | Higher risk of osteomyelitis | Fewer complications post-surgery |
Surgical Approach | Tibia cut and reshaped | Tibial tuberosity cut and advanced |
Studies and Evidence | Extensive studies supporting outcomes | Similar outcomes shown in studies |
Extracapsular Repair: Key Differences
Extracapsular repair uses a strong suture outside the joint. This keeps the knee steady. The bone does not get changed. Dogs may need more time to heal. They may not get back to full activity as fast as with tplo surgery or TTA. The cut is smaller, and the surgery is less invasive. Each method has different risks for problems.
Surgery Type | Major Complication Rate | Minor Complication Rate | Total Complication Rate |
|---|---|---|---|
TPLO | 3.1% | 8.3% | 11.4% |
TTA | 15.4% (SSI) | N/A | N/A |
Extracapsular Repair | 4.2% (SSI) | N/A | N/A |
Following Your Surgeon’s Plan
Your surgeon’s plan is more important than general timelines. Always do what your vet says. Start rehab early, but keep it slow and safe. Go to all checkups and get imaging when told. If you think something is wrong, call your clinic right away.
Tip: Controlled rehab helps your dog heal. Do not let your dog do more until your surgeon says it is okay.
TPLO vs TTA vs Extracapsular: Comparison Table
How does rehab change for TPLO, TTA, or Extracapsular repair?
Surgery Type | What’s Healing | Why Restriction Matters | What Often Stays the Same (First 8–12 Weeks) |
|---|---|---|---|
TPLO | Bone and joint | Prevents bone shifting | Leash walks, crate rest, slow activity |
TTA | Bone and joint | Protects bone and implant | Leash walks, crate rest, slow activity |
Extracapsular | Soft tissue and suture | Suture needs time to hold | Leash walks, crate rest, slow activity |
TPLO and TTA recovery can take 6 to 12 months. Extracapsular repair may take longer for full use. Always use the standard patient and timeline from the Quick Reference Card. Safety is most important. If you see swelling, limping, or changes in your dog, call your vet.
First 14 Days: The Non-Negotiables
Incision and Swelling Care
The first two weeks after surgery set the stage for your dog’s healing process. You must check the incision every day. Look for redness, swelling, pain, or pus. Use this table to guide your daily checks:
Time Period | Care Activity | Frequency | Key Points |
|---|---|---|---|
Daily | Inspect incision for infection | Once per day | Watch for redness, swelling, pain, or pus. |
Keep the incision clean and dry. Do not let your dog lick or chew the stitches. An e-collar helps prevent this. Swelling near the ankle is common and should go away in a few days. Apply ice packs to the knee for 10 minutes, three times a day, during the first three days. This helps reduce swelling and supports the healing process.
Tip: Your surgeon’s protocol overrides general timelines. Call the clinic sooner rather than later if something feels off.
Pain Management and Comfort
Pain control is a key part of post-operative care. Give all medications exactly as your veterinarian prescribes. Never give aspirin or Tylenol, as these can be dangerous. Keep your dog warm and dry. Confine your dog to a crate or small room when you cannot supervise. This keeps your dog safe and helps prevent injury.
Use passive range of motion exercises two to three times daily to prevent stiffness.
Massage the muscles gently for 10 minutes, twice a day.
Safe Bathroom Breaks and Support
Take your dog outside on a leash three to five times a day for bathroom breaks. Keep walks short—5 to 10 minutes on flat ground. Support your dog with a sling if needed. Do not allow running, jumping, or stairs. These essential care tips help protect the knee and support recovery.
Schedule a recheck appointment with your veterinarian 10 to 14 days after surgery.
Follow all home care instructions closely.
Note: Controlled rehab should start early but must be gentle. Imaging clearance is needed before increasing activity.
Dog CCL Surgery Recovery Timeline Text Copy Code: Recovery Week by Week
The dog ccl surgery recovery timeline helps you know what to do after tplo surgery. You should follow a week-by-week plan to keep your dog safe. Each part of recovery has its own goals, activities, and warning signs. Your surgeon’s rules are more important than general advice. Call your vet right away if something seems wrong.
Weeks 0–2: Rest and Gentle Motion
Goal: Keep the incision safe and start gentle movement.
Allowed Activity: Only take your dog out on a leash for bathroom breaks. Use a crate for rest and take short walks on flat ground.
Rehab Exercises:
Do passive range-of-motion exercises, 10 times, 3 times a day, but only if your vet says it is okay.
Massage your dog gently for 10 minutes, two times a day.
Put a cold pack on the knee for 10 minutes, three times a day for the first three days. Red Flags:
Watch for swelling, pus, or redness at the incision.
Limping that gets worse.
Changes in how your dog acts, like being clingy or sleepy. Why This Matters: Protecting the knee early stops infection and helps healing start.
Checklist:
Take your dog out on a leash for bathroom breaks
Check the incision every day
Do PROM and massage
Use cold packs
Watch for swelling or pain
Weeks 3–4: Controlled Walks
Goal: Help your dog get stronger and more confident with careful activity.
Allowed Activity: Walk your dog on a leash for 10 to 15 minutes, three times a day.
Rehab Exercises:
Keep doing PROM, 10 times, 3 times a day.
Help your dog stand and shift weight with support.
Try simple balance exercises. Red Flags:
Limping, stiffness, or swelling after walks.
Not wanting to use the leg. Why This Matters: These walks help your dog build muscle and keep the joint steady without getting hurt.
Checklist:
Walk your dog on a leash
Do PROM and balance work
Watch for limping
Do not let your dog run, jump, or walk on slippery floors
Weeks 5–6: Strength and Balance
Goal: Make your dog’s muscles stronger and improve balance.
Allowed Activity: Walk your dog on a leash for 15 to 20 minutes, three times a day.
Rehab Exercises:
Let your dog walk up and down small hills for 5 to 10 minutes, one or two times a day.
Hold stretches for 6 to 10 seconds, 10 times.
Walk your dog in figure-eights for 5 minutes, once a day.
Step on and off a low curb for 10 to 20 feet, three times a day.
Practice sit-to-stand, 5 to 7 times, two times a day. Red Flags:
Soreness that lasts more than one or two days after exercise.
Swelling or heat at the knee. Why This Matters: These exercises help your dog heal and get ready for more activity.
Checklist:
Walk your dog longer
Add curb work and figure-eights
Do stretching and sit-to-stand
Watch for soreness or swelling
Weeks 7–8: Endurance and Trotting
Goal: Build up your dog’s endurance and start short trotting.
Allowed Activity: Walk your dog on a leash for 20 to 30 minutes. Add short, controlled jogging for about 20 feet.
Rehab Exercises:
Walk in figure-eights for 5 minutes, one or two times a day.
Do hip sways for 5 minutes, once a day.
Try harder balance and coordination exercises. Red Flags:
Limping or pain after doing more activity.
Not wanting to put weight on the leg. Why This Matters: Endurance training helps your dog move normally and get ready for more exercise.
Checklist:
Walk your dog longer
Add short trotting
Do advanced balance work
Watch for pain or limping
Weeks 8–12: Return to Normal Activity
Goal: Slowly get back to normal daily routines.
Allowed Activity: Walk your dog on a leash for up to 45 minutes, split into shorter walks if needed. Start gentle play and water exercise if your vet says it is okay.
Rehab Exercises:
Try short swimming sessions, 3 to 5 minutes, and increase slowly.
Keep doing figure-eights and curb work.
Start stair work with supervision. Red Flags:
Any pain, limping, or swelling.
Trouble with new activities. Why This Matters: This step helps your dog move from recovery to normal life, but you still need to limit activity until your vet says it is safe.
Checklist:
Walk your dog longer
Start gentle play and water exercise
Do stair work with supervision
Watch for problems
Weeks 12–24: Full Conditioning
Goal: Get your dog’s strength, endurance, and joint stability back to normal.
Allowed Activity: Slowly let your dog do all normal things, like running and playing, but only if your vet says it is okay.
Rehab Exercises:
Do advanced strength and conditioning exercises.
Let your dog walk, run, and play without limits.
Keep working on balance and coordination. Red Flags:
Sudden limping or injury.
Signs of tiredness or pain after activity. Why This Matters: Full conditioning makes sure your dog’s knee is strong and healthy after tplo surgery.
Checklist:
Let your dog do normal activities
Keep doing advanced rehab
Watch for new injuries
Go to regular checkups
Week-by-Week Timeline Table
Week Range | Primary Goal | Leash-Walk Target | Rehab Exercises | Hard ‘Do Not’ List |
|---|---|---|---|---|
0–2 | Protect incision, gentle ROM | 5–10 min, 3x/day | PROM, massage, cold compress | No running, jumping, stairs, off-leash |
3–4 | Controlled walks, balance | 10–15 min, 3x/day | PROM, balance, assisted standing | No rough play, no slick floors |
5–6 | Strength, coordination | 15–20 min, 3x/day | Incline/decline, curb work, stretching | No unsupervised activity, no swimming |
7–8 | Endurance, trotting | 20–30 min, 3x/day | Trotting, figure-eights, hip sways | No off-leash, no uncontrolled running |
8–12 | Return to normal activity | Up to 45 min, split walks | Water exercise, stair work, play | No high-impact sports until cleared |
12–24 | Full conditioning | Unrestricted (if cleared) | Advanced strength, play, running | No activity without vet clearance |
Walking Progression Calculation:
Start with 10 minutes per walk in week 2. Add 5 minutes each week for 4 weeks. By week 6, your dog should walk 20 to 30 minutes if there is no limping or soreness. Always check for pain or swelling. Only let your dog do more if they walk well and use the leg every step.
Your surgeon’s rules are more important than general advice.
Call your vet right away if something seems wrong.
Tip: Controlled activity and regular checkups help you follow the recovery timeline and avoid problems. The dog ccl surgery recovery timeline gives you easy steps for each week. You help your dog heal by limiting activity and following each phase. Always ask your vet before changing your dog’s routine after tplo surgery.
Home Rehab Exercise Library
PROM: Passive Range of Motion
You help your dog’s healing process by gently moving the knee through its natural range. PROM is a key part of rehabilitation at home, especially in the first weeks.
How to do PROM:
Step 1: Support your dog’s leg above and below the knee.
Step 2: Slowly bend and straighten the knee within a comfortable range.
Step 3: Repeat 15–20 times, two to four times a day.
Stop if your dog shows pain, pulls away, bites, or the leg feels stiff.
PROM keeps the joint flexible and helps prevent stiffness. Do not force the movement.
Balance and Weight Shifts
Balance work helps your dog regain strength and stability during the healing process.
How to do weight shifts:
Step 1: Stand your dog on a non-slip surface.
Step 2: Gently nudge the hips side to side.
Step 3: Lift the non-surgical leg for a few seconds to shift weight onto the healing leg.
Step 4: Repeat for 5–10 reps.
Stop if your dog loses balance or shows discomfort.
Controlled balance exercises are safe for rehabilitation at home. Always supervise closely.
Sit-to-Stand, Curb Work, Figure-Eights
These exercises build muscle and improve coordination.
Sit-to-Stand:
Step 1: Ask your dog to sit, then stand.
Step 2: Repeat 5–7 times, twice daily.
Curb Work:
Step 1: Walk your dog up and down a low curb for 10–20 feet.
Step 2: Repeat three times daily.
Figure-Eights:
Step 1: Walk your dog in a figure-eight pattern for 5 minutes.
Step 2: Do this once or twice daily.
Stop if your dog limps, resists, or seems sore.
Water Exercise: When to Start
Water therapy supports the healing process by reducing joint stress.
Start water exercise after your veterinarian clears it, usually after two weeks.
Begin with 3–5 minutes of walking in water.
Increase time slowly as your dog gains strength.
Your surgeon’s protocol overrides general timelines. Call the clinic sooner rather than later if something feels off.
Sample Daily Rehab Schedule:
Morning: Leash walk + rehab session (5–15 min)
Midday: Leash walk
Evening: Leash walk + rehab session (5–15 min)
This routine gives your dog two focused rehabilitation at home sessions plus walks each day.
TPLO Recovery Guide: Walking and Activity Plan
Calculating Walks and Progression
You want to help your dog recover after tplo surgery. The tplo recovery guide gives you a clear plan for walks and activity. Start with short, slow leash walks. Increase the time only if your dog walks well and does not limp. Use this table to guide your weekly walk schedule:
Week | Walk Duration (minutes) | Frequency (times per day) |
|---|---|---|
Weeks 3-4 | 5 | 2-3 |
Week 5 | 15 | 2-3 |
Week 6 | 20 | 2-3 |
Week 7 | 25 | 2-3 |
Week 8 | 30 | 2-3 |
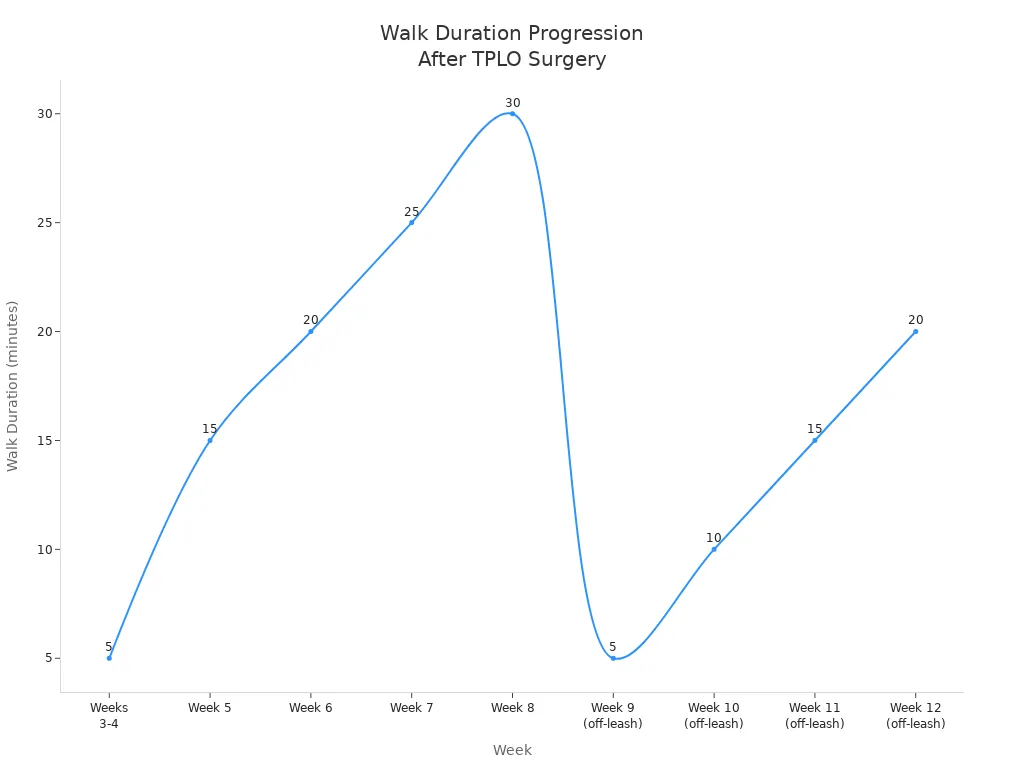
Tip: Add 5 minutes to each walk per week if your dog shows no lameness. Always use a leash. Do not let your dog run or jump. Crate rest is important when you cannot supervise.
Handling Setbacks or Lameness
Setbacks can happen during tplo surgery recovery. If your dog starts limping or seems sore, stop increasing activity. Go back to the last safe level. Give your dog extra rest and watch for swelling or pain. Support your dog with these steps:
Adjust the plan if your dog struggles.
Set small, reachable goals.
Keep a daily log of progress.
Make sure your dog eats well and gets enough sleep.
Use calming routines like gentle petting.
You may feel worried if your dog has a setback. This is normal. Focus on the progress you have made. If you see sudden lameness, swelling, or your dog stops using the leg, call your veterinarian right away.
Reminder: Your surgeon’s protocol overrides general timelines. Call the clinic sooner rather than later if something feels off.
Managing Stairs, Floors, and Transfers
Safety at home is a big part of the tplo recovery guide. After tplo surgery, stairs and slippery floors can cause injury. Use these strategies:
Strategy | Description |
|---|---|
Ramp or Steps | Place ramps or pet steps by beds and couches. |
Safety Gates | Block stairs and unsafe areas with gates. |
Slippery Surface Protection | Put non-slip mats on floors to prevent slips. |
When you move your dog, support the back end with a sling or towel. Always keep your dog on a leash indoors if needed. Never let your dog go up or down stairs alone during early tplo recovery.
Checklist:
Use ramps or steps for furniture
Block stairs with gates
Cover slick floors with mats
Support your dog during transfers
Stay patient and follow the tplo recovery guide. Controlled rehab and regular checkups help your dog heal after tplo surgery.
Recovery Week by Week: When to Pause or Call the Vet
Red Flags and Warning Signs
You help watch your dog after surgery. Look for these warning signs during recovery:
The knee looks swollen compared to the other leg.
Your dog cannot put weight on the surgery leg.
Limping does not go away or gets worse after walks.
The incision looks red, feels hot, or has discharge.
Your dog starts hiding or will not eat.
Your dog slips or falls during walks.
If you see any of these, stop activity and check your instructions. Tell your veterinarian about new or worse symptoms.
Your surgeon’s protocol is more important than general timelines.
Call the clinic quickly if something seems wrong.
Traffic-Light Decision Table
Use this table to help decide if you should let your dog do more, keep things the same, or stop activity. Watching your dog closely keeps them safe.
Is it safe to let your dog do more this week?
Criteria | Green: Advance | Yellow: Hold/Regress | Red: Stop & Call the Vet |
|---|---|---|---|
Incision Appearance | Dry, calm, no redness | Mild redness, mild scab | Open, draining, hot, or smelly |
Swelling/Heat | None or mild, stable | Mild, improving slowly | Marked swelling, heat, or pain |
Weight-Bearing Trend | Using leg every step | Hesitant, partial use | Refuses to use leg |
Lameness After Walks | None or improving | Slight, not worsening | Worsening or sudden lameness |
Willingness to Use Leg | Confident, eager | Occasional hesitation | Reluctant or refuses |
Slipping/Falls | None | One minor slip, recovers | Fall, cannot rise, or yelps |
Only let your dog do more if all boxes are green. If you see yellow, slow down or go back a step. If you see red, stop and call your veterinarian.
What to Document for Your Vet
Writing down what you see helps your veterinarian check recovery. Keep notes and take photos every day to share at checkups.
Documentation Type | Description |
|---|---|
Daily findings | How the incision looks, pain level, activity |
Eating, behavior, worries | |
Medications given | Dose, changes, how your dog reacts |
Photos | Pictures of wounds or healing |
Take clear pictures of the incision and any swelling. Write down changes in activity or mood. Bring your notes and photos to every vet visit.
Your surgeon’s protocol is more important than general timelines.
Call the clinic quickly if something seems wrong.
Top Mistakes in CCL Recovery
Overactivity and Premature Freedom
You might be happy when your dog wants to move. But letting your dog do too much too early is dangerous. If your dog runs, jumps, or plays off-leash before healing, bad things can happen. The metal plate or screws might break or move. Your dog’s bone could crack from too much stress. Healing might take longer, especially for older dogs. The table shows what can go wrong if you let your dog do too much:
Complication | Description |
|---|---|
Implant Failure | The metal plate or screws can shift or break if your dog is too active. |
Bone Fractures | Too much strain may cause small bone cracks, especially in active dogs. |
Delayed Healing | The bone may take longer to heal, especially in older dogs. |
Always do what your surgeon says. Call the clinic right away if you are worried.
Slipping, Stairs, and Leash Errors
Slippery floors, stairs, and leash mistakes can make your dog fall or twist a leg. Put down non-slip mats and block off stairs. Always use a short leash when your dog walks. Never let your dog use stairs alone.
Skipping or Rushing Rehab
You might want to skip rehab or go too fast, but this is not good. Rehab helps your dog get strong, steady, and brave again. If you miss rehab or do too much, your dog might get sore or lose progress. Always follow your vet’s plan and go to all checkups.
Top 12+ Mistakes List
Letting your dog run, jump, or play off-leash too soon
Not checking the incision every day
Missing vet appointments
Letting your dog use stairs or walk on slippery floors
Using a long or retractable leash
Doing too many exercises at once
Not watching for pain or swelling
Not using a crate or safe place for rest
Forgetting to give medicine as told
Not checking for infection at the incision
Letting your dog do more without your vet’s okay
Not writing down how your dog is doing
Waiting too long to call the clinic if you see a problem
Your surgeon’s plan is more important than general advice.
Call the clinic right away if you think something is wrong.
Nutrition, Weight, and Quick Reference Card
Diet and Weight Management
You help your dog get better after tplo surgery. Good food helps your dog heal and keeps joints strong. Focus on protein, healthy fats, and vitamins. These things help fix tissues and lower swelling. Keep your dog at a good weight. Extra weight makes the knee hurt more after tplo. Try these tips to help your dog stay healthy:
Give your dog lean meats, fish, or chicken for protein.
Add good fats like omega-3s to help the joints.
Pick complex carbs to give steady energy.
Make sure your dog gets vitamins A, C, E, and D for health.
Always have fresh water ready for your dog.
When your dog is resting after tplo, feed less food to stop weight gain. Here is an easy way to figure out how much to feed:
Feeding Phase | Daily Food Amount (cups) | Adjustment (%) | New Amount (cups) |
|---|---|---|---|
Before Surgery | 2.0 | — | 2.0 |
After Surgery (Rest) | 2.0 | -25% | 1.5 |
If your dog ate 2 cups before tplo, give 1.5 cups during crate rest. This helps your dog stay at a healthy weight.
Reminder: Your surgeon’s plan is most important.
Call your clinic right away if you are worried.
Supplements to Discuss with Your Vet
Supplements can help your dog’s joints after tplo surgery. Talk to your vet before you start any new supplement. Here are some you can ask about:
Glucosamine and chondroitin help fix cartilage.
Omega-3 fatty acids lower swelling and help with food.
GlycanAid HA has hyaluronic acid and helps older dogs or those with joint surgery.
N-palmitoyl-d-glucosamine and quercetin may help with joint pain.
A study found that dogs healed faster after tplo when they got joint supplements with chondroitin sulfate and glucosamine. Always ask your vet about the right amount and which product to use.
