
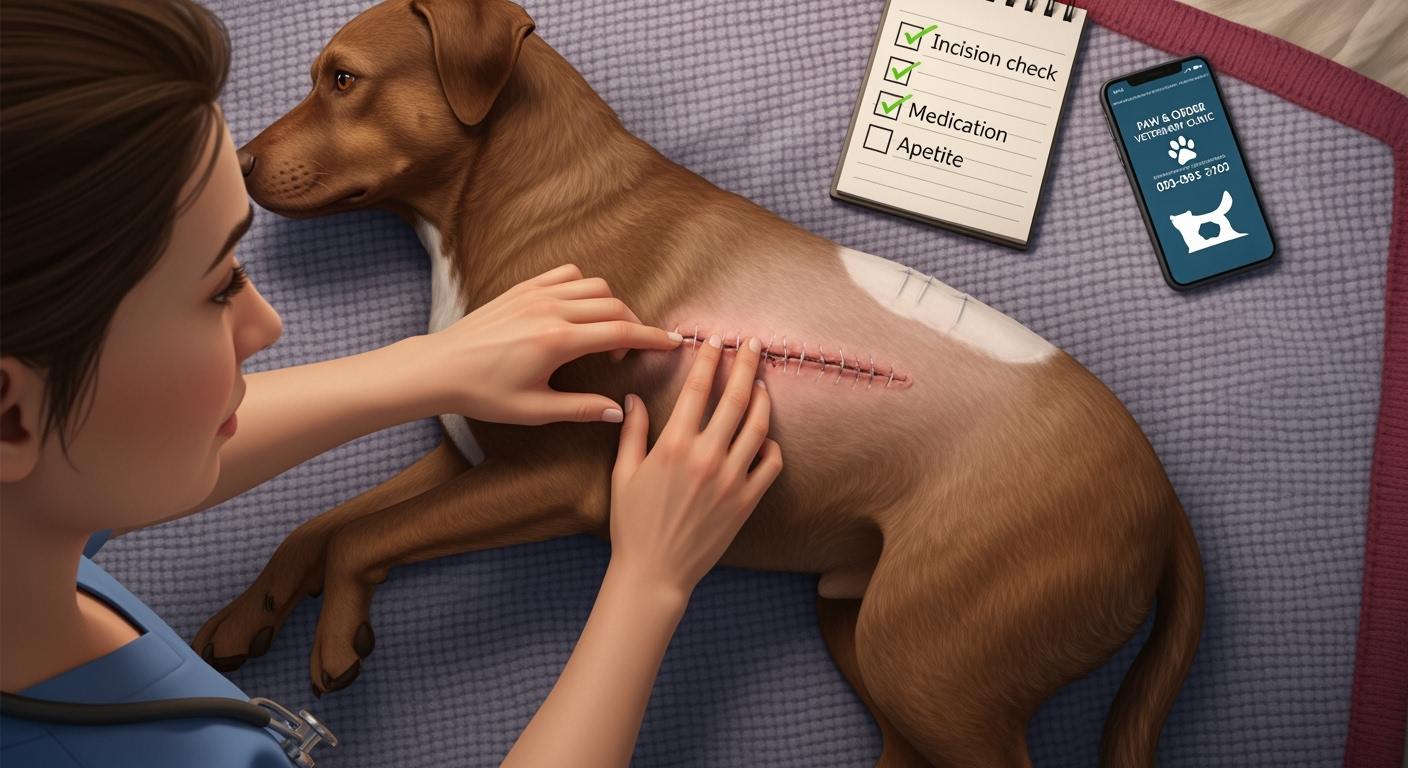
After your dog starts to heal after surgery, check the incision every day. This helps you see changes early. Look for things that are different from yesterday, like swelling or redness. It is important to know what kind of surgery your dog had. You should also know where the incision is and how it was closed. Always read your discharge instructions first. Most dogs get better if you watch them closely. Watch for dog incision infection signs. Do not let your dog lick the area. Do not use strong cleaners or ointments unless your vet says it is okay. Use the quick reference card and checklist to help you keep track and keep your dog safe.
Key Takeaways
Check your dog’s incision daily for changes. Look for redness, swelling, or discharge to catch problems early.
Use a barrier like a cone or recovery suit to prevent your dog from licking the incision. This helps avoid infections.
Take clear photos of the incision each day. Comparing photos helps you notice any changes in healing.
Know the signs of infection: spreading redness, heat, pus, or a bad smell. Call your vet if you see these symptoms.
Follow your vet’s instructions carefully. Proper care and monitoring can lead to a smoother recovery for your dog.
Incision healing: what’s normal in the first two weeks
Early changes: mild redness, swelling, bruising, scab
During the first two weeks after surgery, you will notice changes at the incision site. Most dogs recover within 10 to 14 days. You should limit your dog’s activity during this time to help the incision site heal. Keep your dog from running, jumping, or playing rough. Always use a barrier, like a cone or recovery suit, if your dog tries to lick or rub the incision site.
It is normal to see some mild redness, swelling, or bruising at the incision site, especially in the first 24 to 48 hours. The skin may look pink or red, and you might see a small scab form. These changes show that the body is healing. Use the table below to help you know what is normal and what needs attention:
What you notice at the incision site | Why it can matter | What to do next |
|---|---|---|
Mild redness, swelling, or bruising | Normal healing | Keep monitoring daily |
Small scab or firm lump under skin | Healing tissue or suture reaction | Take a photo and check for changes |
Spreading redness, heat, or pus | Possible infection | Call your vet |
Tip: Take a clear photo of the incision site each day. This helps you spot changes early.
Normal vs Concerning Signs
Normal: Mild redness, slight swelling, small scab, or a firm lump under the incision site.
Concerning: Redness that spreads, heat, pus, strong odor, or the incision site opening up.
Skin glue, staples, and suture reactions
You may see skin glue, staples, or sutures at the incision site. Dogs often have mild reactions to these closure methods. Mild inflammation can happen in the first few days and usually lasts one to four days. Sometimes, a small lump forms under the incision site. This is common and often goes away as healing continues.
If you notice the incision site looks worse or your dog seems uncomfortable, keep a close watch. Do not use harsh cleaners or ointments unless your vet tells you to. Prevent licking, as this can slow healing or cause infection.
Safety Note: Always follow your vet’s instructions for caring for the incision site. If you see new or worsening symptoms, contact your vet.
Printable Quick Reference Card:
Keep a copy of the quick reference card handy. It lists normal healing signs, infection warning signs, and when to call your vet.
Dog incision infection signs to watch for
Signs of infection: redness, heat, swelling, discharge, odor
Check your dog’s incision every day for changes. Dog incision infection signs can show up fast. Daily checks help you find problems early. Watch for these infection signs at the incision:
Redness that spreads away from the incision
Skin that feels hot when you touch it
New swelling or swelling that gets worse
Discharge that looks like pus or will not stop
A bad or strange smell coming from the wound
If you see any of these, take a clear photo. Compare it to photos from other days. Mild redness and swelling are sometimes normal. If these get worse or spread, call your vet. Do not use strong cleaners or ointments unless your vet says so. Licking can cause infection, so use a barrier if your dog tries to reach the area.
Safety Tip: If you see pus, a strong smell, or redness that spreads, call your vet right away. These are common dog incision infection signs and need quick help.
Wound opening, missing staples, bleeding
Sometimes, the incision can open or lose staples or sutures. You might see tissue sticking out or bleeding that will not stop. These dog incision infection signs mean the wound is not healing right.
The incision edges pull apart or open up
Staples or sutures fall out before your vet removes them
Bleeding that does not stop after a few minutes
Tissue poking out from the incision
If you see these signs, keep your dog calm. Stop your dog from licking or rubbing the area. Take a photo and call your vet as soon as you can. Do not try to close the wound or use products unless your vet tells you.
Alert: Wound opening or missing staples can cause infection or slow healing. Call your vet right away if you see these problems.
Systemic signs: fever, lethargy, not eating
Dog incision infection signs can affect your dog’s whole body. Systemic signs mean the infection may be spreading. Watch for these symptoms:
Tiredness that lasts more than two days
Not eating more than one or two meals
Shaking, hiding, or drooling from pain
Vomiting or diarrhea that lasts over 24 hours
Fever (rectal temperature at or above 103.0°F)
High fever (rectal temperature at or above 105.0°F—go to emergency)
Check your dog’s temperature if you see these symptoms. Use a digital rectal thermometer for the best reading. If your dog’s temperature is 103.0°F or higher, call your vet that day. If it is 105.0°F or higher, go to the emergency clinic right away.
Fever Classification | Temperature (°F) | What to Do |
|---|---|---|
Normal | 99.5–102.5 | Keep monitoring daily |
Fever | ≥103.0 | Call your vet today |
High Fever | ≥105.0 | Go to emergency clinic now |
Note: Tiredness and not eating can mean a serious infection, especially with fever or wound discharge. Sudden changes in energy or eating mean you should call your vet.
Action Table: What to do next
Use this table to help you decide what to do after your daily checks:
Color | What You See | Action |
|---|---|---|
🟢 Green | Mild redness, slight swelling, small scab, no discharge, normal temperature | Keep monitoring daily, take photos |
🟡 Yellow | Redness spreading, heat, new swelling, mild discharge, mild pain, temperature 103.0–105.0°F, refusal to eat one meal | Call your vet today, send photos if possible |
🔴 Red | Pus, foul odor, wound opening, missing staples, active bleeding, tissue protruding, high fever (≥105.0°F), severe lethargy, not eating multiple meals | Go to emergency clinic or call your vet immediately |
Dog incision infection signs can change fast. You need to act quickly if you see red-level symptoms. Always keep your vet’s number nearby. Take photos and notes about changes. Acting early helps stop serious problems and keeps your dog safe.
Daily check routine for dog incisions
You help your dog get better after surgery. For the first 10 to 14 days, look at your dog’s incision every day. Many vets say to check twice a day, in the morning and at night. This helps you notice changes early and keeps your dog safe.
Photo check and tracking changes
Take a clear photo of the incision each day. Try to use the same angle and light every time. Hold your phone steady. Put something like a coin or your finger in the picture for size. These daily photos help you and your vet see if the incision is healing or if there are problems.
Evidence Type | Description |
|---|---|
Study Focus | Evaluating the effectiveness of laser therapy on incision healing in dogs using photo documentation |
Methodology | Utilized a clinical scar scale correlated with histopathology, assessed through digital photography |
Findings | Photo documentation effectively tracked healing changes without tissue sample collection, indicating reliable visual assessments of the healing process |
Write down what you see each day. Look for swelling, redness, discharge, or changes in how your dog acts. If you see something new, compare it to yesterday’s photo.
Tip: Taking photos and notes every day helps your vet if you have questions.
Touch test and pain response
Wash your hands or put on clean gloves before you touch the incision. Gently feel around the area. The skin should feel cool or just a little warm. Watch for pain, like if your dog flinches or pulls away. If your dog seems very sore or the area feels hot, write it down and call your vet.
Smell the area gently. A normal incision should not smell bad. If you notice a strong or strange smell, write it down and tell your vet.
Printable checklist for owners
Use this checklist every day:
Look at your dog’s incision for swelling, redness, or odd discharge.
Wash your hands or wear clean gloves before touching it.
Check for warmth, bad smell, or more redness.
Take a clear photo from the same angle each day.
Write down any changes or worries.
Scenario Example:
What I saw: “Mild redness and a small scab on my pet’s incision.”
How I classified it: “Normal healing, no discharge or odor.”
What I did next: “Took a photo, wrote a note, and kept monitoring.”
Safety Note: Stop your dog from licking the incision. Do not use strong cleaners or ointments unless your vet says it is okay.
What to do if you see signs of infection
Safe steps at home
If you notice possible dog incision infection signs, you can take safe steps at home while you contact your veterinarian. First, keep the wound clean and dry. Use only vet-approved antiseptics or saline solutions if your vet has told you to. Do not use human creams or ointments unless your vet says it is safe. Prevent your dog from licking or chewing the incision by using an Elizabethan collar, recovery suit, or another barrier. This step lowers the risk of more irritation or infection.
Check the wound twice a day for changes in color, swelling, or discharge. Write down what you see and take a photo each time. This record helps your vet understand how the incision changes over time. Give your dog any prescribed pain medication as directed. Watch for signs of discomfort, such as limping, whining, or not wanting to move. Always follow your post-op instructions for wound care and activity restriction.
Safety Note: Never let your dog lick or chew the incision. Licking can cause infection and slow healing.
Mistakes to avoid
Some common mistakes can make an infection worse or delay healing. You should avoid these actions:
Letting your dog lick, chew, or scratch the incision area.
Using harsh cleaners, hydrogen peroxide, or ointments not approved by your vet.
Allowing the incision to get wet from bathing or swimming.
Not keeping the wound clean and dry.
Ignoring changes in the wound or your dog’s behavior.
If you see swelling, pain, pus, or fever, do not wait to call your vet. Do not try to treat the infection yourself. Your vet knows the best way to help your dog heal.
Tip: Keep a daily log of your dog’s incision and behavior. This helps you spot problems early.
When to call your vet or go to emergency
You need to know when to call your vet and when to seek emergency care. Some symptoms mean you should call your vet the same day. Others mean you should go to the emergency clinic right away.
Here is a decision table to help you act quickly:
Color | What You See | Action |
|---|---|---|
🟢 Green | Mild redness, slight swelling, small scab, no discharge, normal temperature (99.5–102.5°F) | Keep monitoring daily, take photos, follow vet’s instructions |
🟡 Yellow | Redness spreading, heat, new swelling, mild discharge, mild pain, temperature 103.0–105.0°F, not eating one meal | Call your vet today, send photos if possible |
🔴 Red | Pus, foul odor, wound opening, missing staples, active bleeding, tissue protruding, high fever (≥105.0°F), severe lethargy, not eating multiple meals | Go to emergency clinic or call your vet immediately |
Urgent symptoms that need a vet visit or emergency care:
Fever at or above 103.0°F
High fever at or above 105.0°F (go to emergency now)
Loss of appetite for more than one meal
Unusual tiredness or weakness
Foul-smelling discharge or pus
Excessive pain when you touch the area
Skin that looks dark or has rapidly spreading redness
Multiple draining wounds
Difficulty breathing
Swelling that feels hot or tender
Lump that gets bigger
Limping if the incision is near a limb
If you see any of these symptoms, call your vet right away or go to the emergency clinic. Take your daily notes and photos with you. This information helps your vet decide the best treatment.
Safety Reminder: If you are unsure, always call your vet. Early action can prevent serious problems.
For more help, see our related posts on licking prevention, cone alternatives, recovery suit vs e-collar, and post-op swelling. These guides can help you protect your dog’s incision and support a smooth recovery.
Preventing infection: barriers and protection
Choosing the right barrier (cone, suit, sleeve)
You need to stop your dog from licking or chewing the incision. Licking can cause infection and slow healing. The most common barriers include Elizabethan collars (cones), recovery suits, and sleeves. You can also use wound protectors for some surgical sites. Each option has strengths and weaknesses.
Barrier Type | Prevents Licking | Comfort | Mobility | Stress Reduction |
|---|---|---|---|---|
Recovery Suit | High | High | High | High |
Sleeve | High | High | High | High |
Cone (E-collar) | Moderate | Low | Low | Low |
A cone keeps your dog from reaching the incision with their mouth. Recovery suits and sleeves cover the wound and often feel more comfortable. Some dogs find cones stressful and have trouble eating or drinking. You should choose the barrier that best fits your dog’s needs and the location of the incision.
Safety Note: Never skip a barrier if your dog tries to lick. Licking can introduce bacteria and cause infection.
Comfort and fit checks
Check the fit of the barrier every day. The barrier should cover the incision fully but not rub or pinch the skin. Your dog should move, eat, and drink with the barrier in place. If you use a suit or sleeve, make sure it stays clean and dry. Wash it as needed. For cones, check for signs of rubbing on the neck or face.
Try the “reach test”: Watch your dog for a few minutes. Make sure they cannot reach the incision with their mouth or paws. If they can, adjust or switch the barrier.
Tip: A good fit keeps your dog safe and comfortable during healing.
Barrier options by incision location
Match the barrier to the incision site for the best protection:
Abdomen or chest: Use a recovery suit or cone.
Leg or paw: Use a sleeve or cone.
Tail or perineal area: Use a cone, as suits may not cover these spots.
If your dog has trouble with one barrier, try another type. Always keep the incision dry and clean. Do not use harsh cleaners or ointments unless your vet tells you.
Incision Location | Best Barrier Option | Licking Risk Without Barrier |
|---|---|---|
Abdomen/Chest | Suit or Cone | High |
Leg/Paw | Sleeve or Cone | High |
Tail/Perineal | Cone | High |
Note: Check barriers at least once a day for the full 10–14 day healing window. Replace or adjust as needed to keep your dog safe.
Special cases: confusing signs vs infection
Sometimes, you may see changes near your dog’s incision that look worrying but are not true infections. Knowing what is normal and what needs a vet’s help can keep your dog safe.
Seromas vs infection
A seroma is a pocket of clear fluid that can form under the skin after surgery. You might notice a soft, squishy swelling near the incision. This can look scary, but it often does not hurt your dog. Here’s how you can tell a seroma from an infection:
The swelling feels soft and fluid-filled.
Your dog does not seem painful when you touch it.
The area develops slowly, often a few days after surgery.
The skin does not feel hot.
There is no discharge, pus, or foul smell.
The fluid looks clear, not red or cloudy.
You should keep watching the seroma. Call your vet if:
The swelling gets bigger or does not go away.
The area starts to smell bad.
The fluid changes color or becomes bloody.
The incision opens or stitches come loose.
Your dog acts sick, stops eating, or seems very tired.
Safety Note: Never try to drain a seroma at home. Always ask your vet for advice.
Skin glue, sutures, staples: what’s normal
Incisions heal in stages. You may see mild redness, swelling, or a small scab. These are normal healing signs. Here’s what usually happens:
Inflammation: The area may look red or a little swollen. This stage lasts a few days.
Proliferation: New tissue forms. The incision may look pink and have a shiny line if skin glue was used.
Remodeling: The wound gets stronger. A small, firm lump under the skin can be normal.
Keep the incision clean and dry. Limit your dog’s activity for 10–14 days. Do not use harsh cleaners or ointments unless your vet says it is safe.
Strategy | Description |
|---|---|
Regular Vet Checkups | Help you catch problems early. |
Watch for Behavior | Notice changes in appetite, energy, or movement. |
Recognize Symptoms | Look for limping, swelling, or unusual smells. |
Tip: If you are unsure, take a photo and call your vet. Early action helps prevent serious problems.
You are important for your dog’s healing. Checking your dog every day helps you find problems early. This keeps your dog’s healing going well.
Look at your dog’s incision in the morning and at night. This helps you see redness, swelling, or discharge before they get worse.
Use a checklist and quick reference card. These tools help you remember what to do and lower the chance of infection.
If you notice warning signs like a fever over 103.0°F, redness that spreads, or a strange smell, call your vet right away. Acting fast can stop big problems and help your dog get better.
FAQ
How often should you check your dog’s incision after surgery?
You should check your dog’s incision at least once a day for 10–14 days. Many vets recommend checking twice daily. Use photos and notes to track changes. This helps you spot problems early and keeps your dog safe.
What should you do if your dog licks the incision?
Stop your dog from licking right away. Use a cone, recovery suit, or sleeve as a barrier. Licking can cause infection. If you see redness, swelling, or discharge, call your vet. Never use ointments unless your vet says it is safe.
Is mild swelling or redness normal after surgery?
Mild swelling or redness at the incision edge is common in the first few days. Watch for spreading redness, heat, or pus. If these signs appear, contact your vet. Take daily photos to help you notice changes.
When should you call your vet about the incision?
Call your vet if you see pus, a foul smell, wound opening, missing staples, or a fever of 103.0°F or higher. Go to the emergency clinic if your dog has a fever of 105.0°F or acts very sick.
Can you clean the incision at home?
Clean the incision only if your vet tells you to. Use saline or a vet-approved cleaner. Do not use hydrogen peroxide, alcohol, or human ointments. Keeping the area dry and protected helps healing.
