
When comparing dog lick sleeve vs cone, the main decision is whether your dog needs targeted limb protection or broader licking prevention across harder-to-cover areas. This article is for owners, clinics, and rehab-minded buyers who need to compare which option is more practical based on wound location, behavior, comfort, and daily recovery routine. Read it to decide when a lick sleeve is usually the better fit, when a cone is the safer choice, and when to review condition-based recovery pathways before choosing a product direction.
Key Takeaways
Choose a lick sleeve when the wound is on the leg and targeted coverage is enough.
Choose a cone when the wound is outside the limbs or the dog can still reach the area despite sleeve use.
Behavior, wound location, and compliance matter more than appearance alone.
Fit and daily monitoring determine whether either option is working safely.
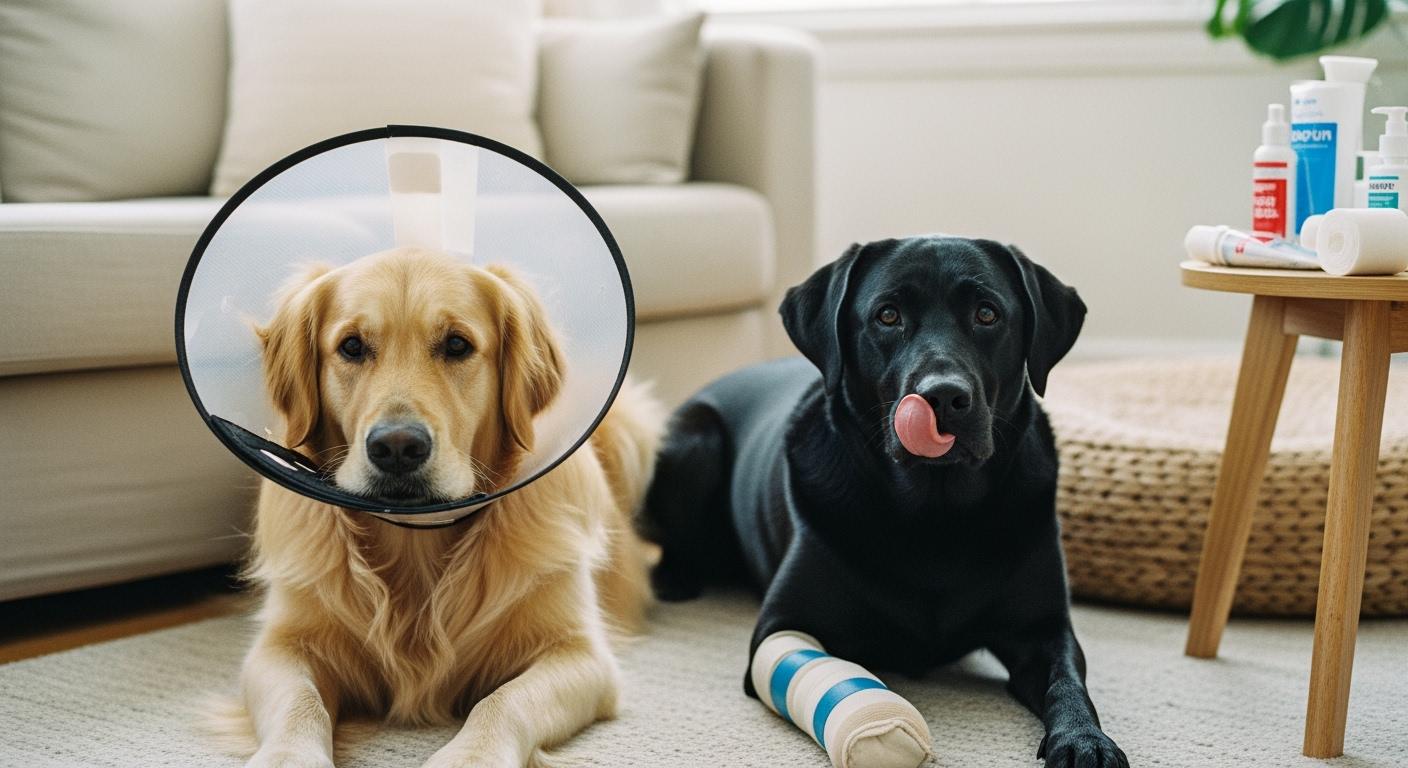
Dog Lick Sleeve vs Cone: Key Differences
The practical difference is simple: a lick sleeve covers a specific limb area and tries to preserve normal mobility, while a cone blocks oral access more broadly when targeted coverage is not enough. The better choice depends on what must be protected and how determined the dog is to reach it.
What Is a Lick Sleeve?
A dog lick sleeve is a soft, form-fitting recovery covering designed to protect a specific area on the leg while allowing more natural daily movement than a cone. It is typically used for limb wounds, hot spots, surgical sites, or irritated skin when targeted coverage is enough and the dog can still function well with a wearable sleeve. If you want broader educational background before comparing product options, review the foundational material in our GaitGuard Guides.
What Is a Cone?
A cone, also called an Elizabethan collar or e-collar, is a broad recovery barrier that prevents the dog from reaching wounds, dressings, or irritated areas with the mouth. It is generally the safer choice when the wound is outside the limbs, when the dog is highly persistent about licking, or when targeted coverage does not provide enough protection.
Main Uses and Benefits
Use the table below as a decision shortcut. The goal is not to find a universal winner, but to match the protection method to wound location, licking persistence, and recovery routine.
Decision point | Lick sleeve | Cone |
|---|---|---|
Main role | Targeted limb coverage | Broad licking prevention |
Best fit | Leg wounds, localized irritation, sleeve-tolerant dogs | Hard-to-cover wounds, persistent licking, broader protection needs |
Mobility impact | Usually lower | Usually higher |
Behavioral tradeoff | Often easier to tolerate | Often more effective when licking is persistent |
Main limitation | Only protects the covered area | Can affect comfort, eating, sleeping, and navigation |
A lick sleeve is usually the better fit when the wound is on the leg, the dog tolerates wearable coverage well, and preserving routine mobility matters during recovery.
A cone is usually the better fit when broader protection matters more than comfort tradeoffs, especially for wounds on the torso, tail, neck, or other areas that a sleeve cannot cover reliably.
Decision rule: choose a sleeve when targeted leg coverage is enough; choose a cone when the dog can still reach the wound or when the wound lies outside the sleeve’s coverage zone.
Both options help protect your dog during recovery. A dog lick sleeve offers targeted coverage and comfort for limb injuries. A cone provides broad protection for wounds in hard-to-cover spots or for dogs who persistently lick. Always consider your dog’s needs and ask your vet for advice.
When to Choose a Lick Sleeve

Best Use Cases
A lick sleeve is usually the better fit for limb wounds, leg hot spots, post-procedure protection on the limb, and cases where the dog needs targeted coverage without the broader disruption of a cone. It is most useful when the dog is not able to bypass the sleeve and reach the wound anyway.
Comfort and Mobility
Sleeves are often chosen because they preserve more normal movement during recovery. That makes them more practical in cases where the dog still needs to walk comfortably, rest normally, and complete daily activities with minimal disruption.
Usually lower impact on walking and resting
More targeted protection for the covered limb area
Often easier tolerance for dogs that dislike cones
Better fit for recovery routines where movement continuity matters
Compared with cones, sleeves are often easier to tolerate. That does not make them automatically better; it only means they are more suitable when targeted coverage is enough.
Wound Coverage
You want good cover for leg wounds. The sleeve’s shape keeps your dog’s leg safe and clean. The table below shows how a lick sleeve helps your dog heal:
Feature | Description |
|---|---|
Coverage zone | Designed mainly for leg-area protection |
Barrier function | Helps reduce licking, biting, and environmental contact on the covered limb |
Mobility tradeoff | Usually allows more natural movement than a cone |
Main limitation | Does not protect wounds outside the covered area |
You usually choose a sleeve when the recovery goal is targeted limb protection with lower disruption to daily movement. If you are comparing broader recovery use cases, review our Solutions overview first.
When to Choose a Cone
Best Use Cases
You may need a cone when your dog has wounds in places that are hard to cover, such as the torso, tail, or near the head. Cones, also called Elizabethan collars or e-collars, work well for dogs who keep licking or biting at their wounds. They help protect surgical sites, stitches, and irritated skin. You can see the most common scenarios for using a cone in the table below:
Scenario | Description |
|---|---|
Post-operative torso wounds | Broad protection when the surgical area cannot be covered by a sleeve |
Tail or hindquarter wounds outside sleeve range | Helps stop oral access where targeted limb coverage is not enough |
Persistent licking behavior | Useful when the dog keeps trying to reach the wound despite local coverage |
Bandage or device protection | Helps preserve dressings and recovery equipment when oral interference is a risk |
You should choose a cone if your dog has a wound that a sleeve cannot cover or if your dog keeps trying to reach the area. A cone helps reduce direct licking or chewing that could disturb the wound, dressing, or surgical site.
Full Licking Prevention
Cones provide broad protection by limiting access to many areas of the body. This can be important for wounds in hard-to-cover locations or when a dog is very determined to lick or bite. A cone acts as a physical barrier that helps reduce interference with the wound, stitches, dressings, or other recovery equipment.
Protection rule: when wound location or licking persistence exceeds what a sleeve can control, a cone is usually the safer choice.
Behavioral Considerations
Some dogs may feel anxious or uncomfortable when wearing a cone. You might notice your dog struggling to eat or drink from their bowl. Dogs often need time to adjust their sleeping positions to find comfort. You can help your dog by making the cone fit well and by creating a positive experience. Give treats and praise when your dog wears the cone. This helps reduce stress and makes recovery easier.
Dogs may feel anxious or stressed with a cone.
A good fit can help your dog feel better.
Dogs can still eat, drink, and sleep, but they may need time to adjust.
You should watch your dog closely and talk to your vet if you have concerns about comfort or behavior. Choosing between a dog lick sleeve vs cone depends on your dog’s wound, behavior, and comfort needs.
How to Decide: Wound, Behavior, and Comfort
The better choice usually becomes clear when you compare four factors together: wound location, licking persistence, fit tolerance, and daily recovery routine. This section should help you decide which factor matters most in the current case.
Wound Location
Wound location is usually the first decision filter. Start by asking whether the wound is on a limb and can be protected locally, or whether it sits in an area that requires broader access prevention.
Limb wounds usually fit sleeve-based protection better.
Torso, tail, neck, or hard-to-cover wounds usually fit cone-based protection better.
If the dog can still reach the wound despite local coverage, broader protection is usually needed.
If the wound is on the leg and the dog tolerates wearable protection, a sleeve often makes more sense. If the wound is outside the sleeve’s range or the dog is very persistent, a cone is often the safer option. When you reach the stage of comparing actual recovery products, review Products by coverage pattern and daily-use practicality.
Dog Temperament
Temperament affects compliance. Dogs that become highly stressed in cones may tolerate sleeves better, while persistent chewers or determined lickers may still require cone-based protection even if it is less comfortable.
Fit and Sizing
Proper fit and sizing matter for both sleeves and cones. You want the device to stay in place and keep your dog comfortable. A sleeve should fit snugly but not too tight. A cone should allow your dog to eat and drink without trouble. Regular checks and adjustments help prevent skin irritation and keep the device working well. Always follow your vet’s advice for sizing and fitting.
Owner Convenience
Use this checklist before choosing between sleeve and cone:
Is the wound on a limb or outside limb coverage?
Can the dog still reach the wound despite local protection?
Does the dog tolerate wearable coverage better than a cone?
Can the device stay aligned during the daily routine?
Is the recovery goal targeted protection or broader access prevention?
Selection rule: match the device to the wound and the dog’s behavior first, then refine by comfort and handling practicality.
You can use this section to compare dog lick sleeve vs cone and make a confident choice. Always focus on your dog’s safety, comfort, and healing.
Tips for Safe and Effective Use
Record for 5 days during recovery: wound location, number of licking attempts, time the device stayed aligned, skin response after use, eating and resting tolerance, and whether the current protection level still feels sufficient.
Proper Fit
Fit quality determines whether either protection method will remain usable. A sleeve should stay in place without twisting or exposing the wound, and a cone should block access without creating unnecessary feeding or rest problems. Early fit review is part of safe recovery, not an optional step.
Fit check rule: if the sleeve slips or the cone fails to block access, treat that as a protection failure and reassess immediately.
Monitoring and Adjustments
Monitoring should focus on repeatable signals: whether the wound stays protected, whether the device remains aligned, whether the dog tolerates eating and resting, and whether skin irritation is developing. If those signals worsen, the current setup should be reassessed rather than simply tightened or left unchanged.
Avoiding Common Mistakes
Many owners make simple mistakes that can slow healing. Avoid these common issues:
Do not skip measuring your dog before choosing a size.
Do not leave the device on too loose or too tight.
Do not ignore signs of discomfort or skin problems.
Do not forget to follow your vet’s instructions for wound care and device use.
Note: Always follow your veterinarian’s advice. Check for changes such as swelling, redness, discharge, increasing discomfort, or unusual behavior. Prompt review helps the veterinary team determine whether the wound-care or protection plan needs to change.
More on Dog Recovery Protection
Internal Links to Related Content
After you decide between sleeve and cone, keep the next step simple. Use Guides for educational background, Solutions for condition-based recovery direction, and Products when you are ready to compare actual protection options.
Workflow tip: choose the protection category first, then compare products within that category.
When to Ask Your Vet
You want your dog to heal quickly and safely. Your veterinarian is your best resource for advice on wound care and recovery protection. You should reach out to your vet if:
You feel unsure about which device to use.
Your dog shows signs of discomfort, swelling, or irritation.
The wound does not heal as expected.
Your dog keeps trying to remove the device.
Your vet can recommend the right protection based on your dog’s wound, behavior, and daily routine. Always follow your vet’s instructions for wound care and device use. This helps your dog recover with less stress and fewer complications.
Note: Every dog is different. Personalized advice from your veterinarian ensures your dog gets the best care possible.
The key difference between a lick sleeve and a cone is protection scope. A lick sleeve is usually the better fit for targeted limb wounds when mobility and comfort need to stay as normal as possible. A cone is usually the better fit when the wound sits outside limb coverage or when the dog’s licking behavior makes broader prevention necessary.
Choose sleeve-based protection for localized limb coverage and lower daily disruption.
Choose cone-based protection for broader access prevention and harder-to-cover wounds.
For follow-up after this comparison, continue only to the most relevant internal paths: use Guides for educational background, Solutions for condition-based direction, and Products when the case is ready for device evaluation.</p>
Data authenticity note: This article is for educational purposes only. It is designed to help readers compare when targeted sleeve protection is more appropriate than a cone, and when cone-based prevention is the safer choice. It does not replace veterinary diagnosis, wound evaluation, individualized fitting, or a full recovery plan.
FAQ
Can I use a dog lick sleeve instead of a cone?
Sometimes, yes. A lick sleeve is usually enough for leg wounds when the dog cannot bypass the sleeve and reach the area anyway. If the dog still reaches the wound or the wound is outside limb coverage, a cone is usually safer.
Which is more comfortable for my dog: a sleeve or a cone?
Sleeves are often easier to tolerate, but comfort alone should not decide the case. The better option is the one that still protects the wound reliably.
Will a lick sleeve stop all licking?
No. A lick sleeve only protects the covered area. If the dog can still reach the wound or is targeting another body area, broader protection is needed.
How do I know which option is best for my dog?
Start with wound location, then check whether the dog can still reach the wound despite local protection. After that, compare tolerance, fit, and daily-use practicality.
Can my dog wear both a sleeve and a cone?
Sometimes, yes. A sleeve and cone can be used together when localized wound coverage is still needed but the dog also requires broader licking prevention. That decision should still be guided by veterinary advice and actual wound behavior.
