
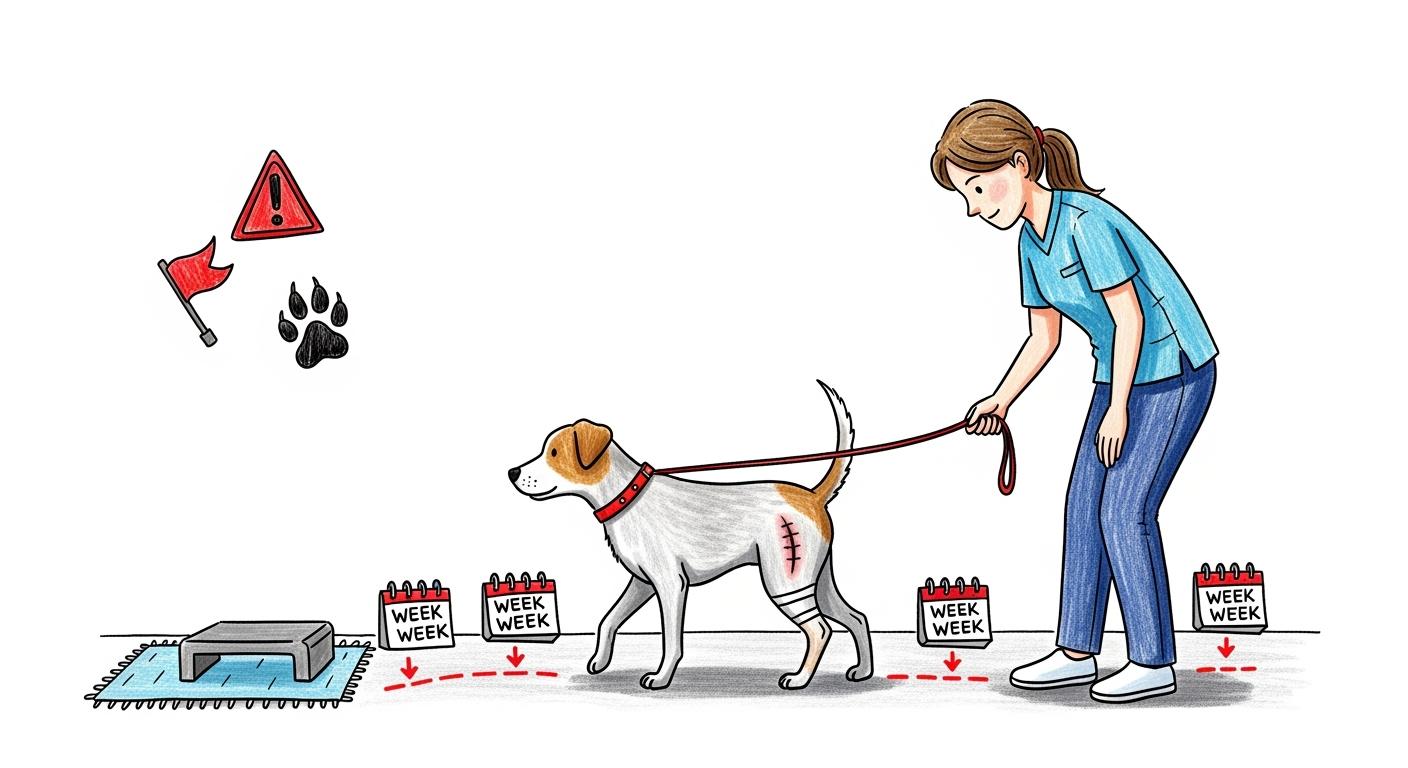
TPLO recovery week by week can feel confusing because progress does not always move in a straight line. A dog may seem better after a short leash walk, then look sore, tired, or more cautious later in the day. Bathroom breaks, leash-walk limits, simple exercises, swelling, limping, and red flags should all be checked against the veterinarian’s recovery plan.
This guide explains what owners commonly watch during each stage of TPLO recovery, how leash walks and home exercises usually fit into the process, and which warning signs mean the dog should be checked by a veterinarian before activity increases.
Key Takeaways
Follow the recovery plan each week to help your dog heal after TPLO surgery. Every week has special activities to help your dog get better.
Keep a daily record of your dog’s walks and exercises. This helps you see how your dog is doing. It also gives your vet important information.
Look for red flags like more swelling, a lot of pain, or if your dog will not use the leg. Call your vet if you see any worrying changes.
Use safe changes at home, like non-slip mats and baby gates, to make your home safe for your dog while they recover.
Be patient and follow the activity rules your vet gives you. This helps your dog heal the right way and lowers the chance of problems.
Quick Reference Card
Recovery milestones and week-by-week overview
You want to know what to do for your dog’s TPLO recovery. The week-by-week plan helps you keep track of each step. Look at the table below to see what happens each week:
Week | Milestone Description | Example Activities |
|---|---|---|
1–2 | Strict rest | Leash-only potty, crate rest |
3–10 | Guided exercises | Controlled leash walks, curb walking, figure 8s, weave cones, weight shifting |
11–16 | Return to normal activity | Gradual increase, regular walks |
Tip: At week 6, your vet might want to take x-rays. This helps check if the bone is healing. The results help plan the next steps.
How to use this guide
Follow the steps in the week-by-week plan. Write down how long you walk your dog each day. Keep track of gentle exercises too. Notice any changes in how your dog moves or feels. Go to the vet for regular checkups to see how healing is going. Look for signs like easier movement or less limping. Always do what your vet says about exercise and rest.
Unified assumptions for this guide:
Your dog is getting better after TPLO surgery.
You live in the United States and use normal aftercare.
Your surgeon’s plan is the most important thing.
Core healing anchors:
Keep your dog very calm for the first 8 weeks.
Get x-rays around week 8 to check bone healing.
Slowly let your dog do more over the next 4 weeks.
Most dogs are fully better in 3 to 6 months.
Simple math example:
If your vet says to walk your dog for 10 minutes, 3 times a day, you will walk 30 minutes each day. In one week, that adds up to 210 minutes. This helps you see how much your dog is walking and keeps you on track.
Note: Use a notebook or your phone to write down daily walks and exercises. Show this record to your vet at every visit.
TPLO recovery week by week timeline
You want a simple plan for tplo recovery week by week. This timeline shows you what to do and what not to do. It also tells you when to look for problems. Each part builds on the last one. It helps you know how to help your dog heal and stay safe.
Days 0–3: Rest and ice protocol
Phase | What to Do | Allowed vs Not Allowed | Red Flags to Watch |
|---|---|---|---|
Days 0–3 | – Keep your dog in a crate or small pen. | Allowed: Leash-only potty breaks (under 5 minutes). | – Bleeding from incision |
Tip: Ice can help with swelling and pain. Always put a towel around the ice pack.
Days 4–7: Confinement and incision care
Phase | What to Do | Allowed vs Not Allowed | Red Flags to Watch |
|---|---|---|---|
Days 4–7 | – Keep using the crate or pen. | Allowed: Leash-only potty breaks, gentle support. | – Redness spreading from incision |
Note: Some swelling or bruising is normal for a few days. It should get better over time.
Weeks 1–2: Leash-only potty and PROM
Phase | What to Do | Allowed vs Not Allowed | Red Flags to Watch |
|---|---|---|---|
Weeks 1–2 | – Keep your dog in the crate or pen most of the time. | Allowed: Leash-only potty, PROM (if cleared), gentle support. | – Incision not healing |
PROM means you gently move your dog’s leg like your vet showed you. This keeps the joint moving well.
Weeks 3–4: Controlled leash walks and gentle exercises
Phase | What to Do | Allowed vs Not Allowed | Red Flags to Watch |
|---|---|---|---|
Weeks 3–4 | – Start leash walks for 5–10 minutes, 2–3 times a day. | Allowed: Controlled leash walks, figure 8s, PROM. | – Limping that gets worse |
Try figure 8s both ways. This helps your dog get stronger and better balance.
Weeks 5–8: Gradual walk increase and activity restriction
Phase | What to Do | Allowed vs Not Allowed | Red Flags to Watch |
|---|---|---|---|
Weeks 5–8 | – Make leash walks a little longer each week. | Allowed: Gradual leash walks, gentle exercises. | – Soreness after walks |
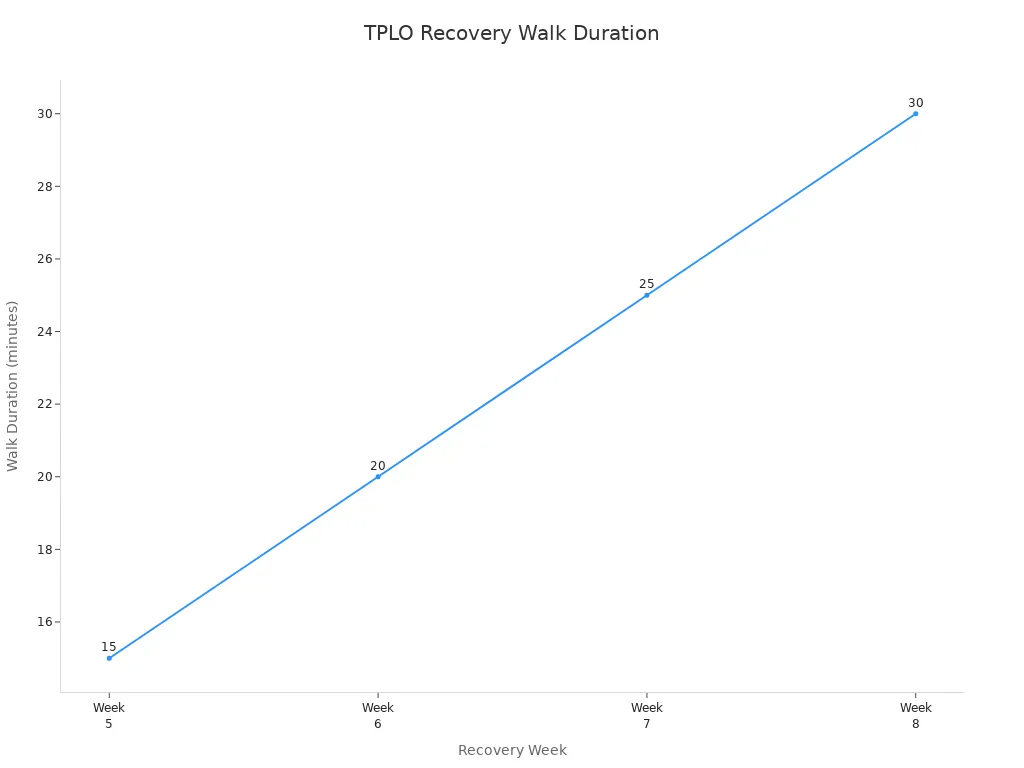
Week | Duration of Walks | Frequency |
|---|---|---|
5 | 15 minutes | 2–3 times a day |
6 | 20 minutes | 2–3 times a day |
7 | 25 minutes | 2–3 times a day |
8 | 30 minutes | 2–3 times a day |
If your dog seems sore or tired, make walks shorter. Many short walks are better than one long walk.
Weeks 9–12: Return to normal activity (if cleared)
Phase | What to Do | Allowed vs Not Allowed | Red Flags to Watch |
|---|---|---|---|
Weeks 9–12 | – After your vet says it is okay, slowly go back to normal walks. | Allowed: Gradual return to normal walks, stairs (if cleared), supervised play. | – Redness or swelling at incision |
Your vet will check for swelling, pain, or limping before letting your dog do more.
Weeks 13–16: Conditioning and monitoring
Phase | What to Do | Allowed vs Not Allowed | Red Flags to Watch |
|---|---|---|---|
Weeks 13–16 | – Add harder exercises like sit & stand, hind leg stands, and cookie stretches. | Allowed: Advanced exercises, swimming (if cleared), off-leash (if cleared). | – Dog does not want to put weight on the leg |
This part helps your dog get strong and confident again. Always ask your vet before starting new things.
You can use this tplo recovery week by week plan to help your dog heal. Each step helps your dog get better and keeps problems away. The first eight weeks are very important for bone healing. Be patient and do the same things every day. Always ask your vet if you have questions about rehab.
Allowed vs Not Allowed by phase
Safe activities each week
You want to help your dog recover safely after TPLO surgery. Each week brings new steps. The table below shows what you can do during each phase. Follow your vet’s advice for every activity.
Activities Allowed | |
|---|---|
Weeks 1 and 2 | Controlled leash walks (3–5 times/day for 5 minutes), Passive Range of Motion (PROM) exercises, ice and heat therapy. No off-leash activity. |
Weeks 3 and 4 | Increase leash walks (up to 10 minutes), continue PROM twice a week, gentle figure 8 walking, easy inclines. |
Weeks 5 through 8 | Longer leash walks (up to 20 minutes), continue previous exercises. No off-leash activity. |
Weeks 8 through 12 | Gradually introduce off-leash activity, starting with 5 minutes in week 9, up to 20 minutes by week 12. |
Tip: Write down your dog’s walks and exercises. This helps you track progress and share updates with your vet.
What to avoid until cleared
You must protect your dog’s healing knee. Some activities can slow recovery or cause injury. Wait for your vet’s approval before trying anything new.
Do not let your dog run, jump, or play ball.
Avoid rough play with other dogs for at least 6 weeks.
Do not allow unsupervised off-leash time.
Keep your dog away from stairs unless your vet says it is safe.
Hold off on strenuous exercise until your vet clears it, usually after 12–16 weeks.
Wait at least 6 months before trying sports or high-impact activities.
Note: Most dogs can walk on the leg within 24 hours after surgery. You should see moderate weight bearing in 2 weeks. Full rehabilitation takes time, so stay patient and follow each step.
Red Flags vs Normal Recovery
You want to know what is normal and what is not during your dog’s TPLO recovery. Use this guide to help you spot healthy signs, mild concerns, and serious warning signs. Always call your vet if you feel unsure.
Green: Healthy signs
You may see these signs as your dog heals. These are expected during recovery:
Mild limping, especially in the first four weeks
Favoring the operated leg after rest or long walks
Small amount of swelling near the knee that gets better each day
Clear fluid at the incision for a few days
Appetite and energy stay close to normal
Your dog should show slow improvement each week. You may notice your dog uses the leg more and moves with less stiffness.
Yellow: Mild concerns
Some changes need you to watch closely and call your vet if they do not improve. Use this table to check common mild concerns:
Concern Type | Description |
|---|---|
Signs of Pain | Your dog shows pain when walking, standing, or climbing stairs. |
Swelling | Swelling does not go down or gets worse after the first week. |
Infection | The incision looks red, warm, or has a mild odor. |
Mechanical Issue | Your dog seems unstable or has trouble bearing weight. |
If you see these signs, write them down and call your vet for advice.
Red: Serious warning signs
You must act fast if you see these signs. These can mean a serious problem:
Sudden or severe lameness after your dog was improving
Worsening pain or swelling, especially if the area feels hot or firm
Redness, pus, or foul odor from the incision
Difficulty walking, sudden weakness, or collapse
Clicking sounds from the knee or sudden refusal to use the leg
Call your vet right away if you notice any of these warning signs.
Tip: Keep a daily log of your dog’s activity, appetite, and any changes. This helps your vet decide what to do next.
Red Flags vs Normal Recovery Table
Issue | Green: Monitor | Yellow: Call Your Vet | Red: Urgent Evaluation |
|---|---|---|---|
Sudden worsening lameness | Mild limp after rest | Limping gets worse | Cannot walk or sudden collapse |
New drainage/odor | Clear fluid, no smell | Mild odor, pink fluid | Pus, blood, or foul odor |
Bandage issues | Bandage stays clean | Bandage slips or gets damp | Bandage soaked in blood/fluid |
Sudden weakness | Tired after exercise | Weakness lasts over a day | Sudden weakness or collapse |
You help your dog recover by watching for these signs and acting early. Stay calm and follow your vet’s advice for each step.
Home Setup Checklist
A safe home environment helps your dog recover after TPLO surgery. You can make a few changes to support healing and prevent injury. Use this checklist to prepare your space for each stage of home rehabilitation.
Safe floors and traction
You want your dog to walk without slipping. Non-slip surfaces are important for home rehabilitation. Carpet gives good traction. Avoid slick floors like tile, wood, or vinyl. Place non-slip mats near your dog’s bed, food, and water bowls. These mats help your dog stand up and move safely. You can also use rugs in hallways and other walking areas.
Table: Home Modifications for Safety
Home Modification | Description |
|---|---|
Confinement | Use a crate or small room to limit movement and prevent injury. |
Baby Gates | Block stairs and furniture to reduce fall risk. |
Non-Slip Rugs or Mats | Place on hard floors to stop slipping. |
Short Leash Outdoors | Keep control during potty breaks. |
Tip: Check mats and rugs often. Make sure they stay flat and do not bunch up.
Stairs and car transfers
Providing a ramp for your dog to use instead of stairs works well if you have space. If a ramp is not possible, use a harness and help your dog go up or down steps. Even a little support from you can make walking easier. Do not let your dog jump into the car. Use a harness to lift and gently place your dog in the car.
During home rehabilitation, block access to stairs with baby gates. Only allow stairs if your vet says it is safe.
Comfortable sleep area
Your dog needs a quiet, cozy spot to rest. Choose a place away from busy areas. Use thick, soft bedding to cushion joints and prevent pressure sores. Place the bed on a non-slip surface so your dog can get up easily.
Table: Features of a Good Sleep Area
Feature | Description |
|---|---|
Non-slip flooring | Mats or rugs under the bed prevent slipping and strain. |
Soft bedding | Thick bedding supports the joint and keeps your dog comfortable. |
Quiet space | A calm area helps your dog relax and heal. |
Check the sleep area every day. Keep it clean and dry. This helps your dog feel safe and supports a smooth home rehabilitation process.
TPLO surgery recovery essentials
Bone healing and muscle rebuilding
You help your dog get better after TPLO surgery by following a careful plan. Bone healing takes a long time. Most dogs need about 10 to 12 weeks for the bone to join together. Full strength comes back in 3 to 6 months. Your dog’s muscles also need to get stronger during this time. You help muscles by doing gentle exercises and short walks. These steps help your dog get stronger and have better balance.
Bone fusion takes about 10–12 weeks.
Full bone strength can take up to 6 months.
Gentle movement stops stiffness.
Controlled walks and easy exercises help muscles grow.
You use physical rehab steps to guide you. These steps include leash walks, passive range of motion, and balance exercises. You check progress each week. You look for signs like better weight use and easier movement.
Tip: Write down your dog’s activity and exercises every day. This helps you see how your dog is doing and lets you share updates with your vet.
Why strict restriction matters
Strict restriction is very important for safe TPLO surgery recovery. You keep your dog calm and in a small space, especially for the first eight weeks. This keeps the bone safe and stops injury. Too much activity can hurt or slow healing. You use a crate or small room when you cannot watch your dog. You only let your dog out for short, leash-only bathroom breaks.
Activity restriction is needed for healing.
Keep your dog in one place and watch closely.
Short, controlled walks are important.
The first 6–8 weeks need the most care.
Only let your dog do more after your vet says it is okay.
You follow these steps to stop problems. You help your dog heal faster and safer. You give your dog the best chance to get strong again by sticking to the plan.
Note: Always ask your vet before changing your dog’s routine or adding new exercises.
Rehab Exercise Menu
You want your dog to heal well after TPLO surgery. A structured rehab exercise menu helps you support recovery and build strength. Always ask your veterinarian before starting any new exercise. Each activity below has a goal, safe steps, and stop rules.
PROM and gentle movement
Goal: Keep the joint flexible and prevent stiffness.
How to do it: Gently move your dog’s knee through its natural range of motion while your dog lies on their side. Hold the leg above and below the knee. Move slowly and stop if your dog resists or seems uncomfortable.
Stop rules: Stop if your dog pulls away, shows pain, or the incision looks red.
When to start: Begin PROM only if your vet approves, usually in the first week as part of post-surgery therapy.
Tip: Short, gentle sessions work best. Try 5–10 repetitions, 2–3 times a day.
Weight shifting and balance
Goal: Encourage your dog to use the healing leg and improve balance.
How to do it: Stand your dog on a non-slip surface. Gently shift their weight from side to side by moving their hips or shoulders. Use treats to help your dog stand still.
Stop rules: Stop if your dog loses balance, sits down, or shows discomfort.
Benefits: These exercises help your dog use the repaired leg, improve weight distribution, and build confidence. They are a key part of rehabilitation and can speed up healing.
Checklist:
Start with a few seconds per session.
Increase time as your dog gets stronger.
Always supervise closely.
Controlled leash walks
Goal: Build strength and restore normal walking.
How to do it: Walk your dog on a short leash at a slow pace. Keep walks on flat, non-slip surfaces. Increase walk time each week as your vet recommends.
Stop rules: Stop if your dog limps more, tires quickly, or shows pain.
Weeks | Duration of Walks | Frequency of Walks |
|---|---|---|
Weeks 1-2 | 5 minutes | 3-5 times per day |
Weeks 3 | 8 minutes | 3-5 times per day |
Weeks 4 | 10 minutes | 3-5 times per day |
Week 5 | 12 minutes | 3-5 times per day |
Week 6 | 15 minutes | 3-5 times per day |
Week 7 | 18 minutes | 3-5 times per day |
Week 8 | 20 minutes | 3-5 times per day |
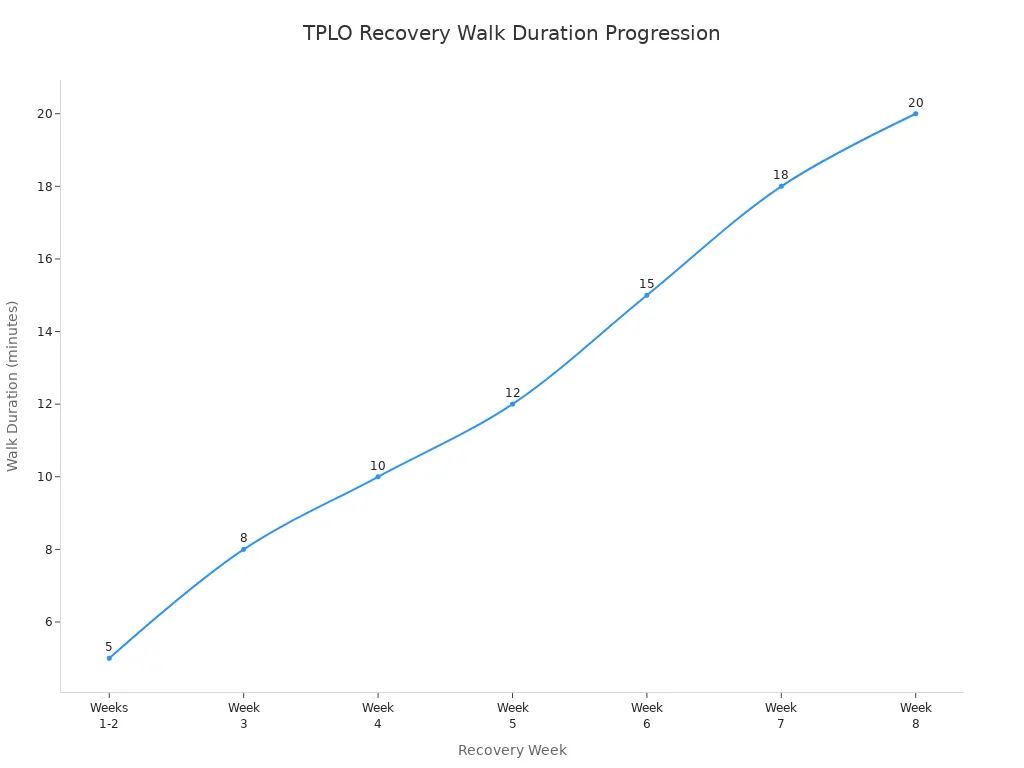
Note: Track your daily therapies in a notebook. Share your progress with your vet at each checkup.
Support Gear Guide
You want your dog to heal safely after TPLO surgery. The right support gear makes a big difference. Each tool helps you manage your dog’s comfort, safety, and healing. Use this mini-guide to choose and check the most important items.
E-collar and recovery suit
You need to stop your dog from licking or chewing the incision. E-collars, like the classic plastic cone, work well for this. The Comfy Cone gives a softer option that still protects the wound. For leg surgeries, the Lick Sleeve covers the whole leg and blocks access to sutures. Bodysuits shield chest or belly incisions and let your dog move freely. You can use more than one device together for extra comfort and safety.
Tip: Check the fit every day. The collar or suit should not rub or chafe the skin. Make sure your dog can eat and drink easily.
Common risks:
Loose collars slip off and do not protect the wound.
Tight collars cause rubbing or sores.
Some dogs get anxious with a cone, so try a soft option if needed.
Sling and harness support
Harnesses and slings help you support your dog when walking, especially on stairs or slick floors. A rear sling lifts the back end and reduces strain on the healing leg. A harness gives you control and keeps your dog steady.
Checklist for safe use:
Adjust the sling or harness so it fits snugly but does not pinch.
Hold the handle close to your dog’s body.
Watch for signs of chafing or slipping.
Common misuse risks:
Over-supporting can make your dog rely on you too much.
Loose straps may cause your dog to trip.
B2B sourcing note: For pet brands or distributors comparing canine braces, recovery protection, or lift-support products for bulk supply, review GaitGuard’s custom dog brace manufacturing support.
Traction aids
Slippery floors can cause falls. Traction aids, like non-slip socks or booties, help your dog walk safely. Place rugs or mats in busy areas. Always check that socks stay on and do not twist.
Gear Type | Main Benefit | Fit/Safety Check |
|---|---|---|
E-collar/Suit | Protects incision | No rubbing, easy eating/drinking |
Sling/Harness | Supports movement | Snug fit, no pinching |
Traction Aids | Prevents slipping | Socks stay on, mats flat |
Stay calm and check your gear every day. The right tools help your dog heal and stay safe.
Managing pain and swelling
After TPLO surgery, you want to keep your dog comfortable and help the knee heal. You can use simple steps at home to manage pain and swelling. Your vet will guide you on the best plan for your dog.
Cold and warm compress basics
You can use cold and warm compresses to help your dog feel better. For the first three days after surgery, place a cold pack wrapped in a towel on the knee for 10 minutes, two or three times a day. This helps reduce swelling and numb the area. After three days, you can switch to a warm compress if your vet says it is safe. Use a warm, damp cloth for 10 minutes, three to five times a day. Warmth helps relax muscles and improve blood flow.
Tip: Always check the temperature of the compress before you place it on your dog’s skin. The pack should feel cool or warm, not hot or icy.
When swelling is not normal
You should check your dog’s leg every day. Some swelling is normal, but you need to watch for signs that mean you should call your vet. Swelling that gets worse or does not go down can signal a problem.
Here are signs that swelling is not normal:
You see more puffiness or bulging around the knee.
The swollen area feels warmer than the rest of the leg.
Your dog limps more or does not want to put weight on the leg.
Your dog has trouble moving or straightening the leg.
If you notice any of these signs, write them down and contact your vet for advice.
Pain management works best when you use several steps together. Give medications as directed, limit activity, and create a calm space for your dog. Regular check-ins with your vet help you adjust the plan if needed.
Vet check-ins and complications
Infection and implant issues
You need to watch for complications after your dog’s TPLO surgery. Some problems happen more often than others. Surgical site infection is the most common major complication. It can happen in about one out of four dogs. Other studies show that the total complication rate ranges from about 10% to 15%. Major complications, like those needing another surgery, happen less often—about 3% to 7% of cases.
Common complications include:
Redness, swelling, or discharge at the incision
Heat or pain around the knee
Limping that gets worse instead of better
Implant problems, such as screws or plates shifting
You should check your dog’s incision every day. Look for changes in color, swelling, or any fluid. If you see pus, blood, or a bad smell, call your vet right away. Watch for signs that your dog does not want to use the leg or seems in pain. These can mean a problem with the implant or an infection.
Call your vet if you notice any sudden changes. Early action helps prevent bigger problems.
Symptom log for vet calls
You can help your vet by keeping a symptom log. Write down what you see each day. This makes it easier to track changes and answer your vet’s questions.
What to include in your log:
Date and time of each walk or exercise
How your dog moves (limping, stiffness, normal walking)
Any swelling, redness, or discharge at the incision
Appetite and energy level
Any new behaviors, like licking or chewing the leg
Sample Symptom Log Table
Date | Activity | Incision Check | Walking/Movement | Notes |
|---|---|---|---|---|
6/1/2024 | 10-min walk | Mild swelling | Slight limp | Ate well, no licking |
6/2/2024 | 12-min walk | No swelling | Walking better | More active today |
Bring your log to every vet visit. This helps your vet make the best plan for your dog’s recovery.
You help your dog recover by following each weekly step and watching for red flags. Use the checklists and tables to track progress and spot problems early. Stay patient and keep your routine steady. Talk with your vet if you have questions or see changes. Most dogs heal well when you follow the plan and give steady support. Careful management gives your dog the best chance for a strong recovery.
This article covers one specific recovery problem. For a broader recovery-support path across braces, lift harnesses, anti-lick protection, wound coverage, pressure checks, and B2B sourcing, visit the Dog Recovery Support Guide.
FAQ
How soon can you walk your dog after TPLO surgery?
You can start short, leash-only potty breaks within 24 hours after surgery. Keep walks under five minutes. Always follow your vet’s instructions for timing and distance.
When can your dog go up stairs again?
Wait until your vet says stairs are safe. Most dogs need to avoid stairs for at least eight weeks. Use a harness or sling for support if stairs are allowed.
What if your dog licks the incision?
Licking can cause infection. Use an e-collar or recovery suit to prevent licking. Check the incision daily. Call your vet if you see redness, swelling, or discharge.
How do you know if your dog is doing too much?
Watch for limping, swelling, or tiredness after walks. If your dog seems sore or stops using the leg, reduce activity. Write down changes and call your vet for advice.
