
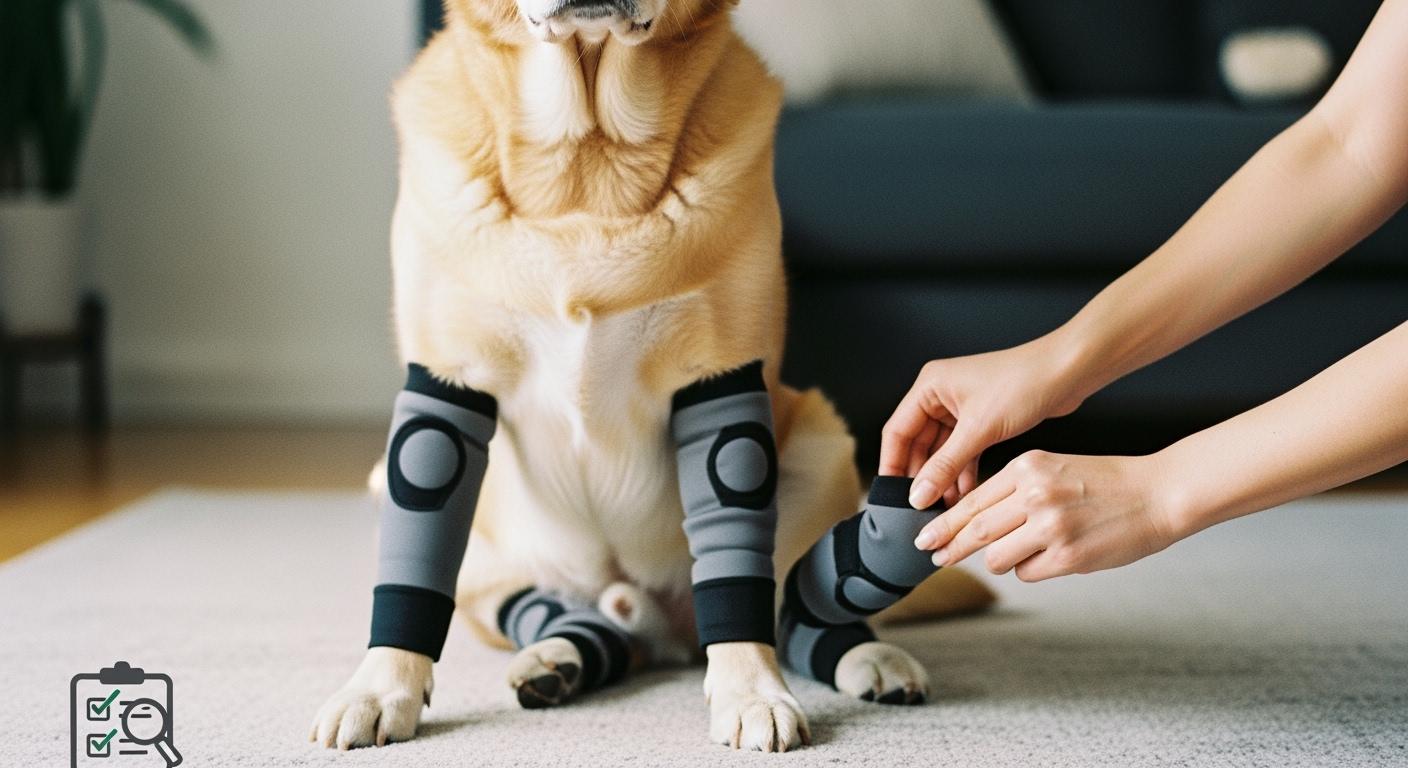
You slide the sleeve on. It sits flat. The pad covers the elbow or knee point. Then your dog walks across the room, sits, lies down — and the cuff edge rolls inward. The pad drifts. The bony point you meant to protect is exposed again.
This is not a minor fit hiccup. Edge rolling rewrites what the sleeve actually does: compression turns into a pressure line, coverage becomes a moisture trap, and what looked like protection becomes a source of friction. Understanding why this happens requires looking past the standing fit and into what the sleeve edge does under load.
The Failure Chain That Starts With a Curling Edge
A dog’s limb tapers from shoulder or hip down to the paw. The elbow and knee joints flex and extend with every stride, continuously changing the shape under the sleeve. This means the cuff does not sit on a static cylinder — it rides a surface that narrows, bends, and twists.
A narrow cuff concentrates force across a thin contact band. When the joint bends, friction drags that band along the skin. Without enough cuff width to spread the shear force, the edge folds inward. Once it folds, the crease creates a lip that catches more friction with each step, accelerating the roll. The pad, no longer pinned by a stable edge, drifts off the bony point.
Tightening the sleeve adds circumferential tension but does nothing to widen the force distribution zone. The cuff still curls — now with added pressure marks underneath. That is the core of the failure: more tension does not compensate for less cuff width. The same dynamic plays out when a knee sleeve rotates during turns or after the dog lies down, because a narrow cuff lacks the surface area to resist the lateral forces that joint rotation generates. How sleeve rotation interacts with patellar support follows the same principle: rotation exposes what the pad was supposed to cover.
Where the curl usually starts
Edge curling most often begins near the hock or the elbow crease. The skin here is thinner and the joint motion is constant. When a cuff edge sits directly over a bending crease, it receives concentrated force on tissue not built to distribute it. That is where the first inward fold appears.
Why tightening fails
Tightening compresses the limb uniformly but does not anchor the edge. The edge still receives friction; it still has nothing resisting the fold. What changes is the pressure under the entire cuff — often enough to leave red lines or indentations — while the rolling continues. A sleeve that needs overtightening to stay in place already has an edge design problem.
| What you see | Likely cause | Why tightening fails | Better design or fit response |
|---|---|---|---|
| Top cuff rolls inward | Narrow cuff, weak edge | Increases pressure marks | Wide flat cuff, bound edge |
| Bottom edge curls upward | Flat-cut edge, friction | Edge still curls | Folded or bound edge |
| Pad slides behind elbow/knee | Pad not shaped, loose fit | Pad still drifts | Shaped pad, stable placement |
| Red line appears at edge | Over-tightening, friction | Red mark persists | Adjust size, check edge structure |
| Sleeve rotates after turns | Loose sleeve, poor grip | Rotation repeats | Better grip, adjusted size |
| Dog chews seam or cuff | Discomfort, pressure line | Chewing continues | Softer seam, wider cuff |
A 5-Minute Movement Test for Knee Sleeve and Elbow Guard Fit
A standing fit check tells you almost nothing. The sleeve looks right because the limb is static, the joint is not flexing, and friction has not begun to work on the edge. The only way to know whether a knee compression sleeve or elbow guard actually holds is to test it under movement.
The test below is designed to surface edge rolling and pad drift within five minutes — the window where most fit failures first become visible. Run it before you commit to a wear schedule, and repeat it anytime you change sizing or layer a sleeve under or over other gear. This same logic applies across knee support setups where stability depends on fit precision rather than just strap tension.
Step 1: Mark the starting cuff line
Start with your dog standing squarely. Position the sleeve so the pad centers over the bony point. Use a washable marker or a small piece of tape to mark the top edge of the cuff against the fur. This mark is your reference — if the cuff moves, you will see the gap.
Step 2: Walk, turn, sit, and lie down
Walk your dog for one minute at a normal pace. Then ask for one sharp turn, one sit, one full lie-down, and one stand-up. These movements generate the same friction and joint flexion the sleeve faces during daily wear. Watch the cuff edge throughout.
- Check whether the top or bottom cuff edge rolls inward.
- Note if the pad shifts away from the elbow or knee point.
- Watch for the sleeve rotating or fabric bunching behind the joint.
Note: If you see the sleeve edge rolling or the pad sliding during this test, do not keep tightening. Tightening at this stage masks the failure rather than fixing it. You need a wider cuff, a bound edge, or a different size — not more tension.
Step 3: Check pad position and skin condition
After the movement sequence, measure whether the cuff mark has shifted more than half an inch from its starting position. Remove the sleeve and inspect the skin along the cuff line and under the pad. Look for defined red lines, dampness, or any swelling — these are pressure-concentration signals, not normal wear marks. Small dogs in particular need this check because their limb circumference leaves less margin for error; fit checks for smaller breeds catch slipping and rubbing that larger dogs may tolerate longer before showing visible marks.
| Signal level | What you see | Action |
|---|---|---|
| Green | Edge stays flat, pad remains centered, no skin marks | Continue use, monitor twice daily |
| Yellow | Small rolling, light pink mark, slight pad drift | Recheck size, edge design, pad shape, grip |
| Red | Rolling repeats, pad exposes bony point, lasting mark, hot or damp skin | Stop use, reassess fit, consult veterinarian |
If you see yellow or red signals, adjust the size or switch to a sleeve with a wider cuff and bound edge. Repeat the test after any change. Green across all three signals is the minimum for safe daily wear.
Cuff, Pad, Seam, and Fabric Choices That Change Whether a Sleeve Holds
Edge rolling is not random. It traces back to four design decisions: cuff width, edge construction, pad shape, and material breathability. Each can be the difference between a sleeve that stays put through a full day and one that curls within the first walk.
Wide flat cuffs that resist curling
A wide flat cuff distributes the friction load across a broader contact area. Instead of a thin band that folds under concentrated shear, the force spreads across the full cuff surface. This lowers the pressure at any single point along the edge and reduces the likelihood of an inward fold starting. Neoprene adds durability without stiffening the cuff to the point of discomfort. Adjustable stirrup straps let you fine-tune the cuff position so it lands above or below the joint crease — the exact placement matters because a cuff that sits directly on a bending crease faces more friction than one positioned just above it.
Bound or folded edges instead of raw flat edges
A raw flat-cut edge has no structural resistance to curling. Friction pushes it, and nothing pushes back. A bound or folded edge creates a finished rim that resists deformation — the binding adds a second material layer that increases the force required to initiate a fold. It also protects the skin from direct contact with a sharp fabric edge, which matters most where the limb tapers and the cuff grips tightest. Bound edges tend to outlast raw edges through repeated wash cycles too, because the binding prevents the edge from fraying or losing shape. Across elbow sleeve types with different edge constructions, the ones with bound or folded rims consistently resist curling longer than flat-cut alternatives.
Shaped pads that stay over the bony point
A flat rectangular pad drifts because it has no contour locking it to the joint. A shaped pad — contoured to match the curve of an elbow or the front of a knee — resists rotation by creating a natural pocket that the bony point settles into. When the cuff stays stable and the pad is shaped, the two work together: the cuff prevents vertical migration, and the pad contour prevents rotation. Knee pads designed with contoured shaping tend to hold position better than flat pads during turns and lie-downs because the contour gives the pad a natural resting position it returns to after movement.
Breathable SBR or perforated fabric for active wear
A sleeve that does not breathe traps heat and moisture under the edge. Damp skin softens and becomes more friction-sensitive — the same edge pressure that caused no issue on dry skin can leave marks on skin that has been moist for 20 minutes. Perforated SBR and sandwich mesh fabrics move moisture outward and allow airflow through the sleeve body. A three-layer construction — breathable outer, thin perforated SBR middle, mesh inner — keeps the sleeve light enough that the cuff does not bear extra weight pulling it downward. That weight matters: a heavy, waterlogged sleeve body adds downward drag that the cuff edge must resist, increasing the force that drives curling.
| Weak structure | Better structure | Why it matters |
|---|---|---|
| Narrow cuff | Wide flat cuff | Spreads friction, reduces rolling |
| Raw or weak edge | Bound or folded edge | Resists curling, protects skin |
| Flat pad | Shaped elbow/knee pad | Keeps pad centered on bony point |
| Bulky inner seam | Low-profile outer seam | Reduces friction, increases comfort |
| Non-breathable fabric | Perforated SBR, breathable layers | Keeps skin dry, reduces odor |
| Loose sleeve tube | Adjusted guard, stable pad | Maintains coverage, prevents drift |
When Edge Rolling Means This Guard Is Not the Right Match
Some sleeves roll because the design is weak. Others roll because the guard type does not match what the dog’s limb shape or activity level demands. Knowing the difference prevents you from cycling through adjustments on a sleeve that was never going to work.
Red marks, hair loss, and dampness under the edge
After 20 minutes of wear, lift the cuff edge and check the skin. Run your fingers along the cuff line. If the skin feels damp, the edge is trapping moisture — even if it looked flat when you put it on. A defined red line tracing the cuff means pressure is concentrating along a thin band, the signature of a narrow or rolling edge. Hair loss around the cuff area signals chronic friction. These three signs together — dampness, red line, hair loss — mean the sleeve is not just uncomfortable; it is degrading the skin barrier with every wear cycle.
Chewing, limping, and repeated removal
Dogs signal fit problems in ways that are easy to misread. Chewing at the seam or cuff edge is not boredom — it is a direct response to a pressure point or irritation line. Limping that appears after the sleeve goes on and disappears after removal points to joint interference or nerve pressure from an edge digging in. Repeated attempts to remove the sleeve, especially when the dog seeks out the cuff edge with its teeth, mean the fit or edge design needs reassessment, not more wear time. For dogs that need protection but cannot tolerate a full brace structure, the tradeoffs between an elbow sleeve and a rigid elbow brace center on this exact question: whether the dog will accept the device long enough for it to do its job.
Disclaimer: The movement test and visual skin checks described here assume a short-coated dog where the cuff edge and skin condition are directly visible. Double-coated breeds may show subtler rub marks that fur conceals — run your fingers along the cuff line after each wear session to feel for warmth, slight swelling, or dampness that visual inspection might miss. Dogs with angular limb deformities or atypical leg conformation may distribute cuff pressure differently than the breed norms these fit checks were patterned for, and may need a professional fitting assessment.
| Signal level | What you see | What to do |
|---|---|---|
| Red | Redness, swelling, heat, open skin, or repeated chewing at the cuff | Stop use and consult your veterinarian |
If rolling, red marks, or discomfort persist after adjusting size and edge design, stop using the sleeve and consult your veterinarian.
FAQ
What actually causes the sleeve edge to roll after my dog moves?
The limb tapers and the joint flexes. A narrow cuff concentrates friction across a thin contact band. Joint motion drags that band, and without enough cuff width to spread the shear, the edge folds inward. Once folded, the crease catches more friction and the roll accelerates.
Why does tightening the sleeve not stop the edge from rolling?
Tightening increases circumferential tension but does not widen the force distribution zone. The edge still receives concentrated friction; it still has nothing resisting the fold. What changes is the pressure underneath — often enough to leave marks — while the curling continues.
How do I check whether the guard actually fits during movement?
Mark the cuff edge position, walk your dog for one minute, then add a turn, sit, lie-down, and stand-up. If the mark has shifted more than half an inch or the pad no longer centers on the bony point, the fit is not holding under real use.
At what point does edge rolling mean the guard is simply the wrong choice?
When dampness, a defined red line, and hair loss appear together along the cuff line, the sleeve is degrading the skin barrier with every wear cycle. If these signs persist after adjusting size and switching to a wider bound-edge cuff, the guard type may not match the dog’s limb shape or activity level.
Which design features actually reduce edge rolling?
A wide flat cuff to spread friction, a bound or folded edge to resist the initial fold, a contoured pad that locks onto the joint, and breathable fabric that keeps the skin dry so it stays less friction-sensitive. These four features address rolling at its mechanical root rather than masking it with tension.
