

A dog harness with a lift handle should do two jobs well: fit the body securely and let you provide steady support without creating unnecessary pressure. This guide explains how to check fit, body coverage, and handle placement so the harness works more safely during stairs, short walks, standing support, and bathroom breaks. A correct setup can make daily assistance easier and more controlled, while a poor fit can create rubbing, unstable lifting, and avoidable strain for both the dog and the handler.
Quick check: the harness should stay stable, keep the armpit area clear, and let the dog move without twisting or resisting the lift. If the dog shows pain, weakness, or worsening instability, stop and ask your veterinarian or rehab professional for guidance.
Key Takeaways
A lift-handle harness should be judged by fit, body coverage, and handle position, not by size label alone.
The handle should help you lift with control without tipping the dog forward, pulling unevenly, or concentrating pressure in one area.
Daily fit checks should include strap tension, armpit clearance, skin condition, and movement quality during real use.
Why Fit and Handle Placement Matter in a Dog Harness
Fit and handle placement matter because a support harness is not just worn—it is used under load. When the harness fits correctly, pressure stays more even, lifting feels steadier, and daily assistance is easier to repeat. When the fit is wrong, the dog may resist movement, lose balance, or show rubbing in the chest, shoulder, or armpit area. That is why sizing, strap path, and handle location all need to be checked together rather than one at a time.
Comfort, Control, and Safety Risks
A support harness should be checked as a weight-distribution and control system. If fit or handle placement is off, the problem is not just comfort. It can affect balance, movement quality, lifting control, and wear tolerance over time. The table below outlines the most common risks to watch for.
Risk Type | Description |
|---|---|
Chafing | Straps rub at the armpit, sternum, or flank and create repeated skin irritation |
Discomfort | The dog shortens stride, resists the harness, or changes posture during assisted movement |
Physical Strain | Pressure concentrates on the chest, shoulder, spine, or one support zone during lifting |
Escape Risk | A loose or poorly adjusted harness shifts, twists, or slips during movement |
Long-term Issues | Repeated uneven loading can reduce wear tolerance and strain soft tissue over time |
A well-fitted harness should spread pressure more evenly, preserve natural movement, and improve handling confidence during support tasks. For dogs with weak hind legs or reduced balance, poor fit can make stairs, transitions, and short support sessions less stable instead of more stable.
When to Use a Support Harness
A support harness is most useful when the goal is controlled assistance, not just restraint. The better question is not whether the dog “needs a harness,” but whether the dog needs repeatable support during movement, transitions, or short daily tasks.
Situation | Description |
|---|---|
Assisted walking | Useful when the dog can still move but needs steadier support during short walks |
Stairs and elevation changes | Useful when the caregiver needs more control while helping the dog step up or down |
Bathroom and transition support | Useful when the dog needs brief, repeatable help standing, squatting, or repositioning |
If the dog struggles with stairs, short walks, or controlled bathroom support, a lift-handle harness may be appropriate. Before using it under load, check fit, handle position, and whether the dog can still move in a steady, natural pattern. A harness should improve control, not force the dog into an awkward gait.
How to Measure Your Dog for a Harness
Key Measurements for Proper Fit
Measure before you compare size charts. The goal is to collect repeatable body measurements that make the fit easier to evaluate once the harness is on, especially if the dog needs regular assisted support.
Use a soft measuring tape or a piece of string and a ruler.
Make sure your dog stands straight with weight on all four legs. Ask someone to help if needed.
Measure the girth at the widest part of the chest, just behind the front legs. Wrap the tape snugly but not too tight.
Measure the neck where the harness will sit, usually at the base of the neck near the shoulders.
For some harnesses, measure the chest bridge from the top of the sternum to a spot a hand’s width behind the front leg.
Repeat each measure three times for accuracy. Dogs may move, so double-check your numbers.
Tip: Use the two-finger rule as a final fit check, not as a substitute for measuring. Record girth, neck, and any body-shape details that may affect strap path or handle balance.
In most support-harness fittings, girth and neck are the baseline measurements, but coat thickness, body shape, and the intended support task also affect final fit quality.
Choosing the Right Size Support Harness
After measuring, compare the numbers to the brand’s sizing chart, but do not stop there. Size labels are not interchangeable across brands, so the better approach is to match measurements first and then confirm adjustability, body coverage, and movement once the harness is on the dog.
Always reassess sizing if your dog gains or loses weight.
Adjust for thick or thin coats, especially during seasonal changes.
Look for signs of a good fit: the harness should be snug but not restrict movement.
Note: Proper tips for dog harness sizing include checking fit often and making changes as your dog’s body changes.
Repeat the measurement process whenever weight, coat thickness, or mobility needs change. Small body changes can materially affect fit, strap path, and handle performance.
How to Fit a Dog Harness with Lift Handle
Adjusting Straps and Body Coverage
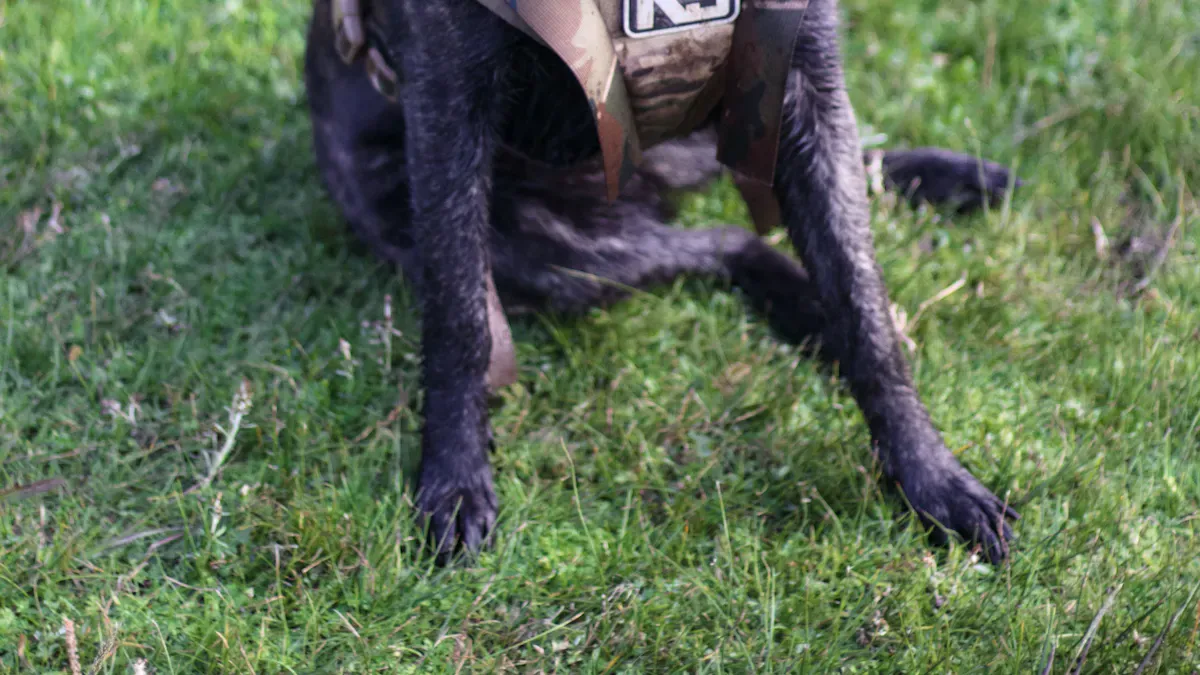
Start with all straps loosened so you can place the harness correctly before tightening anything. Position the chest, shoulder, and support panels where the design intends them to sit, then fasten and adjust in stages. If the system has front and rear sections, make sure they work together as one support path instead of pulling from separate directions.
Adjust each strap as part of a fit check, not just for tightness. The harness should stay stable without crowding the shoulders, rubbing the armpits, or pressing into the sternum or flank. A correct fit allows the dog to walk, turn, and transition naturally without visible twisting, pinching, or pressure concentration.
Tip: Bring your dog’s personal leash and collar for extra security and comfort during walks.
Checking for Snugness and Comfort
Check snugness only after the harness is sitting in the correct position. Use the two-finger rule under the main straps, but also look at movement quality, armpit clearance, and whether the harness shifts when the dog walks or turns. A harness can feel snug and still be fitted badly if the strap path is wrong.
The two-finger rule helps you find a proper fit.
Check the fit of all straps, including the neck and chest.
Make sure the harness does not restrict movement or cause chafing.
A correct fit should improve stability, reduce rubbing risk, and make the handle easier to use without shifting the harness. Recheck fit after weight or coat changes and whenever the dog’s movement or support needs change.
Note: Fit should be reviewed during real use, not just while the dog is standing still. A harness that looks correct at rest can still shift under assisted movement.
Signs of Poor Fit
You must watch for signs of poor fit when you fit a dog harness. These signs can affect safety and comfort. Here are the most common signs:
The neck strap sits too high or too low. This can cause pressure on the throat or interfere with leg movement.
The chest strap is too close to the armpits. This leads to rubbing and irritation.
The strap between the front legs is too wide. This causes chafing and discomfort.
Your dog avoids or resists the harness. This shows discomfort or pain.
If you see any of these signs, stop treating the fit as acceptable and reset it from the beginning. Recheck strap path, chest position, armpit clearance, and whether the harness stays balanced when the dog starts moving.
Fit should be reviewed as part of a routine inspection process, especially when the harness is used for stairs, bathroom support, or repeated assisted walking.
Safety tip: Before each use, check strap tension, armpit clearance, handle alignment, and whether the dog’s movement pattern still looks natural.
Dog Harness with Lift Handle Fit and Handle Placement
Handle Position and Weight Distribution
Handle placement affects how balanced the lift feels and how the load is distributed through the harness. If the handle sits too far forward or too far back, the dog may tip, twist, or take weight unevenly through one area. The best position is the one that allows controlled assistance while keeping the dog more level and easier to support through normal movement.
A better design does not just place the handle on top. It also spreads support through the intended body panels so the dog is assisted through the chest, torso, or rear support zone without hanging from one point. That makes lifting steadier, easier to repeat, and less likely to create pressure hotspots.
Here is a quick look at how handle position affects support:
Aspect | Description |
|---|---|
Handle Position | The handle should help the dog stay level during assisted movement rather than tipping forward or back. |
Support Mechanism | The harness should distribute load through its support panels instead of pulling from one narrow point. |
Momentum Maintenance | The dog should still be able to step forward naturally without the harness interrupting balance or stride. |
Before daily use, check whether the handle feels balanced in real movement, not just when the dog is standing still. A stable handle should help the dog move with support, not change the dog’s posture or make lifting feel awkward for the handler.
Testing Handle Stability and Caregiver Control
Testing handle stability is important for dog harness with lift handle fit and handle placement. You want the handle to feel strong and steady when you help your dog. Start by checking all buckles and straps. Make sure they are tight and secure. Use a soft measuring tape to check that the harness fits well. If your dog is between sizes, choose the larger size and adjust for a snug fit.
Try these steps to test handle stability and control:
Gently lift your dog using the handle. Watch for any twisting or slipping.
Use both hands for larger dogs. Wide, padded handles give you more comfort and control.
Never lift by the abdomen alone. Support both the front and rear, especially for dogs with weak legs.
Walk a few steps with your dog. The harness should not shift or cause your dog to lose balance.
Adjust the straps if you notice any wobbling or uneven pressure.
A harness that allows controlled adjustment and stable body coverage usually gives the handler better control with less twisting and less pressure concentration. If the dog still feels unstable after correct adjustment, the support method or support level may need to be reviewed.
Special Situations: Stairs, Bathroom Breaks, Walking
Dog harness with lift handle fit and handle placement matters most in daily tasks. You may need to help your dog up stairs, during bathroom breaks, or on walks. Each situation needs a careful approach.
For stairs, support both the front and back of your dog. Keep the handle steady and move slowly. This prevents slips and keeps your dog safe.
During bathroom breaks, use the handle to guide your dog gently. A good fit helps your dog squat or lift a leg without strain.
On walks, check that the harness does not rub or shift. The handle should stay in place, giving you control without pulling on your dog’s neck or spine.
Mobility harnesses are usually a better choice than short slings when the support need is more structured, more repeatable, or spread across multiple daily tasks. The key question is whether the dog can be assisted with stability and whether the handler can repeat the task safely.
For stairs, bathroom support, and short assisted walks, reassess fit and handle control in the exact situation where the harness will be used. A setup that works on flat ground may still need adjustment for stairs or turning.
Fit and handle placement should be checked before each assisted-use session, especially when the harness is part of a daily mobility routine.
Troubleshooting and Common Mistakes
Red Flags and Discomfort Signs
Use this section as a red-flag check during real use, not just during first fitting. A harness may look acceptable when the dog is standing still but still fail during stairs, assisted walking, or repeated lifting. Watch for these signs early.
Repeated head-tossing or skipping steps during walks.
Reluctance to extend the front leg or sudden stopping at the harness area.
Visible chafing, redness, or hair loss where straps rub.
Avoidance behavior, such as backing away when you approach with the harness.
Stiff walking, short steps, or hesitation when moving.
Deep marks or indentations on your dog’s skin after removing the harness.
These signs of a poorly fitted dog harness can lead to restricted movement and poor control. You should check for these red flags every time you use the harness.
Tip: Inspect the harness during and after use for pinching, rubbing, swelling, twisting, or any visible change in movement quality.
Adjustments for Better Fit and Placement
Recheck fit after weight, coat, mobility, or activity changes. A harness can improve assisted handling, but it should not be used as a substitute for diagnosis or treatment if pain, weakness, or instability continues.
Measure your dog to ensure the harness is the correct size.
Adjust both sides of the straps evenly to prevent tilting.
Use the two-finger rule—allow two fingers between the harness and your dog’s body.
Place the neck strap just behind the ears and the chest strap behind the front legs.
Make small adjustments while your dog stands naturally.
Test the harness with a leash attached to ensure it does not twist or shift.
Check for wear and tear, especially after your dog grows or changes coat.
You can also:
Ensure straps sit flat and do not twist.
Choose harnesses with multiple attachment points for better control.
Opt for waterproof or reflective materials if needed.
For escape-prone dogs, select a harness with a third strap for added security.
Troubleshooting helps you keep your dog comfortable and safe. Always check fit after weight or coat changes. Remember, a harness is not a replacement for veterinary diagnosis or treatment. If you notice ongoing discomfort, consult your veterinarian.
Daily fit checks matter more than one-time setup. Use this simple review template after introducing or readjusting a lift-handle harness:
Session: date, activity, and support duration.
Fit check: strap tension, armpit clearance, body coverage, and handle alignment.
Response: stable movement, rubbing, hesitation, twisting, or easier assisted handling.
Review the notes every few days and adjust only when you can see what changed. Data authenticity note: This article is for educational purposes only. It is designed to help readers evaluate support-harness fit and handle placement, not to replace a veterinary diagnosis or an individualized rehab plan.
FAQ
How tight should a dog harness with a lift handle fit?
The harness should feel stable without restricting movement. Use the two-finger check as a final confirmation, but also verify that the straps stay flat, the armpit area stays clear, and the harness does not shift during assisted use.
Where should the lift handle sit on my dog?
The handle should sit where it helps the dog stay level during assisted movement. The exact position depends on body coverage and load distribution, but it should not tip the dog forward, pull unevenly, or create pressure in one narrow area.
What if my dog seems uncomfortable in the harness?
Stop and reassess fit if you see rubbing, posture change, twisting, hesitation, or resistance to assisted movement. If those signs continue after adjustment, stop use and consult your veterinarian or rehab professional.
Can I use the harness for all activities?
You can use the harness for walking, stairs, and bathroom support when fit and handle placement have already been checked. For longer or higher-load activities, confirm suitability before use instead of assuming the same setup works for every task.
