
You want your dog to feel better and heal safely. The best parts of a dog shoulder brace are pain relief, stability, and better movement. These parts help your dog move without hurting the shoulder more. A good brace helps your dog get better from arthritis or injury. It also helps your dog recover after surgery. Your veterinarian’s plan is more important than general timelines. This guide gives you useful tips and expert advice. It helps you choose what is best for your dog’s comfort and safety. Always follow your veterinarian’s plan over general timelines.
Pain relief helps your dog feel comfortable.
Stability keeps the shoulder safe while healing.
Better movement lets your dog walk with help.
Key Takeaways
A dog shoulder brace helps with pain and gives support. It also helps your dog move better after arthritis or an injury. – You should always do what your veterinarian says for your dog’s care. This is more important than just following general advice. – Watch your dog for any skin problems. Make sure the brace fits right so your dog is not uncomfortable and can heal well. – Let your dog get used to the brace slowly. Start with short times wearing it, then make the time longer as your dog gets used to it. – Learn the difference between pain and soreness in your dog. This helps you know when to call the veterinarian for help.
What a dog shoulder brace can and cannot do
Support vs immobilization
You may wonder if a dog shoulder brace can fully stop your dog’s shoulder from moving. The answer is no. The shoulder joint sits in a spot that makes it hard to keep still. Even with a brace, your dog’s shoulder will move a little when they walk or stand. This means a brace gives support but does not lock the joint in place.
Tip: Your veterinarian’s protocol overrides general timelines.
Veterinarians use braces for different reasons. Sometimes, you need to rest the joint or protect it after an injury. Other times, you want to help your dog move safely or prevent risky motions. A brace can help muscles do their job or keep the shoulder from moving too much. You should know that braces do not repair tendons or ligaments by themselves.
Shoulder joints are hard to immobilize because of their location.
Some movement happens even with a brace.
Healing can take time and needs a slow return to normal activity.
Behavior and load management
You might see your dog walk better with a brace. Many owners notice their dogs move more easily and seem happier. Some dogs with problems in both shoulders find it easier to walk when wearing a brace. You may also see less pain and more support during walks.
Dogs often show better mobility with a brace.
Some dogs walk better, even with both shoulders affected.
Braces can reduce pain and help your dog feel more comfortable.
Comfort support risks
You must watch for problems when your dog wears a brace. Skin issues like redness, sores, or hair loss can happen. Sometimes, the brace may slip or not fit right. Most problems are minor and get better with rest or small changes to the fit. Some dogs may not like wearing the brace at first.
Skin irritation, sores, or hair loss can occur.
Braces may slip or have mechanical issues.
Most problems are minor and improve with adjustments.
Good fit, regular checks, and your veterinarian’s help lead to better results.
Note: Your veterinarian’s protocol overrides general timelines.
Common shoulder issues in dogs
Shoulder problems can make your dog feel bad and move less. You might see your dog limp, walk slower, or not want to play. Some shoulder problems happen more often than others. It is important to know the signs so you can help your dog.
Tendon pain patterns
Active dogs often get tendon injuries. These injuries can hurt, cause swelling, and make it hard to move the leg. Each tendon problem has its own signs. The table below shows some common pain patterns and symptoms you might notice:
Injury Type | Pain Patterns and Symptoms |
|---|---|
Biceps tendonitis | Lots of pain and limping, mostly in active dogs. |
Supraspinatus tendonitis | Pain, swelling, and less movement in the shoulder. |
Infraspinatus tendon injury | Hard time using the hurt leg. |
Bicipital tenosynovitis | Swelling around the biceps tendon. |
Supraspinatus/biceps tendinopathy | Pain and trouble moving because of scar tissue. |
Rotator cuff injuries | Pain and hard to move the leg. |
Calcific tendonitis | Pain and swelling from calcium, hard to move. |
Subscapularis tendon injury | Lots of pain and hard to use the leg. |
Your dog might not use the sore leg or may act hurt when you touch the shoulder. Your veterinarian’s plan is more important than general timelines.
Instability and recurrence
Some dogs have shoulder instability. This means the shoulder moves too much or slips out of place. Medial shoulder instability is a common problem. Dogs with this problem may limp sometimes or have trouble standing up. Instability can come back if you do not manage it well. A dog shoulder brace can help support the joint and stop risky movement. Always follow your veterinarian’s plan over general timelines.
Arthritis support goals
Arthritis makes the shoulder hurt and stiff. You might see your dog slow down or have trouble with stairs. The main goals for arthritis are to lower pain, protect the joint, and help your dog stay active. You can use things like a dog shoulder brace, gentle exercise, and home changes to help your dog. Ask your veterinarian for the best plan for your pet.
Common shoulder problems in dogs are:
Tendinopathy
Articular damage
Biceps tendinopathy
Supraspinatus tendinopathy
Medial shoulder instability
Tip: Watch for changes in how your dog moves or acts. If you notice problems early, you can help your dog sooner.
Veterinary evaluation steps
Mimicking other joint pain
Shoulder injuries in dogs can look like other joint problems. Your dog might limp or not use one leg. These signs can also mean elbow problems, especially in big dogs. It is important to check for elbow pain first. This helps find out what is really wrong. Your veterinarian uses special tests to see where the pain comes from.
Shoulder injuries can look like elbow problems.
It is hard to tell because signs are similar in big dogs.
Checking for elbow pain helps find the real problem.
Imaging and rehab basics
Your veterinarian uses many steps to find shoulder injuries. You help by telling the vet about your dog’s symptoms and injury history. The vet checks your dog and moves the shoulder to see how it works. Advanced imaging shows what is wrong inside the joint. Here are some common steps your vet may use:
Step | Description |
|---|---|
Clinical History | You tell the vet about your dog’s symptoms and injury. |
Physical Examination | The vet checks for pain and movement in the shoulder. |
Orthopedic Examination | Special tests help find pain in the shoulder. |
Radiographs | X-rays rule out other causes but may miss tendon injuries. |
Advanced Imaging Techniques | MRI, ultrasound, or arthroscopy show more details. |
Additional Diagnostics | Arthroscopy or ultrasound may be used for more checks. |
Imaging lets your vet see inside the joint. Classic arthroscopy gives very clear pictures and is best for finding shoulder instability. Needle arthroscopy costs less and can be used again. MRI helps find nerve problems. CT and ultrasound check soft tissue injuries. Radiographs are common but do not show every problem.
Imaging Technique | Effectiveness | Notes |
|---|---|---|
Classic Arthroscopy | Best for shoulder instability | Gives very clear pictures of the joint. |
Needle Arthroscopy | Cheaper option | Can be used again and costs less. |
MRI | Finds nerve problems | Good for thoracic limb lameness. |
CT | Shows lots of detail | Used before ultrasound for soft tissue. |
Ultrasound | Checks soft tissue | Used after CT for other injuries. |
Radiographs | First test done | May not show soft tissue injuries. |
Your veterinarian’s plan is more important than general timelines.
When not to delay care
You need to act fast if your dog’s pain gets worse or your dog cannot walk. If you see bad pain, swelling, or new nerve signs, call your veterinarian right away. Waiting can make things worse. Always listen to your veterinarian for the best care. Your veterinarian’s plan is more important than general timelines.
Dog shoulder brace decision table
Traffic-light guide
You want to know if a dog shoulder brace is right for your dog today. Use this traffic-light table to help you decide. This table gives you a quick way to check if a brace is safe, if you should use caution, or if you need to call your veterinarian first. Always remember: Your veterinarian’s protocol overrides general timelines.
Is a dog shoulder brace appropriate today?
Criteria | 🟢 Green: Go Ahead | 🟡 Yellow: Use With Caution | 🔴 Red: Stop and Call Vet |
|---|---|---|---|
Pain Level | Mild, controlled with meds | Moderate, sometimes limps | Severe, cries, cannot settle |
Weight-Bearing | Walks with support | Hesitates, partial weight | Cannot bear weight at all |
Instability | Mild, no collapse | Sometimes slips or stumbles | Shoulder gives out, frequent falls |
Owner Capacity | Can check skin, adjust fit | Needs help for checks | Cannot monitor or adjust brace |
Skin/Chewing | Skin healthy, no chewing | Mild redness, watches area | Open sores, chews at brace |
Tip: If you see any red signs, stop using the brace and call your veterinarian. Your veterinarian’s protocol overrides general timelines.
Defeating “reach and twist”
Dogs often try to reach or twist out of their brace. You can help prevent this by checking the fit every time you put the brace on. Make sure the straps sit flat and do not pinch. Watch your dog for the first few sessions. If your dog chews or scratches at the brace, take it off and check the skin. Use a short break-in period at first. Start with 30–60 minutes, 3–5 times a day. Increase the time by about 25% every 3–4 days if your dog’s skin and walk look good.
Check the fit each time you use the brace.
Watch for chewing, scratching, or slipping.
Use a slow break-in schedule to help your dog adjust.
If you see redness, swelling, or sores, stop using the brace and talk to your veterinarian. You want your dog to feel safe and comfortable.
Matching brace to symptoms
You need to match the right tool to your dog’s symptoms. A dog shoulder brace works best when your dog has mild to moderate pain, can walk with support, and needs help to avoid risky movement. If your dog has severe pain, cannot walk, or has new nerve signs, a brace is not enough. You must call your veterinarian.
Use a brace for mild pain, support, and safe movement.
Use caution if your dog hesitates or has mild redness.
Do not use a brace if your dog cannot walk, has open sores, or chews at the brace.
Note: The dog shoulder brace does not heal tendons or ligaments by itself. It helps support your dog during recovery.
You can use this decision table to guide your choices at home. Always check with your veterinarian if you are unsure. Your veterinarian’s protocol overrides general timelines.
Fitting and break-in process
Measuring and strap placement
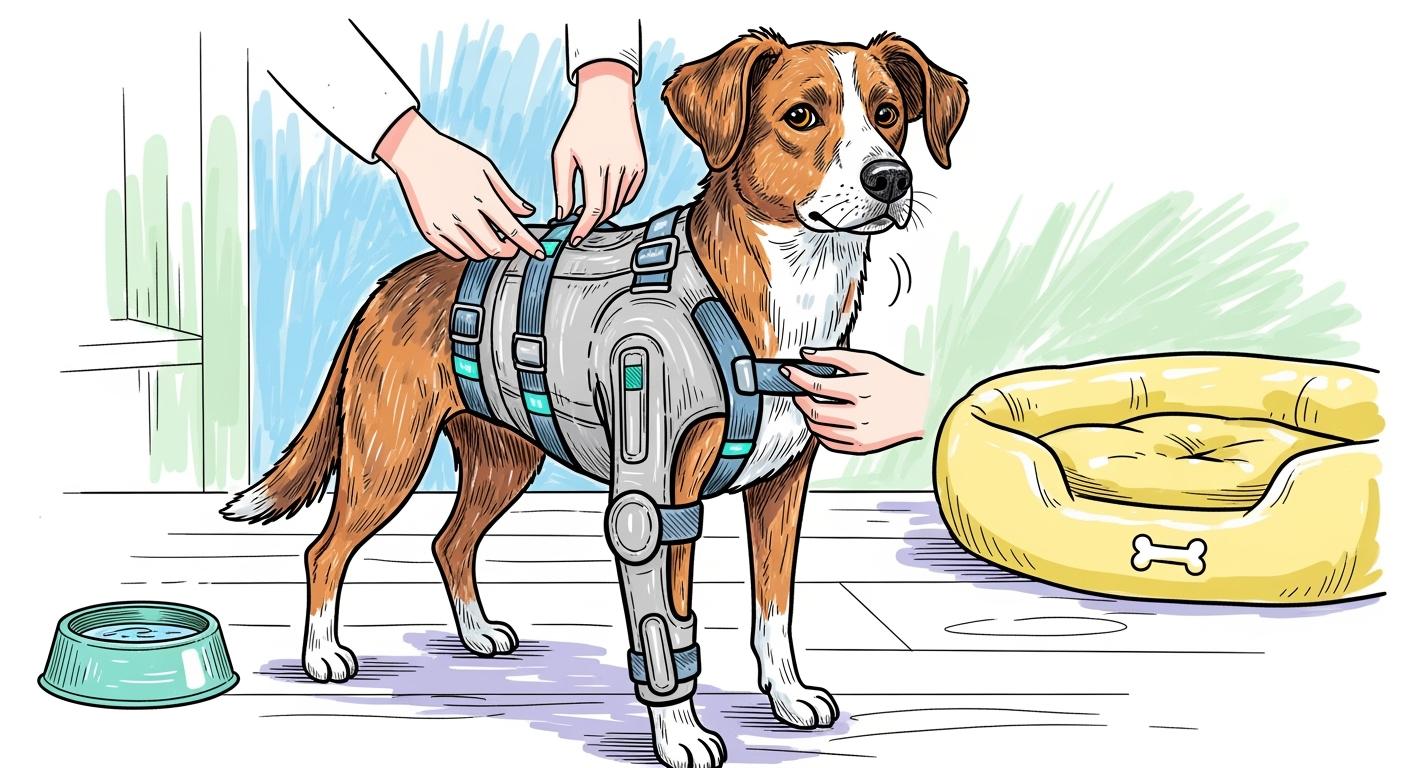
You want your dog’s brace to fit well for the best support and comfort. Start by preparing the brace and unfastening all straps. Place the side panels along your dog’s sides and connect them on the back. Secure the strap under the belly, making sure it feels snug but does not stop your dog from breathing easily. Fasten the neck strap so it sits firmly but does not press too hard. Next, place the half-belt over the chest and connect it. Check the fit to make sure nothing rubs or pinches the skin. Finish by wrapping the sleeves around the elbow and wrist, using the Velcro straps to hold them in place. Always check that the brace stays secure as your dog moves.
Break-in schedule
Your dog needs time to get used to wearing a shoulder brace. Start slow and build up the wear time each day. Here is a simple break-in plan:
Day 1: Wear for 30 minutes, 2–3 times.
Day 2: Wear for 1 hour, 2–3 times.
Day 3: Wear for 2 hours, 2–3 times.
Day 4: Wear for 3 hours, 2–3 times.
Day 5: Wear for 4 hours, 2 times.
Day 6: Wear for 6 hours.
Day 7: Wear for 8 hours.
Keep the brace off at night. Over the next week, increase wear time by about 25% every 3–4 days if your dog’s skin and walk look good. Your veterinarian’s protocol overrides general timelines.
Example A: Break-in math
On day 1, if you do three sessions of 30 minutes, your dog wears the brace for 90 minutes total. After two weeks, a 25% increase means about 112 minutes per day. This slow build helps your dog adjust safely.
Skin checks and rub prevention
You must protect your dog’s skin while using a brace. Make sure the brace fits well—not too tight or too loose. Wash your dog’s skin with a gentle cleanser before putting on the brace. Use a soft, breathable liner to reduce friction. After removing the brace, apply a light lotion to keep the skin healthy. Take breaks to let the skin breathe. Change strap positions sometimes to spread out pressure. Watch for redness, sores, or hair loss. Adjust the brace if you see any problems. Your veterinarian’s protocol overrides general timelines.
Remember, a brace supports your dog but does not heal tendons or ligaments by itself. Always put safety first.
Recovery plan and timelines
Rest and activity anchors
You want your dog to heal well. You need to follow a simple plan for rest and activity. Strict rest means your dog stays calm and does not move much. You use a leash for every walk. You do not let your dog run, jump, or play rough. Most dogs with biceps tenosynovitis need about 6 weeks of strict rest. Dogs with mild shoulder instability usually start with a 3-month period of careful activity before changing the plan.
Tip: Your veterinarian’s protocol overrides general timelines.
You can use these activity anchors to help your dog’s recovery:
Recovery Phase | Activity Anchor | Timeline |
|---|---|---|
Strict Rest | Leash walks only, no jumping | 6 weeks |
Post-op Guardrail | No running, jumping, rough play | 8 weeks |
Early Leash Walks | 5 minutes per potty trip | First 2 weeks |
Walk Progression | Build to 20 minutes, twice daily | By 4 weeks post-brace/splint |
You keep your dog on safe surfaces. You do not let your dog use stairs or walk on slippery floors. You use gates or barriers to block unsafe places. You check your dog’s skin and the brace fit every time you put it on or take it off.
Post-op protection phases
After surgery, you protect your dog’s shoulder with a brace and careful activity. You follow a post-op plan to keep your dog safe while healing. You use the brace for 4 weeks when your dog is awake. You take the brace off for sleeping and rest. You do not let your dog run, jump, or play rough for 8 weeks after surgery.
You watch for swelling, redness, or fluid at the cut. Mild redness can last 5–7 days. Mild clear or pink fluid can last 3–5 days. Swelling may show up around 2–5 days and go away by 10 days. You call your veterinarian if you see more fluid, more swelling, a bad smell, or the wound opens.
Safety Alert: Your veterinarian’s protocol overrides general timelines.
You schedule a check-up or suture removal at 11–14 days after surgery. You follow your veterinarian’s advice for cold packs, massage, or physical therapy.
Example B: Recovery calendar
Here is a simple calendar for strict rest and post-op care:
Week | Activity Plan | Notes |
|---|---|---|
Week 1–2 | Leash walks, 5 min per trip | No jumping, stairs, or play |
Week 3–4 | Leash walks, 10 min per trip | Brace on when awake |
Week 5–6 | Leash walks, 15 min per trip | Increase only if approved |
Week 7–8 | Leash walks, 20 min, twice daily | No running or rough play |
You keep your dog on a leash all the time. You do not let your dog off the leash. You use safe surfaces and avoid slippery floors.
Walking progression
You help your dog get stronger and feel better by managing walks. You start with short walks of 10–15 minutes, two or three times each day. You keep walks slow and steady. You use a leash for every walk. You do not go to busy or crowded places.
You add gentle play, like tug-of-war or fetch, to help your dog’s mind and body. You use swimming for easy exercise, especially for older dogs. You include physical therapy, massage, and gentle stretching to help your dog recover.
Short leash walks (10–15 minutes, 2–3 times daily)
Gentle play (tug-of-war, fetch)
Swimming for easy exercise
Physical therapy and massage
Gentle stretching for comfort
You use the brace as a helper in your dog’s rehab plan. You do not depend on the brace alone. You work with your veterinarian to change the plan as your dog gets better.
Printable Quick Reference Card
Dog Shoulder Recovery Quick Reference Card

- Strict rest for biceps tenosynovitis: 6 weeks
- Shoulder instability trial: 3 months
- Post-op guardrail: 8 weeks (no running/jumping/rough play)
- Brace wear after surgery: 4 weeks (awake only)
- Incision recheck/suture removal: 11–14 days
- Early leash walks: 5 minutes per trip
- Walk progression: build to 20 minutes, twice daily by 4 weeks post-brace/splint
- Break-in schedule: 30–60 min per session, 3–5 times/day; increase by 25% every 3–4 days
- Skin checks: every time brace is put on or removed
- Cold therapy: 10–15 min, 3–4 times/day for first 3 days (if approved)
- Call vet for: increasing discharge, worsening swelling, foul odor, wound opening
- Your veterinarian’s protocol overrides general timelines.
You print this card and keep it close. You share it with your veterinarian for review. You follow your veterinarian’s plan for the best results.
Comparing support tools
Brace vs harness vs sling
You have a few ways to help your dog’s shoulder. Each tool helps with different problems. A dog shoulder brace gives strong support and stops risky moves. Good braces use tough materials and soft padding. This makes them comfy and keeps them from slipping. A custom fit helps your dog move better and feel less pain. Cheaper braces use simple neoprene or nylon. These can feel rough or slip off.
Front-clip harnesses help you control your dog on walks. They give light support but do not hold the shoulder like a brace. Rear slings help the back legs, not the shoulder. They work best for hip or back leg problems.
Tip: Always check if the support tool fits well and feels good.
When harness is better
Sometimes a harness is better than a brace. If your dog only needs gentle help or has mild pain, a front-clip harness can guide movement. It does not squeeze the shoulder. Harnesses are easy to put on and adjust. They are good for dogs who do not like braces or have sensitive skin. Use a harness for short walks or to help your dog balance.
Rest and rehab are still very important for healing. You can use a harness with crate rest and careful activity. Your veterinarian’s plan is always most important.
Rehab and environment changes
You can help your dog heal by changing things at home. Use gates to block stairs and slippery floors. Give your dog soft bedding and keep the area quiet. Crate rest and careful activity are key for recovery. Braces help after surgery and stop new injuries. Add rugs or ramps to make moving safer and easier. These changes help your dog feel better and heal faster.
Note: Your veterinarian’s plan is always most important.
Support options for canine shoulder problems
Option | Best for | Limits | Owner workload | When to escalate |
|---|---|---|---|---|
Shoulder instability, arthritis | Does not heal tendons | Moderate | Severe pain, no weight bearing | |
Front-clip harness | Mild control, leash walks | Limited shoulder support | Low | Worsening limp, instability |
Strict rest + rehab | Early recovery, mild injuries | Needs supervision | High | No improvement in 2–4 weeks |
Meds plan | Pain management, arthritis | Does not stabilize joint | Low | Pain not controlled, side effects |
Surgery consult | Severe injury, failed recovery | Invasive, costly | High | Rapid decline, nerve signs |
You can use this table to pick the best help for your dog. Always ask your veterinarian before you change your plan.
Top mistakes to avoid
Using a dog shoulder brace can help your dog, but you must avoid common mistakes to get the best results. Many owners make errors with fit, activity, or communication. You can prevent these problems by learning what to watch for.
Fit errors
Not measuring your dog before buying a brace.
Fastening straps too tight or too loose.
Skipping daily checks for skin redness or sores.
Ignoring swelling or changes in your dog’s limb size.
Forgetting to adjust the brace as your dog moves or rests.
Not following the break-in schedule. Start with short sessions and increase time slowly.
Missing signs of chewing or scratching at the brace.
Tip: Check the fit every time you put the brace on or take it off. Your veterinarian’s protocol overrides general timelines.
Activity errors
Letting your dog run, jump, or play rough too soon.
Skipping leash walks or allowing off-leash activity.
Not using gates or barriers to block stairs and slippery floors.
Forgetting to clean the brace weekly.
Not using the brace daily as recommended.
Mistake | Why It Matters |
|---|---|
Too much activity | Can slow healing or cause pain |
No leash control | Increases risk of injury |
Dirty brace | Can cause skin problems |
Communication errors
Not telling your veterinarian about changes in your dog’s movement or pain.
Waiting too long to report redness, swelling, or open sores.
Not asking for help if your dog chews or escapes the brace.
Forgetting to share your home care plan with your veterinary team.
Not updating your vet if you change the brace or routine.
Remember: Your veterinarian’s protocol overrides general timelines. Always ask for help if you are unsure.
By avoiding these mistakes, you help your dog heal safely and stay comfortable with a dog shoulder brace.
Monitoring and reporting
Red flags checklist
You need to watch your dog closely when using a shoulder brace. Look for warning signs that mean your dog needs help. Use this checklist to spot problems early:
Will not walk or cannot put weight on the leg
Cries out or acts like pain is very bad
Swelling, redness, or open sores under the brace
Chews or scratches at the brace
Sudden change in how your dog moves or acts
Brace slips or does not fit right
Your veterinarian’s protocol overrides general timelines.
If you see any of these signs, stop using the brace and call your veterinarian. Clinics use checklists like this to catch problems early. This helps staff follow rules and keeps dogs safer.
Soreness vs pain
You should know the difference between soreness and pain. Soreness means your dog moves slower or seems tired after exercise. Pain means your dog limps, cries, or will not use the leg. Soreness gets better with rest. Pain needs quick help from your veterinarian.
Symptom | Soreness | Pain |
|---|---|---|
Movement | Slow, stiff, but walks | Limping, avoids walking |
Behavior | Tired, less playful | Whines, hides, restless |
Response | Improves with rest | Needs vet evaluation |
You need to check how your dog does with exercise. Not every exercise works for every dog. Sometimes you need to try different things to see what helps.
Therapeutic exercise and muscle strengthening help your dog get better. Injury prevention programs keep your dog healthy.
Recheck and refit timing
Check the brace fit and your dog’s skin every time you put the brace on or take it off. Plan a recheck with your veterinarian about one week after starting the brace. Clinics use this schedule to fix fit problems and help owners follow the plan.
Check skin and brace fit every day
Check fit and how your dog walks after one week
Tell your clinic if you see changes in movement or skin
Your veterinarian’s protocol overrides general timelines.
Clinic/Retailer Counseling Script Example:
"Check your dog's comfort and skin every day. If you see limping, swelling, or open sores, stop using the brace and call us. Plan a recheck in one week to check fit and progress. Your veterinarian’s protocol overrides general timelines."
Better monitoring helps your dog heal safely and keeps owners and clinics from making mistakes.
When picking a dog shoulder brace, look for good support and a proper fit. Make sure the brace feels comfortable and keeps your dog safe. Use the decision table and quick reference card to help you choose at home. Always ask your veterinarian before you change anything. Avoid mistakes so your dog can heal well. Your veterinarian’s plan is more important than general timelines. Print the quick reference card or show the decision table to your vet for the best care.
FAQ
How long should my dog wear a shoulder brace each day?
Start with 30–60 minutes, 3–5 times a day. Increase wear time by about 25% every 3–4 days if your dog’s skin and walk look good. Your veterinarian’s protocol overrides general timelines.
Can a shoulder brace heal my dog’s tendon injury?
A shoulder brace supports your dog’s shoulder and helps prevent risky movement. It does not heal tendons or ligaments by itself. Always follow your veterinarian’s advice for the best results.
What signs mean I should stop using the brace?
Stop using the brace if you see swelling, open sores, severe pain, or your dog cannot walk. Call your veterinarian right away. Your veterinarian’s protocol overrides general timelines.
Is a harness better than a brace for shoulder problems?
A harness helps with gentle control and balance. It does not support the shoulder joint like a brace. Use a harness for mild cases or if your dog dislikes braces.
How do I check if the brace fits correctly?
Check the fit every time you put the brace on or take it off. Make sure the straps are snug but not tight. Look for redness, slipping, or chewing. Adjust as needed for comfort and safety.
