
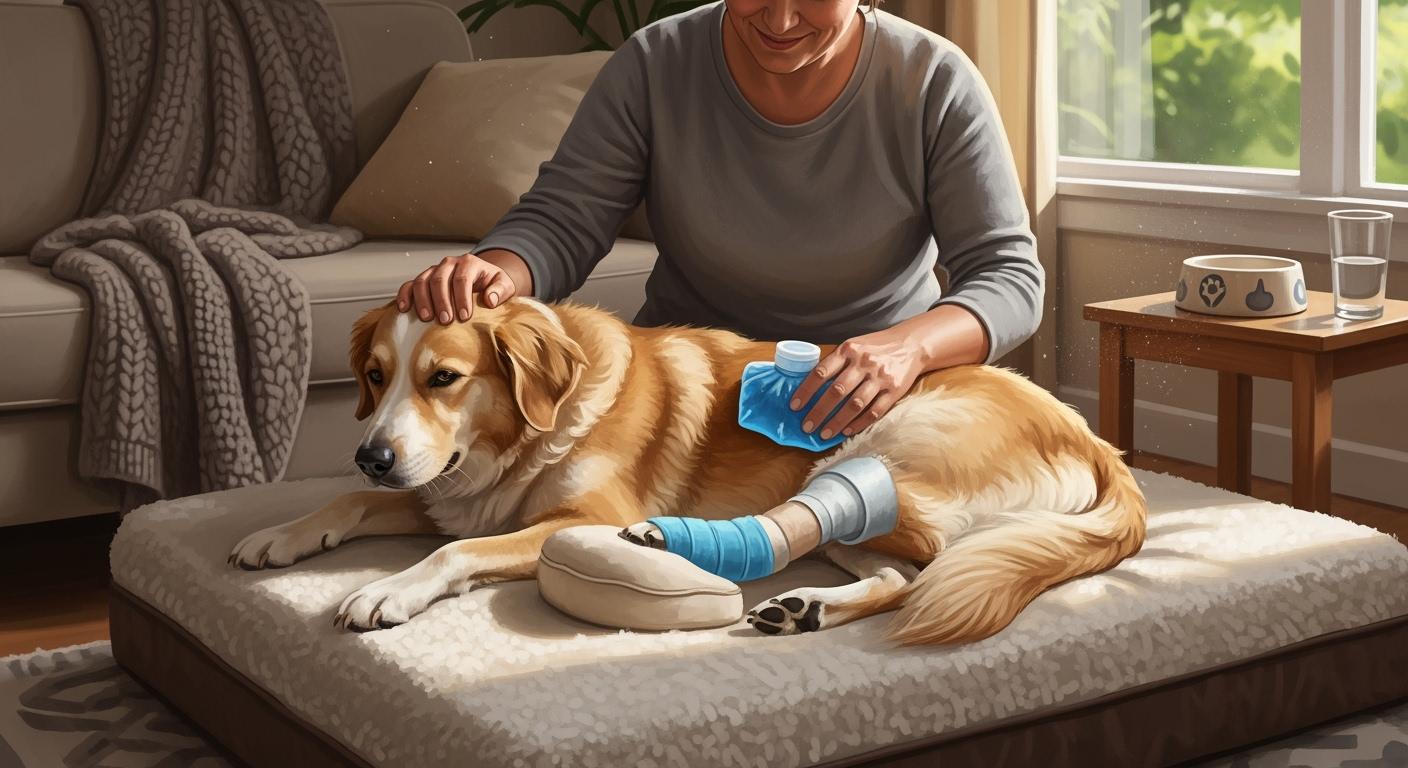
You can help your dog feel better at home. Use easy steps during dog ccl tear recovery. Swelling and pain often happen after a knee injury. Most dogs feel better with cold packs and gentle massage. Changing your dog’s activity also helps. Always follow your veterinarian’s care plan after surgery. Call the clinic if you see strange pain or swelling. This guide helps you at home. It also links to the main recovery timeline for you.
Key Takeaways
Put cold packs on your dog for the first three days after injury. This helps lower swelling and pain. Keep the cold pack on for 10 minutes each time. Do this three times a day. Make sure to take breaks between each use.
Watch your dog’s activity very carefully. Do not let your dog move too much. Too much movement can make swelling worse. It can also slow down healing.
Look at your dog’s incision two times every day. Check for signs of infection like redness or discharge. Call your vet if you see anything that worries you.
Use gentle massage and passive range of motion exercises. These help your dog feel better and improve blood flow. Start with short sessions. Only do this if your vet says it is okay.
Always give medicine the way your vet tells you. Never give your dog human pain medicine. Human medicine can hurt your dog.
Why pain and swelling matter in dog CCL tear recovery
Swelling and movement limits
Pain and swelling are common after a CCL injury. You may notice swelling around the knee, especially in the first few days. This swelling can make it hard for your dog to move the leg. If pain is not controlled, your dog may avoid using the leg. This can lead to muscle loss and make recovery harder. Dogs who do not use their injured leg often lose muscle strength. Weak muscles can make the knee less stable and increase pain. You want to help your dog stay comfortable so gentle movement is possible.
Note: Most swelling peaks in the first 2–3 days after injury or surgery. Mild swelling may last up to 7 days. Always check your vet’s discharge sheet for your dog’s specific plan.
If pain and swelling are not managed, your dog may show signs like limping, restlessness, or even withdrawal from family. Chronic pain can also lead to joint problems such as arthritis. Keeping your dog comfortable helps prevent these issues and supports a smoother dog ccl tear recovery.
Unmanaged pain can cause:
More discomfort and restlessness
Muscle atrophy from less movement
Higher risk of long-term joint problems
Overactivity and inflammation at home
Too much activity during dog ccl tear recovery can make swelling and pain worse. Dogs may want to move more as they start to feel better, but overactivity can slow healing. Inflammation in the knee can lead to more joint fluid, pain, and even damage to the ligament. If inflammation is not controlled, your dog may develop arthritis over time.
Overactivity can cause:
Lameness or sudden pain after a slip or jump
Delayed healing or no improvement in the leg
Problems with surgical hardware if present
You should always follow your vet’s advice about rest and activity. The main goal is to keep your dog comfortable and allow safe, controlled movement. If you notice new or severe pain, call your clinic for help.
What swelling is normal and when to worry
Expected swelling and bruising
You will likely see swelling and bruising around your dog’s knee after a CCL injury or surgery. This is a normal part of the healing process. Swelling often appears near the incision and may extend down the lower leg. You may notice bruising, which usually fades within one to two weeks. Most swelling peaks in the first two to three days and should start to improve after that. Mild swelling can last up to seven days. Bruising should not get worse after the first few days. If you see the swelling or bruising getting better each day, you are on the right track.
Normal signs include:
Mild swelling around the incision
Some bruising near the surgical site
Gradual improvement over the first week
Always check your vet’s discharge instructions for your dog’s specific plan. Every dog heals a little differently.
Signs of infection or setback
You need to watch for signs that may mean a problem. Swelling that gets worse, feels hot, or looks red can signal infection. If you see pus, a bad smell, or your dog seems in severe pain, call your clinic. A soft fluid pocket (seroma) that does not improve in three to five days also needs attention. Dogs may show less energy or refuse to use the leg if something is wrong. These signs can mean a setback in dog ccl tear recovery.
Tip: The goal is comfort and controlled movement, not pushing through pain. Always call your clinic if you are unsure.
Here is a simple table to help you decide what to do if you notice changes:
Symptom/Area | 🟢 Green (Expected) | 🟡 Yellow (Call Clinic) | 🔴 Red (Urgent Evaluation) |
|---|---|---|---|
Swelling trend | Mild, improving daily | Not improving after 3–5 days | Rapidly increasing |
Incision appearance | Clean, dry, mild bruising | Redness, mild oozing | Pus, gaping, bleeding |
Heat/odor/discharge | Cool, no odor | Warm, slight odor | Hot, strong odor, discharge |
Sudden refusal to use leg | Using leg as before | Limping more, hesitant | Won’t bear weight, cries out |
Appetite/energy changes | Normal eating, alert | Eating less, low energy | Stops eating, very lethargic |
If you see yellow or red signs, contact your veterinarian. Your dog’s comfort and safety come first. Always follow your surgeon’s instructions for the best results.
Cold packs and warm packs: safe use and timing
Cold and warm packs can help your dog feel more comfortable during dog ccl tear recovery. You can use these simple tools to manage pain and swelling at home. The right timing and method matter for safety and results. Always check your surgeon’s discharge instructions before starting any therapy.
Cold pack steps and safety
Cold packs work best in the first three days after injury or surgery. You should use a cold pack for 10 minutes, three times a day, with at least two hours between sessions. This routine helps reduce swelling and pain. Studies show that cold compression therapy can lower swelling as well as other methods like bandaging or electrical therapy after 72 hours. Cold packs are most helpful right after activity or a walk.
To use a cold pack safely:
Wrap the pack in a towel to protect your dog’s skin.
Place the pack gently over the swollen area, not directly on the incision.
Set a timer for 10 minutes. Do not go over 15 minutes.
Wait at least two hours before the next session.
Tip: Always check your dog’s skin after each session. If you see redness or your dog seems uncomfortable, stop and call your clinic.
Common mistakes with cold packs include leaving them on too long or placing them directly on the skin. These errors can cause skin damage or frostbite. Never use ice packs without a barrier. Never let your dog chew or play with the pack.
When to use warm packs
Warm packs can help after the first three days, but only if swelling is going down. You can start warm packs on day four. Use them for 10 minutes, three times a day, with at least two hours between sessions. Warm packs work well before a walk to loosen muscles and improve comfort. Always wrap the warm pack in a towel to prevent burns.
Heat therapy can cause burns if used without care. Check the temperature with your hand before placing it on your dog. The pack should feel warm, not hot.
Note: If swelling gets worse or your dog shows new pain, stop using warm packs and call your vet.
Cold vs Warm Decision Table
Use this table to decide which therapy fits your dog’s needs. Always follow your vet’s advice first.
Situation | Cold Pack Helps (🧊) | Warm Pack Helps (🌡️) | Avoid Both & Call Vet (⚠️) |
|---|---|---|---|
First 3 days after injury/surgery | Yes, 10 min, 3x/day | No | If severe pain or skin reaction |
Day 4–7, swelling improving | After walks or activity | Before walks, 10 min, 3x/day | If swelling worsens or new redness |
Swelling not improving | Yes, but call clinic | No | Yes, call clinic |
Skin is red, hot, or blistered | No | No | Yes, call clinic |
Signs of infection (pus, odor) | No | No | Yes, call clinic |
Goal: Comfort and controlled movement. Never push through pain. Call your clinic if you see yellow or red signs in the table.
You play a key role in your dog’s healing. Cold and warm packs can make a big difference when used safely. Always watch for changes and ask your vet if you have questions.
Movement and massage for swelling control
Short walks and slip prevention
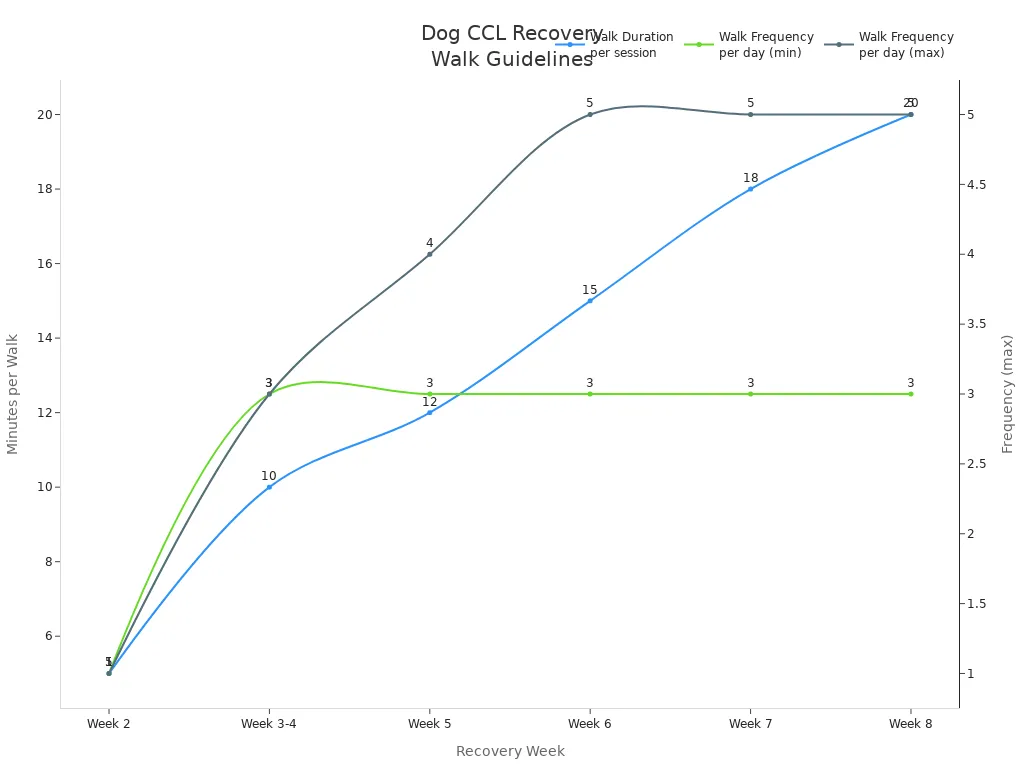
Short, controlled walks help your dog recover safely. You should use a leash every time your dog goes outside. This prevents sudden movements and slips that can slow healing. Start with short walks for bathroom breaks during the first week. Increase the walk time as your dog improves. The table below shows a typical schedule for walks during dog ccl tear recovery:
Week | Duration of Walks | Frequency of Walks |
|---|---|---|
1 | Short walks for elimination only | N/A |
2 | 5 minutes | 1 time per day |
3-4 | 10 minutes | 3 times per day |
5 | 12 minutes | 3-4 times per day |
6 | 15 minutes | 3-5 times per day |
7 | 18 minutes | 3-5 times per day |
8 | 20 minutes | 3-5 times per day |
Always walk your dog on non-slip surfaces. Use a harness for extra support if needed. Watch for signs of pain or limping. If you notice any, stop and call your clinic.
Gentle PROM and massage
Passive range of motion (PROM) and massage help reduce swelling and improve comfort. PROM means you gently move your dog’s leg through its natural range. Start with about 10 gentle repetitions, 2–3 times a day, if your vet approves. Massage the thigh muscles for 2–3 minutes before and after PROM. Avoid touching the incision.
Benefits of PROM and massage include:
Better blood flow and less swelling
Improved joint movement
Less scar tissue
Studies show that dogs who receive PROM and massage have better muscle size and joint movement after surgery. These techniques support healing and comfort.
Massage should feel gentle and soothing. Always check your dog’s reaction. If your dog seems uncomfortable, stop and ask your vet for advice.
Tip: For the first week, you may do up to 9 cold pack sessions and 14 incision checks. Use this math to plan your daily routine.
Owner Routine Checklist (Morning/Evening):
Leash walk (5–10 minutes, as allowed)
PROM (10 reps, 2–3 times/day)
Massage thigh muscles (2–3 minutes)
Cold or warm pack (as directed)
Incision check (2 times/day)
Record pain, swelling, and activity
Your main goal is comfort and controlled movement. Always follow your surgeon’s instructions first. If you see new pain or swelling, call your clinic.
Medication safety and tracking comfort
Vet-prescribed meds only
Only give your dog medicine from your veterinarian. Do not give your dog human pain pills or NSAIDs. Human drugs like ibuprofen or aspirin can hurt dogs badly. These can cause stomach ulcers, kidney problems, or liver damage. If your dog eats human medicine, call your clinic fast. Tell them the name, amount, and when your dog took it. This helps your vet know what to do.
Vets often give NSAIDs like Rimadyl, Metacam, or Prevocox for pain. These help with pain and swelling but can upset the stomach or liver. Your vet may want blood tests to check for problems. Sometimes, opioids like Tramadol or Fentanyl are used after surgery. Gabapentin helps with pain, and Amantidine is for long-term pain. Always use the dose your vet tells you.
Safety Tip: Do not use store-bought medicine unless your vet says it is okay. Always ask your clinic before giving new medicine or supplements.
Medication Safety Do/Don’t Table
Do ✅ | Don’t ❌ |
|---|---|
Use only vet-prescribed medications | Give human NSAIDs (ibuprofen, aspirin) |
Monitor for side effects | Change dose without vet approval |
Administer with food if advised | Skip doses or double up |
Keep a medication log | Use expired or leftover meds |
Daily symptom log
Write down how your dog feels every day. Track pain, swelling, and how much your dog moves. Note if your dog eats less or seems tired. Record when you give medicine and any side effects. This log helps your vet change the plan if needed.
Tip: Go to all follow-up visits. Bring your log to show your vet.
Supplements like glucosamine and green-lipped mussel can help joints. Green-lipped mussel lowers swelling and helps cartilage. Many vets suggest these with rehab and weight control.
Joint Supplement Support
Glucosamine keeps cartilage healthy.
Green-lipped mussel lowers swelling and helps joints heal.
These work best with exercise and good food.
Here is the Pain vs Complication: Traffic-Light Table for quick reference:
Symptom/Area | 🟢 Green (Expected) | 🟡 Yellow (Call Clinic) | 🔴 Red (Urgent Evaluation) |
|---|---|---|---|
Swelling trend | Mild, improving daily | Not improving after 3–5 days | Rapidly increasing |
Incision appearance | Clean, dry, mild bruising | Redness, mild oozing | Pus, gaping, bleeding |
Heat/odor/discharge | Cool, no odor | Warm, slight odor | Hot, strong odor, discharge |
Sudden refusal to use leg | Using leg as before | Limping more, hesitant | Won’t bear weight, cries out |
Appetite/energy changes | Normal eating, alert | Eating less, low energy | Stops eating, very lethargic |
Your main goal is to keep your dog comfortable and moving safely. Always follow your surgeon’s instructions first. Call your clinic if you see yellow or red signs in the table.
Gear and routines for comfort
Support for walks and potty breaks
You can make walks and potty breaks safer for your dog by using a rear support harness. A good harness fits comfortably and does not pinch your dog’s shoulders. Look for a Y-shaped front design. This shape avoids pressure on the shoulders, which helps your dog move naturally during recovery. The GingerLead Harness is one example. It has padding and adjustable straps. You can use it to help your dog walk, get in and out of the car, or move during physical therapy. The harness attaches to your dog’s collar or regular harness for extra stability. Using a harness spreads your dog’s weight evenly. This support helps your dog walk with less pain and lowers the risk of slips or falls.
Some dogs may also benefit from a knee brace. A brace gives extra support and helps your dog feel more comfortable. It does not heal the torn ligament but can make daily activities easier, especially for smaller dogs or mild cases.
Tip: Always use a leash and harness for all walks and bathroom trips. This keeps your dog safe and prevents sudden movements.
Lick-prevention and incision checks
Protecting the incision is important during dog ccl tear recovery. Dogs often try to lick or chew at the incision, which can cause infection or slow healing. An e-collar (cone) is the most common way to stop licking. You can also use soft collars or inflatable collars if your vet approves. Make sure the collar fits well and your dog cannot reach the incision.
You should check your dog’s incision twice a day. Look for redness, swelling, pain, or pus. If you see any of these signs, call your clinic. Here is a quick guide:
Care Activity | Frequency | Key Points |
|---|---|---|
Inspect incision for issues | 2 times daily | Watch for redness, swelling, pain, or discharge |
Recheck with your vet | 10–14 days | Schedule a follow-up to ensure proper healing |
Call your clinic if you notice:
Pus or bleeding
Foul smell
Swelling that gets worse after improving
Clinic Counter Script:
“I am checking my dog’s incision twice a day and using a harness for support. I noticed some redness and mild swelling. Should I bring my dog in for a recheck?”
You can find more details and a week-by-week plan in the main recovery timeline post. Always follow your surgeon’s instructions for the best results. Your main goal is comfort and controlled movement, not pushing through pain.
You play a vital role in your dog’s healing. Gentle, consistent care at home supports the best outcome for dog ccl tear recovery. Most pain and swelling improve with time, but you should always call your vet if you notice changes or feel unsure. Use checklists and tables to guide your daily routine.
Stay patient and follow your recovery plan. Structured home care helps manage long-term joint health and reduces the risk of setbacks.
Watch for signs like swelling, lameness, or trouble rising.
Keep your dog safe and comfortable.
Always follow your surgeon’s instructions first.
FAQ
How long does swelling usually last after a dog CCL tear?
You will see the most swelling in the first two to three days. Mild swelling can last up to seven days. If swelling does not improve or gets worse, call your clinic for advice.
Can I give my dog human pain medicine for a CCL injury?
Never give your dog human pain medicine. Drugs like ibuprofen or aspirin can cause serious harm. Always use medications prescribed by your veterinarian. Call your clinic if you have questions about pain control.
What should I do if my dog keeps licking the incision?
Use an e-collar or a vet-approved alternative to prevent licking. Check the incision twice daily for redness or discharge. If you see swelling, pus, or bleeding, contact your clinic right away.
Is it safe to walk my dog during recovery?
Short, controlled leash walks help your dog heal. Start with bathroom breaks only, then slowly increase walk time as your vet allows. Avoid slippery surfaces and sudden movements. Stop if you notice pain or limping.
When should I call the clinic about pain or swelling?
Call your clinic if you see swelling that does not improve, new redness, heat, pus, or severe pain. Always follow your surgeon’s discharge instructions first. Your main goal is comfort and controlled movement.
