
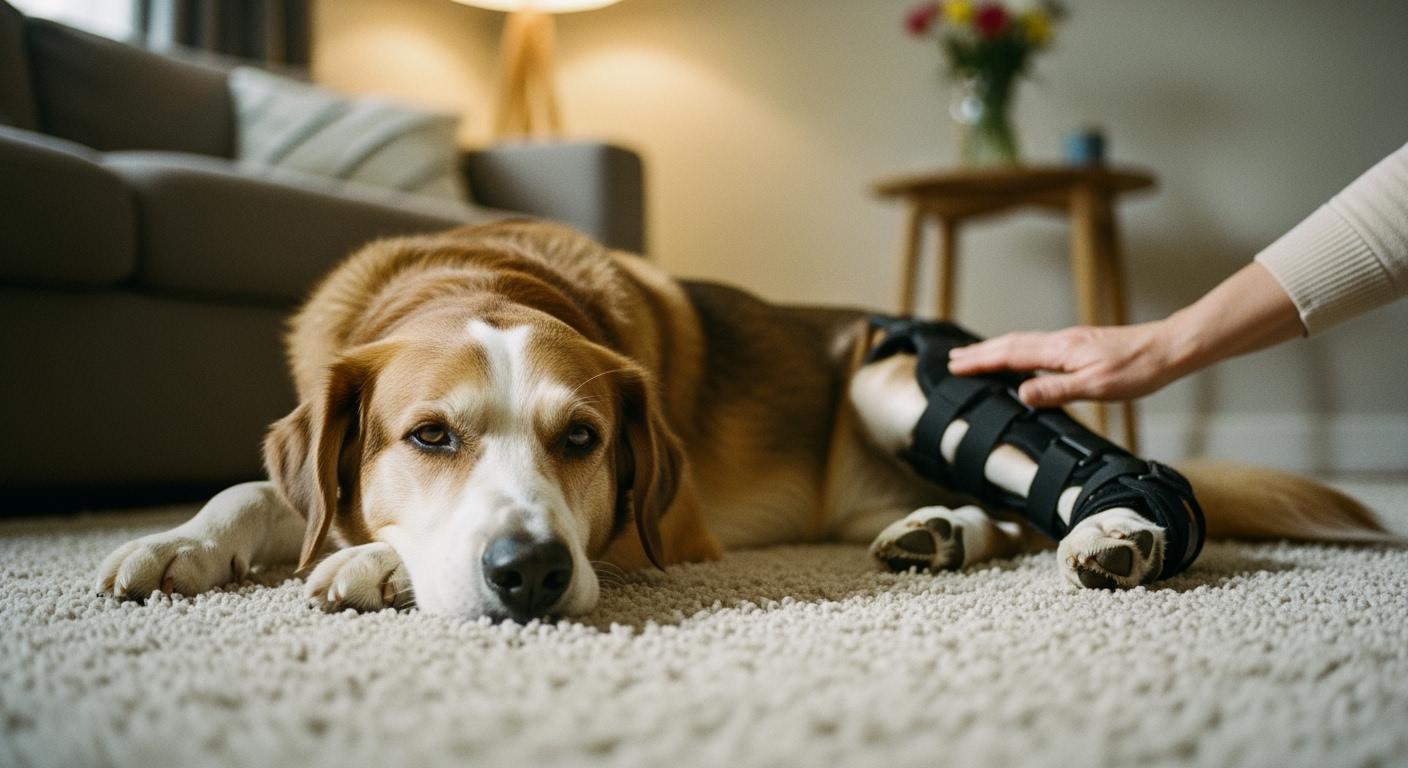
A dog hock brace gives support to the ankle joint after an Achilles tendon injury. You might see signs that a dog needs a leg brace. These signs include sudden lameness, swelling, limping on the back leg, or strange hock movement. These changes can hurt your dog’s health and comfort. Acting early is important. Always talk to a veterinarian to pick the right brace and help your dog heal.
Sudden lameness starts
Swelling in the hurt leg
Limping on the back leg
Strange movement of the hock joint
Tip: Your vet may change advice to keep your dog safe.
Key Takeaways
Look for signs like limping or swelling. Finding problems early can stop more harm. It also helps your dog get better faster.
Ask your vet about the best hock brace. Some injuries need more support than others.
Let your dog get used to the brace slowly. This helps your dog feel comfortable. It also lowers the chance of skin issues.
Watch your dog for changes in how they walk or feel. Tell your vet right away if you see anything wrong.
Make your home safe with non-slip floors and ramps. This helps your dog walk safely while healing.
Dog Achilles Tendon Injury Signs and Causes
Dropped Hock and Crab Claw Stance
After an Achilles tendon injury, your dog may walk or stand oddly. Some dogs have a dropped hock stance. The back leg sinks down, and the toes and metatarsals touch the ground. Other dogs show a crab claw stance. Their toes curl down, and the digits may knuckle. These changes mean the tendon is weak or hurt. If you see these signs, call your veterinarian right away.
Safety Tip: If your dog’s walk or stance changes fast, it could be serious. Acting quickly can stop more harm.
Traumatic vs Chronic Injury in Dogs
Achilles tendon injuries happen in two main ways:
Traumatic injuries: These happen from a cut, hard hit, or strong stretch. Any dog breed can get this injury.
Atraumatic injuries: These build up slowly. Doing the same motion many times, health problems like hypothyroidism, or immune issues can cause them. Labrador Retrievers and Doberman Pinschers get this injury more often.
Feature | Traumatic Injury | Chronic Injury |
|---|---|---|
Cause | External trauma (laceration) | Tendon weakening (degeneration) |
Presentation | Plantigrade walking | Thickened tendon on touch |
Treatment | Surgical repair often needed | Support during healing |
If the tendon tears fast, you may see plantigrade walking. Chronic injuries often make the tendon feel thick when you touch it.
Early Mistakes and the Role of Dog Hock Braces
Waiting too long for help can make things worse. Some owners let their dog rest without support, but this can cause tendon gapping or bad healing. A dog hock brace keeps the joint steady and helps it stay in line. Your veterinarian will tell you when and how to use the brace. Always listen to their advice, since every dog and injury is different.
Note: Your vet may change the recovery plan as your dog heals.
Dog Hock Brace: Functions and Limitations
A dog hock brace helps your dog heal after Achilles tendon injuries. This device keeps the hock joint steady and supports the hurt area. Dog leg braces come in many styles. Each style has its own good points and limits. Knowing about the types of dog braces helps you make safe choices for your pet.
Dog Leg Braces: Soft, Semi-Rigid, and Rigid Types
Dog leg braces are soft, semi-rigid, or rigid. Each type gives a different amount of support. Soft braces help with mild injuries. They feel comfy and give gentle pressure. They do not control joint movement much. Semi-rigid braces give more support and help with rehab. Rigid braces, like custom braces, casts, and splints, give the most support. These are for bad injuries or after surgery when the joint must stay still.
Small dogs may use a knee brace for sprains or small strains. For worse injuries, semi-rigid or rigid braces work better. These braces use strong materials and sometimes have hinges for safe movement. Custom braces fit your dog’s leg and injury. Picking a dog leg brace depends on your dog’s injury, size, and how active they are.
Tip: Always ask your vet which brace is best for your dog. Your vet may change the plan as your dog gets better.
When Dog Hock Braces Support Healing
Dog hock braces help in many ways:
Support and stabilization: The brace keeps the hock joint steady and stops bad movement.
Pain reduction: The brace stops painful moves and helps your dog feel better.
Accelerated healing: The brace holds the joint in a safe spot so the tendon heals faster.
Prevention of further injury: The brace protects the area if your dog hurt their ankle before.
Mobility improvement: Your dog may walk better and feel less pain.
You use a dog hock brace for partial tears, long-term tendon problems, or after surgery. Dog leg braces help your dog feel better, move safer, and lower the chance of getting hurt again. You must follow your vet’s advice for using the brace and for activity limits.
Immobilization, Surgery, and Other Options
Dog leg braces are one way to help Achilles tendon injuries. Sometimes, your vet may use a cast or splint to keep the leg still. Surgery may be needed for big tears or full ruptures. Each choice has its own healing time and risks.
A knee brace for small dogs helps with mild injuries. Bad injuries need rigid braces or surgery. Keeping the leg still does not always change the risk of problems or healing time. Surgery often works better, especially if done soon. Your vet will help you pick the best choice for your dog.
Intervention Type | Outcome Description |
|---|---|
Surgical Repair | Usually gives good results. Recovery takes about 20 weeks. Early surgery works best. |
Immobilization | Casts, splints, or fixators. No big difference in problems or healing time. |
Orthotic Bracing | Used for partial tears or long-term cases. Helps with comfort and movement. Best for dogs who cannot have surgery. |
Note: Your vet may change the treatment plan as your dog heals.
Table: Dog Leg Brace Types and Uses
Here is a quick look at dog leg braces and ways to keep the leg still:
Type | Best Use | Limits | Owner Workload | Risks | Recovery Phase |
|---|---|---|---|---|---|
Soft Wrap | Mild sprains, comfort | Not much control | Easy to use | May slip, low support | Early/mild injury |
Semi-Rigid Brace | Medium injuries, rehab | Needs careful fitting | Medium | Pressure spots, fit issues | Rehab phase |
Rigid Brace | Bad injuries, after surgery | Bulky, less comfy | High | Skin sores, chewing | After surgery |
Splint/Cast | Full immobilization | No movement allowed | High | Skin problems, infection | First weeks after repair |
Post-Op Immobilizer | After surgery | Not for active dogs | Very high | Problems if used wrong | First 6–12 weeks |
Step-by-Step: Brace Selection and Fitting
Ask your vet to check your dog’s injury.
Measure your dog’s leg for the right brace.
Pick the brace type based on injury and activity.
Fit the brace with help from your vet or rehab team.
Check your dog’s skin and comfort each time you use the brace.
Change the brace or plan as your dog heals.
Safety Alert: Watch for swelling, sores, or changes in how your dog walks. Stop using the brace and call your vet if you see problems.
Buying a dog leg brace can help your dog heal, but you must use it the right way. Always follow your vet’s advice and check your dog’s progress often. Dog leg braces work best when you use them as part of a full recovery plan.
Veterinary Assessment and Treatment Pathways
Exam and Imaging for Dog Achilles Injuries
If your dog hurts its back leg, the vet will check it. They look for swelling and pain. They watch how your dog stands and walks. Next, the vet may use imaging tools. Ultrasonography helps the vet see if the Achilles tendon is torn or strained. It also helps them watch healing over time. MRI shows clear pictures of tendon tears and nearby tissues. CT scans are best for bone injuries. They do not show soft tissue well. The vet uses these tests to find the problem and pick the best treatment.
Imaging Technique | Effectiveness |
|---|---|
Ultrasonography | Finds tendon injuries, tracks healing, shows suture material after repair |
MRI | Gives detailed images of tendon tears and nearby structures |
CT | Best for bone injuries, less useful for soft tissue |
External Support: Casts, Splints, Orthotics
The vet may choose different supports for your dog. Casts are hard and protect the tendon early on. Splints let the leg move a little. This can help the tendon heal stronger and stop joint stiffness. Orthotic braces hold the joint steady and keep tension off the tendon. The vet picks the support based on your dog’s activity, injury type, and how much help is needed. Sometimes, a dog starts with a cast and later uses a brace.
Casts: Hard, good for early healing and active dogs.
Splints: Let some movement, help stop joint stiffness.
Orthotic braces: Custom fit, help healing, protect the tendon.
Tip: The vet will change the plan as your dog gets better.
Table: Severity-to-Support Decision Guide
Here is a simple guide to help you know what to do at home and what support the vet may suggest for a 55 lb dog:
What You See at Home | Likely Concern | What to Do Today | Typical Support Discussed |
|---|---|---|---|
Sudden lameness, dropped hock | Possible tendon rupture | Call your veterinarian | Cast, splint, or rigid brace |
Mild limp, swelling | Partial tendon injury | Limit activity, call vet | Semi-rigid or custom brace |
Toes curled, crab claw stance | Chronic tendon problem | Schedule vet visit | Orthotic brace, rehab support |
Open wound, bleeding | Severe injury | Seek urgent care | Cast, surgery, or immobilizer |
Note: The vet may change the plan as your dog heals and gets stronger.
Fitting and Introducing a Dog Hock Brace
Measurement and Fitting Steps
You want the brace to fit your dog’s leg correctly. Follow these steps for a safe and comfortable fit:
Measure the vertical length of your dog’s leg to see how much coverage the brace needs.
Measure the leg’s circumference just above the hock joint.
Measure the circumference just below the hock joint.
Keep your dog calm and gently position the brace on the leg.
Secure the middle strap first, then fasten the upper and lower straps.
Make sure the brace feels snug but leaves space for two fingers between the brace and the skin.
Let your dog walk a few steps to check comfort and fit.
Start with short wearing times and increase gradually.
Remove the brace during sleep.
Watch for signs of poor fit and contact your veterinarian if you notice problems.
Tip: Your vet may adjust these steps for your dog’s needs.
Break-In Schedule for Dog Leg Braces
Introduce the brace slowly to help your dog adjust and prevent skin problems. Use this break-in schedule:
Day 1: Wear for 30 minutes, 2–3 times.
Day 2: Wear for 1 hour, 2–3 times.
Day 3: Wear for 2 hours, 2–3 times.
Day 4: Wear for 3 hours, 2–3 times.
Day 5: Wear for 4 hours, 2 times.
Day 6: Wear for 6 hours.
Day 7: Wear for 8 hours.
Increase up to 12 hours a day, but always remove the brace at night.
For example, you might start with 30–60 minutes, 3–5 times a day, and increase by about 25% every 3–4 days over two weeks. Your vet may change this plan.
Skin Checks and When to Stop
Check your dog’s skin every time you remove the brace. Look for redness, swelling, sores, or hair loss. If you see any of these signs, stop using the brace and call your veterinarian. Never ignore changes in your dog’s walk or comfort.
Safety Alert: If you notice pain, swelling, or open wounds, stop using the brace and get help from your vet.
Checklist: Safe Fitting and Daily Care
Measure and fit the brace as directed.
Follow the break-in schedule.
Check your dog’s skin daily.
Remove the brace at night.
Watch for changes in walking or comfort.
Contact your vet if you see problems.
Note: Your vet may adjust the fitting and care plan for your dog.
Recovery Timeline for Dogs with Achilles Injuries
High-Risk First Weeks
The first three weeks are very important. Your dog must rest a lot and be watched closely. The tendon can gap or get too much stress now. You need to use the brace or cast your vet suggests. Keep your dog from moving too much. Do not let them use stairs, run, or jump. Your vet may want to see your dog every week to check healing and change the plan.
Safety Tip: Always listen to your vet. If you see swelling, pain, or changes in walking, call your vet right away.
Controlled Walking and Loading
After the first weeks, you can start short walks. Use a leash for five minutes, three times each day. Keep your dog on the leash all the time. Do not let them run, jump, or climb. Moving slowly helps keep muscles strong and stops stiffness. Your vet may show you gentle rehab moves, like slow sit-to-stand or walking on flat ground. Use gates to block stairs and slippery floors.
Do not attempt:
Off-leash play
Stairs without supervision
Fast movements or roughhousing
Add more activity slowly as your dog gets better. Your vet will help you with each step.
Return to Normal or Sport
Most dogs need six to twelve weeks of less activity before normal walks. Full healing and going back to sports or hard running can take up to a year. The injury type and how bad it is change the timeline. Some dogs wear a brace for extra help during play or sports. Your vet will check your dog’s strength and movement before letting them do more.
Note: Every dog heals differently. Your vet may change the plan as your dog gets better.
Table: Recovery Timeline by Injury Severity
Injury Severity | Recovery Time |
|---|---|
Mild strain/sprain | Weeks |
Tear/rupture | 4–12 months |
How your dog heals depends on the injury and how well you follow the plan. Rehab and slow loading help your dog heal safely.
Home Setup for Safe Dog Recovery
Flooring, Ramps, and Stairs
You can make your home safer for your dog by looking at the floors and paths your pet uses every day. Slippery floors increase the risk of falls. Place non-slip mats or rugs in areas where your dog walks. If your dog needs to go up or down, ramps are often easier than stairs, especially for larger dogs or those with limited mobility. Ramps reduce strain on the healing leg and help prevent reinjury. For smaller or more agile dogs, stairs may help build muscle, but always check with your vet first. Think about where your dog needs to go and plan safe routes.
Tip: Always ask your veterinarian before making big changes to your home setup.
Potty Breaks and Leash Handling
A clear potty routine helps your dog feel secure and lowers stress. Use a short leash when you take your dog outside. This gives you better control and helps prevent sudden moves that could harm the healing leg. Take your dog out at the same times each day and use the same spot for potty breaks. This routine supports both comfort and safety.
Use a short leash for control.
Stick to a regular potty schedule.
Choose a safe, easy-to-reach potty area.
Crate and Rest Strategies
Crate rest is important for recovery. Choose a crate or pen that lets your dog stand, turn, and lie down comfortably. Use supportive bedding, such as an orthopedic bed, to cushion joints and the injured area. Keep your dog’s mind active with puzzle toys or scent games. Start crate training before surgery if possible, so your dog feels safe and calm during recovery. Always use non-slip surfaces inside the crate.
Note: Short, supervised leash walks and gentle play can help maintain your dog’s mental health during recovery.
Checklist: Home Safety Modifications
Place non-slip mats on all walking paths.
Use ramps for easier access when needed.
Block off stairs unless your vet says they are safe.
Keep a regular potty and feeding schedule.
Use a crate or pen with supportive bedding.
Provide mental enrichment with safe toys.
Communicate with your vet about any changes or concerns.
Your vet may adjust these recommendations based on your dog’s needs.
Monitoring and Reporting to Your Vet
Red-Flag Checklist for Dog Hock Braces
You need to watch for warning signs while your dog uses a brace. Some problems mean you should stop using the brace and call your vet right away. Look for these red flags:
Sudden change in how your dog stands, like a dropped hock or curled toes
Sharp or sudden pain, yelping, or limping that gets worse
Swelling, cold toes, or a bad smell near the brace
Open wounds, sores, or pressure spots under the brace
Chewing at the brace or bandage that you cannot stop
If you see any of these signs, remove the brace and contact your veterinarian as soon as possible.
Normal vs Abnormal Progress Signs
You want to know if your dog is healing well. Normal progress means your dog feels better and moves more easily. Abnormal signs mean you need to call your vet. Use this table to help you track changes:
Stage | Description |
|---|---|
1 | Pain only after activity, goes away quickly |
2 | Pain during activity but still moves well |
3 | Pain during activity that makes movement hard |
4 | Pain even at rest, trouble moving |
5 | Cannot walk or stand, possible tendon rupture |
Other abnormal signs include sharp pain, a popping sound, or your dog not able to rise on its toes. Swelling, tightness, or pain in the back of the ankle also need attention.
Follow-Up and Adjustment Schedule
You should follow a regular schedule for check-ins and adjustments. Your vet will guide you, but a typical plan looks like this:
Start with short brace sessions, about 30 minutes, 2–3 times a day.
Increase wear time each day, adding about 30–60 minutes per session.
By the end of the first week, your dog may wear the brace for up to 8 hours a day.
Always remove the brace at night.
Schedule a recheck with your vet about one week after starting the brace.
Keep all follow-up visits and report any changes or concerns.
Your vet may adjust this schedule based on your dog’s needs and progress.
A dog hock brace can help your pet recover from Achilles tendon injuries. You should always work with your veterinarian for diagnosis, brace selection, and follow-up care. Follow the recovery plan and watch for any changes. If you have concerns, contact your vet right away. With your support and your vet’s guidance, your dog has a good chance to heal and return to a happy life.
Remember, your vet may adjust these steps for your dog’s needs.
FAQ
How do I know if my dog needs a hock brace?
Watch for limping, swelling, or a dropped hock. If your dog stands with curled toes or shows pain, you should contact your veterinarian. Your vet will decide if a brace is right.
Can my dog sleep with the hock brace on?
Remove the brace at night unless your vet says otherwise. This helps prevent skin problems and lets your dog rest comfortably. Always check with your veterinarian for special instructions.
How often should I check my dog’s skin under the brace?
Check your dog’s skin every time you remove the brace. Look for redness, swelling, or sores. If you see any problems, stop using the brace and call your vet.
What activities are safe during recovery?
Use leash walks on flat ground. Avoid stairs, running, or jumping. Keep your dog’s activity low until your vet approves more movement. Your vet may adjust these guidelines.
What should I do if my dog chews at the brace?
Try using a soft cone or distraction toys. If chewing continues, remove the brace and contact your veterinarian. Chewing can cause injury or damage the brace.
