
A scalable brace program needs a documented fit process, clear handoff materials, and traceable quality feedback.
A canine rehabilitation brace program should be evaluated as more than a textile product with a size chart. The brace, measurement method, fitting instructions, clinic handoff, labeling, and complaint process all shape whether the product can be used consistently. For a brand, distributor, or clinic group, those operating details matter before a quotation becomes a purchase order.
This guide provides a B2B framework for reviewing fit, comfort, and safety controls. It does not prescribe a brace or rehabilitation plan for an individual dog. Product selection and use should remain within the buyer’s intended-use policy and, where appropriate, veterinary oversight.
Start with the program, not the sample
A well-finished sample can still fail commercially if nobody can explain who should fit it, how sizes are selected, what acceptable placement looks like, or how a problem is escalated. Before comparing materials and prices, define the complete use path:
- Who identifies the appropriate brace category?
- Who takes and verifies the measurements?
- Who performs or checks the first fitting?
- What information follows the product to the clinic or end user?
- How are fit issues, product defects, and adverse events separated and recorded?
The answers will differ between a veterinary-distribution program and a general pet-retail line. That difference should influence the product claim, packaging, training material, and support model—not only the sales channel.
1. Match the support zone to the product structure
“Canine rehabilitation brace” is a broad commercial term. Knee, hock, carpal, elbow, hip, and back products use different anchor points and cannot share one universal fit rule. A buyer should document the intended body region, coverage, joint clearances, strap locations, and expected adjustment range for each model.
Review whether structural components remain where the specification intends during standing and controlled movement. A hinge, splint, reinforced panel, or compression zone placed incorrectly cannot be corrected by tighter straps. If the supplier cannot translate the product concept into measurable locations and finished dimensions, approval remains subjective.
2. Build a repeatable measurement and sizing protocol
A size chart is only as reliable as the method behind each number. Define anatomical landmarks, posture, units, tape position, and tape tension. Use diagrams or photographs that match the shipped product. If two measurements point to different sizes, the instructions should state which measurement controls selection and when the case requires review.
GaitGuard’s guide to measuring a dog for a leg brace explains the collection process. For a commercial program, test those instructions with people who did not help write them. Record their measurement variation, questions, and incorrect interpretations before printing packaging.
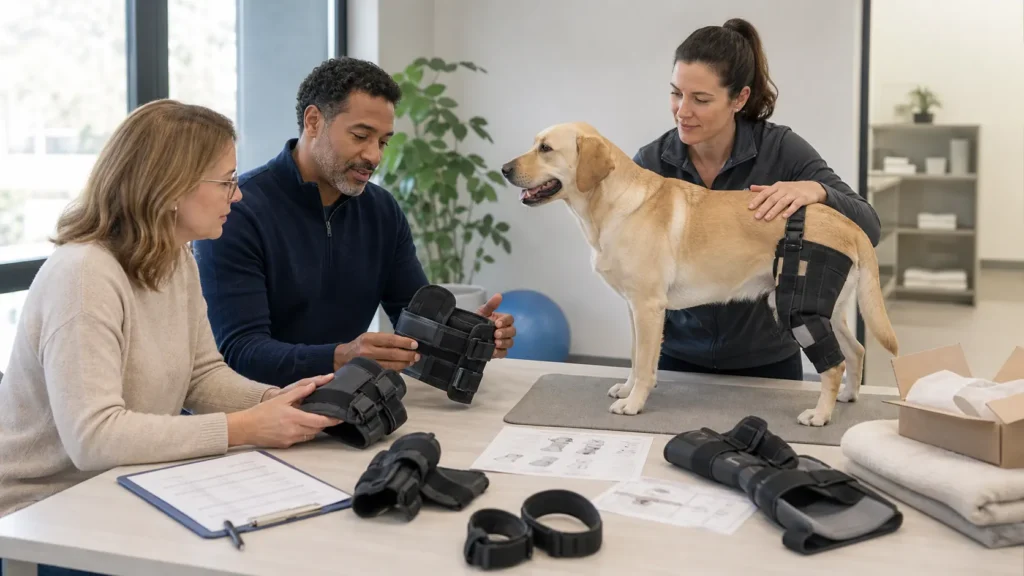
3. Validate the first fitting with observable checks
Replace vague instructions such as “snug but comfortable” with observable checkpoints. The exact criteria depend on the brace type, but a first-fit review can document:
- whether the brace body covers the intended support zone;
- whether edges and straps avoid the wrong joint or flexion area;
- whether closures have adequate overlap without reaching their limit;
- whether rigid or reinforced elements align with the approved reference points;
- whether the product rotates, folds, or migrates during controlled movement; and
- whether the dog’s skin and behavior indicate that fitting should stop and be reassessed.
The fitting record should identify product model, size, side where relevant, lot or batch reference, key measurements, fitter, date, and observations. This makes follow-up more useful than a free-text note saying only “brace slipped.”
4. Treat comfort as a monitored product requirement
Comfort cannot be proven by soft fabric alone. Edge finishing, seam bulk, strap direction, pressure concentration, moisture retention, material stiffness, and movement all contribute. During product development, inspect the smallest and largest settings as well as the middle of the size range. A brace may look acceptable on a medium reference sample but bunch at the minimum setting or lose stable contact at the maximum.
Handoff material should tell users what to observe and whom to contact, without inventing a universal wear schedule. New redness, broken skin, swelling, persistent slipping, damaged closures, unusual distress, or a material change in movement warrants stopping use and following the program’s veterinary or customer-support escalation route. The responsible clinician—not a generic marketing article—should determine the individual use plan.
5. Separate a fit issue from a manufacturing defect
Returns become actionable only when the program uses consistent categories. “Doesn’t work” could describe a measurement error, wrong product type, unclear instruction, size-range gap, construction variation, transport damage, or unrealistic expectation. Each requires a different response.
| Observed issue | Evidence to collect | Possible route |
|---|---|---|
| Brace slips or rotates | Measurements, selected size, fitted photos, strap overlap, movement context | Refit, sizing review, instruction review, or design investigation |
| Edge rubbing or pressure concern | Location, time observed, fit position, product condition, photos where appropriate | Stop-use escalation and fit/product assessment |
| Closure will not hold | Lot, usage history, contamination, hook-and-loop condition, pull direction | Care guidance or defect investigation |
| Seam, splint, or component failure | Lot, failure location, usage context, retained sample | Supplier corrective-action review |
| Measurements fall between sizes | Full measurement set and product category | Size-chart or assortment review |
6. Audit the instructions and claims as part of the product
Product pages, inserts, videos, packaging, and distributor training should use the same intended use and limitations. Avoid implying that every brace treats a condition, prevents surgery, or guarantees recovery unless the claim has appropriate substantiation and legal review for the target market.
For the United States, the FDA explains that animal devices do not undergo the human-device 510(k) or PMA premarket approval process, while manufacturers and distributors remain responsible for safe, effective, properly labeled products. “FDA approved” should therefore not be used as a shortcut claim for a dog brace. Buyers selling in other markets should obtain market-specific advice rather than copying U.S. language.
7. Connect fit feedback to production quality
The approved product specification should include the dimensions and features that affect fit: brace-body length, circumference range, strap length and angle, component position, seam allowance, closure contact area, edge finish, label orientation, and side identification where applicable. Golden samples are useful, but measurable tolerances make inspection repeatable.
Include the smallest, largest, and boundary sizes in approval. For bulk inspection, agree on defect definitions and the sampling plan before production. ISO 2859-1:2026 provides an AQL-indexed framework for lot-by-lot inspection by attributes, but a sampling standard does not decide which brace defects are critical. The buyer and supplier must define those examples for the specific product.
Ask how the supplier controls incoming materials, in-process assembly, final measurements, traceability, and corrective actions. GaitGuard summarizes its current checkpoints on the quality management page; the purchase specification should still state the exact evidence required for the buyer’s program.
8. Create a clinic and customer-support handoff
A scalable handoff package can include the measurement protocol, size decision rule, first-fit checklist, cleaning and inspection instructions, contraindication or escalation language approved for the market, contact route, and a structured issue form. Use version numbers so old instructions can be traced when a complaint is received.
For private-label programs, decide who owns each response: clinic, distributor, brand, or manufacturer. The public-facing brand may receive the first message even when the root cause sits upstream. A responsibility matrix and response-time target prevent sensitive cases from moving between inboxes without resolution.
Buyer checklist before approving a brace program
- Is the intended user, support zone, and sales channel defined?
- Are measurement landmarks and size-selection rules reproducible?
- Does the fit checklist use observable acceptance criteria?
- Have minimum, maximum, and boundary settings been evaluated?
- Are instructions and product claims consistent across every asset?
- Can complaints be traced to product, lot, size, fitting, and instruction version?
- Do specifications convert fit-critical details into measurable tolerances?
- Are escalation ownership and stop-use language clear?
Build the control system before scaling the order
A reliable canine rehabilitation brace program links product geometry to measurement, fitting, instructions, quality control, and post-sale evidence. That system helps a buyer judge whether a problem is isolated or repeatable—and gives the supplier a defined target for improvement.
If you are building a distribution or private-label range, review GaitGuard’s private-label dog brace supply scope and OEM/ODM pet orthotics capabilities. To discuss feasibility, send the product category, target market, size concept, claims direction, and expected order quantity for an initial review.
