
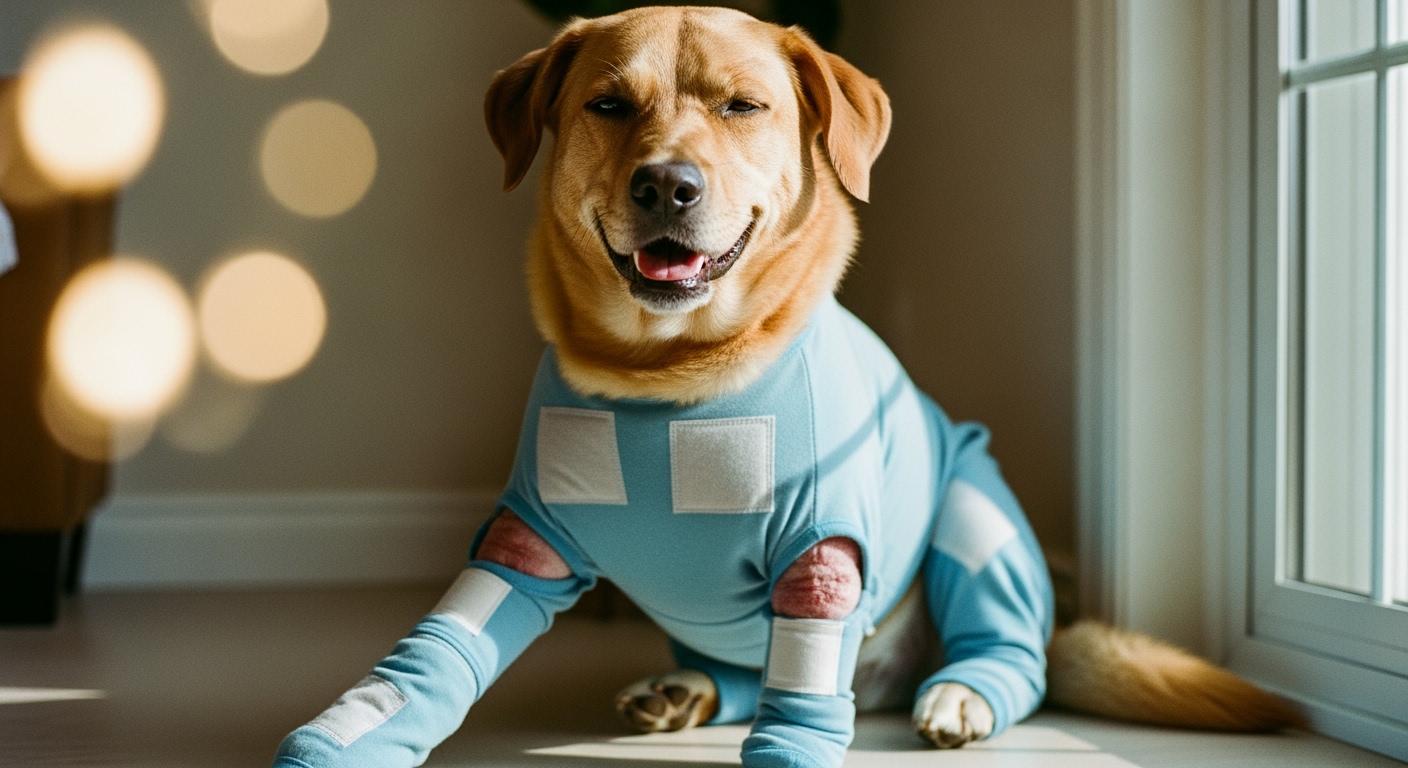
A dog four leg recovery suit for multiple wounds covers every incision while the dog stands still. You check once. It looks right. Then the dog sits, curls, or walks three steps — and a wound near the hip peeks out. Another near the elbow gets pressed by a seam that shifted. The suit did not fail because it is a bad product. It failed because standing-fit checks hide every gap that movement creates. A recovery suit is a mechanical barrier, not a treatment. Its job is to stay between the wound and the world through every position the dog takes. When it cannot do that for all wounds at once, the protection is partial — and partial protection on a surgical site is no protection at all.
Why Multiple Wounds Break the Standing-Fit Assumption
One Covered Wound Does Not Mean Every Wound Is Protected
Seeing one wound stay covered creates a false signal. The eye tracks the visible success and assumes the rest follows. But fabric does not distribute tension evenly. A suit stretched tight across the shoulders may leave slack near the belly. A suit pulled snug at the rear may gap at the chest. Each wound zone competes for fabric coverage, and the body’s movement decides which zone wins. Map every wound before putting the suit on. Check coverage standing, then sitting, curling, walking, lying down, and during the bathroom stance. Look for gaps at leg cuffs, belly opening, rear cutout, stretched fabric panels, and closure areas. Remove the suit. Inspect skin, wound edges, dampness, odor, pressure marks, and rub lines. Decide: continue, adjust, switch barriers, or call the veterinarian.
Tip: Check every wound at least twice daily during the first 24–72 hours with a new suit. The highest-risk window for undetected gap formation is the first three days.
| Failure sign | Why it happens | Better suit feature | What the caregiver should do |
|---|---|---|---|
| Leg cuff rides up | Fabric stretches or slides during movement | Stable four-leg pattern, soft cuffs | Refit, adjust, or try a different size |
| Belly opening exposes a wound | Cutout shifts or is too large | Mapped wound-zone coverage | Add extra barrier or switch suit |
| Fabric traps moisture | Poor breathability, dampness from licking/discharge | Breathable, washable fabric | Remove, dry, and clean suit |
| Dog reaches one wound | Gaps at cuffs or stretched fabric | Secure fit, adjustable closures | Supervise, adjust, or stop and call vet |
| Seam or closure presses wound | Poor seam placement, tight fit | Low-pressure seams, mapped closures | Check for marks, adjust, or stop use |
| Suit twists after walking | Uneven stretch, poor pattern | Stable four-leg design | Reposition or try a better pattern |
Standing Still Hides the Real Fit Problems
A standing dog is a static shape. A moving dog is a sequence of different shapes. The suit that fits one shape must fit all of them. Most fit checks happen while the dog stands — and most fit failures happen while the dog does anything else. When the dog sits, the torso shortens and the belly compresses. Fabric that was taut standing now bunches. When the dog curls to sleep, the spine rounds and the hind legs tuck. Panels that covered hip wounds now pull forward, leaving the rear margin exposed. The standing-fit illusion is why a recovery suit designed for post-surgery protection needs wound-zone mapping that accounts for every resting and active position, not just the measurement pose.
Use this sequence to break the illusion:
- Map every wound zone before putting the suit on.
- Check coverage while the dog stands.
- Recheck during sitting, curling, walking, lying down, and bathroom position.
- Look for gaps at cuffs, belly opening, rear cutout, stretched fabric, and closure areas.
- Remove the suit and inspect skin, wound edges, dampness, odor, pressure marks, and rubbing.
- Decide whether to continue, adjust, switch protection, or contact the veterinarian.
| Status | What you see and feel |
|---|---|
| 🟢 Green | All wounds stay covered during movement, fabric stays dry, no pressure marks, dog tolerates the suit. |
| 🟡 Yellow | Light sliding, mild bunching, damp warmth, increased licking interest, or edge rubbing. |
| 🔴 Red | Wound exposure, chewing, swelling, bleeding, discharge, odor, pain, limping, or repeated escape. |
Note: Any red sign means stop the suit immediately and contact the veterinarian.
When Four-Leg Coverage Matters More Than a Single Sleeve
A single sleeve ends near the wound. That ending point is a failure point. With only an inch or two of fabric beyond the wound edge, any leg movement slides the sleeve margin across the incision like a windshield wiper — wiping bacteria, dragging scabs, keeping the wound surface mechanically irritated. Four-leg coverage anchors the suit at all four extremities, which distributes movement forces across the entire garment instead of concentrating them at one sleeve edge. The sleeve margin near the wound stays more stable because the other three anchor points absorb most of the displacement. That is not about covering more surface area. It is about how force distributes through a connected garment versus a disconnected one. For wounds on a hind leg, the difference between a sleeve and full suit coverage is the difference between relying on one leg cuff’s friction and relying on the entire garment’s geometry. The fit dynamics of a recovery sleeve change substantially when movement forces pull from a single anchor point rather than four.
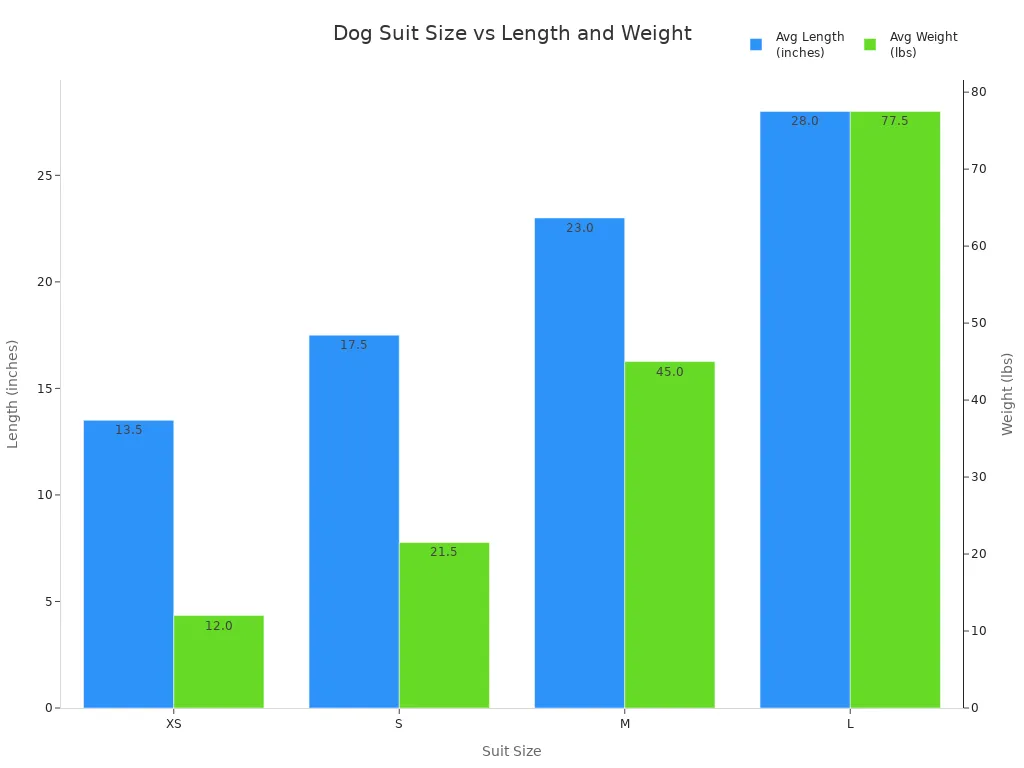
Body shape and breed proportions also shift how fabric tensions resolve across a suit. A deep-chested breed and a barrel-chested breed distribute torso fabric tension along entirely different vectors. The sizing table below gives a starting reference for matching suit dimensions to common breed body types.
| Size | Length (inches) | Weight (lbs) | Example Breeds |
|---|---|---|---|
| XS | 12.5–14.5 | 8–16 | Toy Poodle, Pug, Yorkshire Terrier |
| S | 14.5–20.5 | 18–25 | Beagle, French Bulldog, Shih Tzu |
| M | 20.5–25.5 | 30–60 | Husky, Cocker Spaniel, Bulldog |
| L | 25.5–30.5 | 65–90 | Labrador, Golden Retriever, German Shepherd |
Fabric Mechanics That Decide Which Wound Stays Covered
The suit looks uniform. It is not. Every seam, every panel transition, every change in knit gauge creates a boundary where stretch behavior changes. These boundaries are where coverage fails first. Understanding which mechanical properties drive which failure patterns turns a passive purchase decision into an active fit-verification process.
Leg Cuff Migration and What Drives It
The leg cuff is the most mechanically vulnerable point on a recovery suit. Here is why. The cuff sits at the narrowest diameter of the leg — just above the paw — and forms a ring of fabric under constant tension from two directions: the leg panel pulling upward and the paw pushing downward with every step. When the torso panel and leg panel use different knit gauges — a common production choice because tighter torso knits resist abrasion while looser leg knits ease donning — the two zones recover from stretch at different speeds. Walk the dog ten steps. The torso panel, with its denser knit, stores more elastic return energy per square inch and retracts faster after each stretch cycle. The leg panel, with its more open knit, recovers slower. Each step feeds a small net upward displacement at the cuff. After twenty steps, the cuff sits higher. After fifty, a wound below the elbow that was covered at the start is now exposed. The dog licks at the new gap. Saliva pools. The wound stays wet. A suit with matched panel gauges between torso and leg zones, or with a non-slip cuff binding that mechanically isolates the cuff from torso-panel retraction, stops this ratcheting migration at its source.
That fails fast.
Check it yourself: mark the cuff position with your thumb before a short walk. Walk the dog for two minutes. If the cuff has climbed more than half an inch from your thumb-mark position, cuff migration is active and wound coverage below the elbow or hock is degrading with every step.
Closure Placement vs. Wound Zone Overlap
A Velcro strip, snap, or zipper placed over or adjacent to a surgical incision creates a cycle of micro-trauma. The closure is the stiffest point on the suit. When the dog moves, the surrounding fabric flexes but the closure resists. That stiffness differential concentrates force at the closure edge. If that edge sits within a finger’s width of a wound, every step presses the closure margin against healing tissue — not enough to cause obvious bleeding, but enough to keep the wound in a low-grade inflammatory state. The skin stays pink. The edges do not approximate cleanly. Healing stalls for no obvious reason. The better design places every closure along the back or high on the side panels — positions where the underlying anatomy is muscle and bone rather than a fresh incision line. This is not a convenience feature. It is a wound-mechanics requirement. A suit that maps wound protection and anti-lick coverage together must ensure the closure does not become a secondary wound site.
Verification: after suiting, press a fingertip against each closure edge and slide it toward the nearest wound. If the fingertip reaches the wound margin without crossing empty fabric between the closure and the incision, that closure is too close. Reposition or choose a suit with different closure placement.
Moisture Trapping at the Seam Line
Seams are the suit’s thinnest channels — and its most reliable moisture traps. A flat-felled seam creates a double fabric layer. Capillary action pulls wound exudate and ambient humidity into that narrow space between layers. Once inside, the moisture cannot evaporate outward because the outer fabric layer blocks air exchange. The damp channel sits directly against the skin for hours. Maceration begins. The wound edge softens and whitens. Sutures lose grip in the weakened tissue. This is not a hygiene problem. It is a material-physics problem: the seam construction that makes the suit durable in the wash is the same construction that creates a micro-environment hostile to wound edges. A suit that uses a single-layer bonded seam instead of a folded flat-felled seam eliminates the capillary channel. The tradeoff is seam strength — bonded seams hold less tensile load. But for a recovery suit worn during rest and light movement, that tradeoff favors wound-dryness over garment longevity, and dry wounds close faster than wet ones regardless of how long the suit lasts.
Check it: slide two fingers under the suit along a seam line after 20 minutes of wear. If the fabric on the skin side feels cool and slick rather than warm and dry, moisture is trapped. Remove the suit. Dry the skin. A second suit — rotated in while the first dries — cuts the continuous wet-contact time in half. Rotating two suits is not a convenience; the difference between a sleeve and a full barrier often comes down to whether a single garment can stay dry through a full wear cycle, and with multiple wounds producing drainage from several sites, that threshold is harder to meet.
Tip: Rotate two suits — one on the dog, one drying. Continuous damp contact against a wound edge for more than four hours can begin softening the tissue enough to compromise suture retention.
When a Four-Leg Suit Is Not the Right Barrier
A four-leg recovery suit covers the torso, hips, and proximal legs. It does not cover the paws, the face, the tail base, the perineum, or the distal third of each leg with any reliability. Some wound locations sit entirely outside its coverage envelope. Others sit just inside the edge — technically covered at a standstill, practically exposed with movement. Recognizing when the suit geometry cannot solve the protection problem prevents days of false confidence and delayed healing.
Wound Locations a Suit Cannot Reach
A wound on the paw pad, between toes, on the muzzle, at the ear base, or at the tail head sits outside what any four-leg suit design can cover. Wounds at the hock or carpus — the wrist and ankle equivalents — sit at the boundary. The suit cuff terminates above these joints on most dogs. A wound directly on the joint gets partial coverage at best. The dog’s natural joint flexion pulls the cuff margin back and forth across the incision with every step. That is worse than no coverage at all: it is intermittent mechanical irritation synchronized to the dog’s gait. For wounds at these boundary positions, a recovery sleeve sized for a small dog’s leg or a focal bandage under veterinary direction may provide more stable coverage than a full suit alone.
Reading Moisture, Odor, and Discharge Signals
Moisture under the suit is a normal first sign that something is changing. Not all moisture means infection. But moisture plus odor, moisture plus color change, or moisture plus swelling requires immediate action. The sequence matters. Clear, thin drainage that dries without odor is usually serous fluid — a normal part of healing. Thick, yellow, green, or foul-smelling discharge signals bacterial activity. Remove the suit. Photograph the wound for your veterinarian. Do not put the same unwashed suit back on — bacteria colonize fabric within hours and reapply themselves to the wound on contact. A comparison of anti-lick sleeves versus cones becomes relevant when the suit itself is contributing to wound moisture rather than preventing access to it.
Warning signs that demand stopping the suit:
- Excessive drainage soaking through the fabric
- Unpleasant odor or unusual drainage color
- Redness, swelling, or heat radiating from the incision
- Increased pain response when the area is touched
If any of these appear, stop the suit and seek veterinary guidance before reapplying any barrier.
Disclaimer: These fit-check methods assume a short-coated dog where fabric edge positions and pressure marks are visible without parting the coat. Double-coated breeds — particularly Huskies, Malamutes, Chow Chows, and thick-coated Shepherds — can conceal rub marks, cuff migration, and moisture accumulation beneath dense undercoat. On these dogs, visual inspection is not reliable. Slide fingers under every cuff, closure edge, and seam line to feel for dampness and displaced fabric rather than relying on sight alone. If the dog’s body conformation falls outside breed-typical proportions — particularly dogs with angular limb deformities, very deep or very shallow chests, or unusually short leg-to-body ratios — the coverage patterns described here may not apply predictably, and each wound zone may require individual barrier assessment.
FAQ
How often should wound checks happen under a recovery suit for multiple wounds?
Check every wound at least twice daily during the first 72 hours. After that, move to once-daily checks if all wounds stayed covered and dry through the first three days. Multiple wounds mean multiple independent failure points — double the wound count, double the check frequency. One wound can degrade while another heals uneventfully under the same suit.
Can a dog wear a four-leg recovery suit overnight?
Only if every wound passed both a standing and a curled-sleeping position check before bedtime, and only if the suit is dry at the start of the night. Overnight wear removes the caregiver’s ability to spot a shifting cuff or a moisture buildup for 6–8 hours. If any wound showed yellow-status signals during the day, remove the suit for the night and use an alternative barrier — an Elizabethan collar, a focal bandage, or supervised rest with no barrier — rather than gambling on 8 unmonitored hours.
What is the fastest way to tell if a suit’s fit is failing right now?
Three rapid checks: run a finger under each leg cuff to feel for dampness; mark the cuff edge position with your thumb, walk the dog across the room, and check if the cuff moved; press along each closure line and feel whether any closure edge sits within a finger’s width of a wound. These three checks take under 60 seconds and catch the most common failure modes before they become visible problems.
When should the suit come off and not go back on?
Remove the suit permanently from the wound-protection plan when any of these appear: wound edge separation, bleeding, thick or colored discharge, odor from the incision site, swelling that changes the wound contour, or repeated licking/chewing at the suit itself. These signals mean the barrier strategy has failed and the wound needs veterinary reassessment before any barrier is reapplied.
