
You should use things like Elizabethan collars, soft cones, inflatable collars, or surgical recovery suits to protect your dog’s incision after surgery. These choices help stop licking and scratching. This lowers the chance of infection. Following dog surgery incision care do and don’ts helps your dog heal safely. Always ask your veterinarian for help.
Key Takeaways
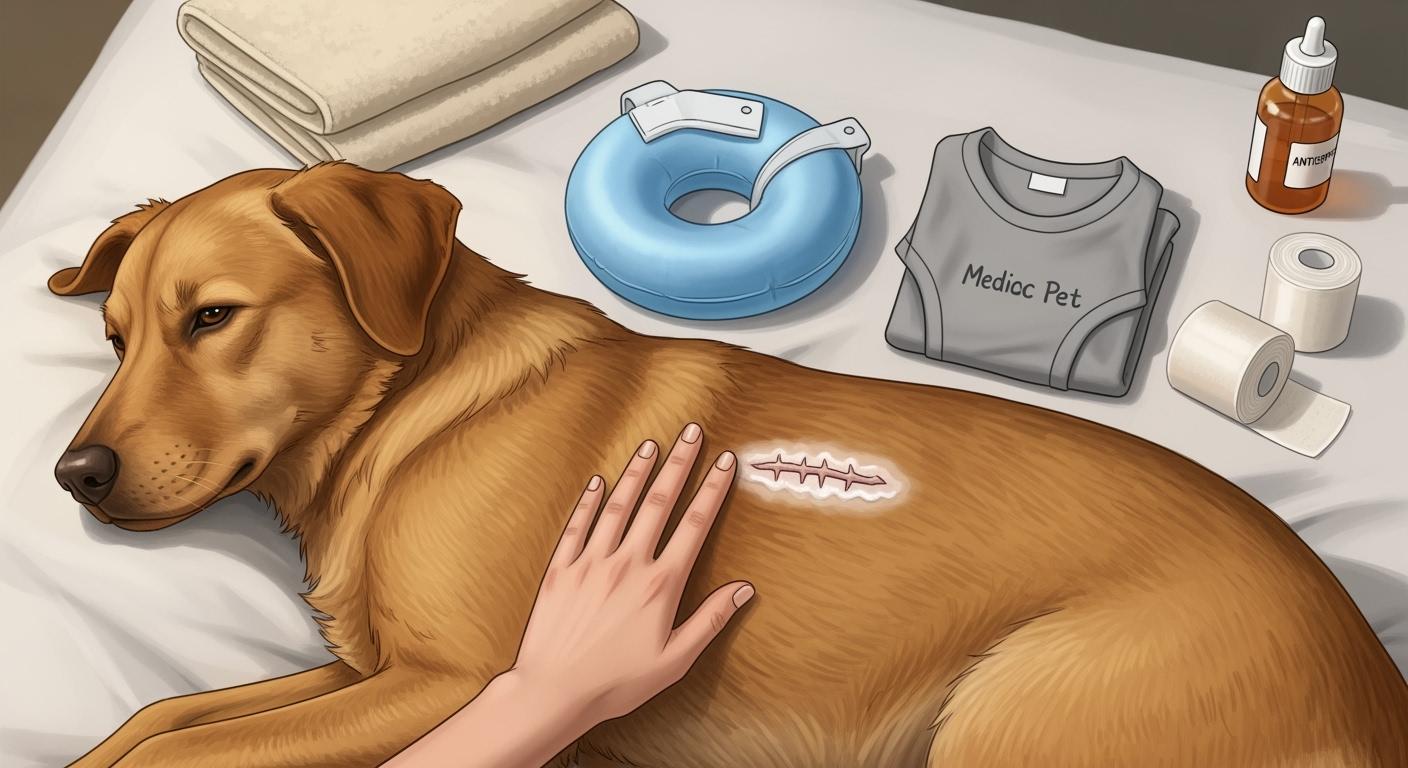
Put on protective gear like Elizabethan collars or recovery suits. This stops your dog from licking the incision. It lowers the chance of infection. It also helps your dog heal faster.
Look at your dog’s incision at least two times each day. Watch for redness, swelling, or discharge. Finding problems early can stop bigger issues. It helps your dog heal the right way.
Keep the incision clean and dry for about 14 days. Do not give your dog a bath during this time. This helps the incision heal better.
Why gear matters for healing
How gear prevents licking and infection
Protective gear plays a key role in helping your dog heal after surgery. When you use an Elizabethan collar, soft cone, or recovery suit, you block your dog from licking or biting the incision. This simple step keeps harmful bacteria away from the wound. Licking can introduce germs that cause infection and slow down healing. You want to avoid setbacks that make recovery harder.
Elizabethan collars and soft cones stop your dog from reaching the incision.
Recovery suits cover the wound and add a barrier against licking.
Less licking means fewer infections and a smoother healing process.
If you follow dog surgery incision care do and don’ts, you give your dog the best chance to heal safely. Always check the gear fit and make sure your dog cannot reach the incision.
Risks of not using protection
Skipping protective gear can lead to serious problems. Dogs often try to lick or chew their wounds. This can open the incision and cause pain. Infection becomes more likely when the wound is exposed to saliva and bacteria. You may see swelling, redness, or discharge. These signs mean you should call your veterinarian right away.
Licking can reopen the wound.
Infection can develop quickly.
Protective gear, like e-collars, helps prevent these issues.
You want to keep your dog safe and comfortable. Always use the right gear and check the incision twice daily. If you notice the incision looks worse instead of better, contact your vet for advice.
Dog surgery incision care do and don’ts
Caring for your dog’s incision after surgery means doing certain things every day. You need to keep the area clean and dry. Stopping your dog from licking is important. Using the right gear and checking the incision often helps your dog heal faster. The routine and table below will help you avoid mistakes and keep your dog comfortable.
Keep the incision dry and clean
Keep the incision dry for about 14 days after surgery. Water can break down the surgical glue and slow healing. Do not bathe your dog or let the incision get wet. If the area gets dirty, clean it gently with a vet-approved antiseptic and sterile gauze. Never use hydrogen peroxide or alcohol. These can hurt the healing skin. Always use gear like an Elizabethan collar or recovery suit to stop licking and chewing.
Tip: Keep your dog inside as much as you can. This helps keep the incision clean and warm. It also lowers the chance of infection.
Monitor twice daily for changes
Check the incision at least two times each day. Look for redness, swelling, discharge, or missing stitches. Take a photo every day in good light. This helps you see changes and share them with your veterinarian. If the incision looks worse, call your vet right away.
Signs to watch for during your checks:
Red or dark pink skin around the incision
Swelling or warmth
Discharge (bloody, clear, milky, yellow, or green)
Stiffness or not wanting to move
Sudden loss of appetite
Vomiting or diarrhea
Openings or damaged stitches
Alert: If you see any of these signs, call your veterinarian as soon as you can.
Avoid creams and home remedies
Do not put creams, ointments, or home remedies on the incision unless your veterinarian says it is okay. Many products, like Neosporin, can cause allergies or stomach problems if your dog licks them. Some ingredients can even be poisonous. The safest way is to keep the incision dry and protected with gear.
Safety Reminder: Only use products or cleaning methods your veterinarian approves.
Step-by-Step Daily Home Routine
Step One: Put on the protective gear (Elizabethan collar, recovery suit, or sleeve) before your dog leaves the crate or bed.
Step Two: Check the incision two times a day. Use the same light and angle for photos.
Step Three: Check the gear fit. Make sure your dog cannot reach the incision. Use the two-finger rule for harnesses. Cones should go past the nose by about two inches.
Step Four: Keep your dog inside and limit activity for 10–14 days, or until your vet says it is okay.
Step Five: If the incision looks worse or you see warning signs, call your veterinarian.
Do and Don’t Table for Incision Care
Do | Don’t |
|---|---|
Use protective gear at all times | Let your dog lick or chew the incision |
Keep the incision dry and clean | Bathe your dog or let the incision get wet |
Check the incision two times a day | Ignore changes in redness, swelling, or discharge |
Take daily photos for tracking | Put creams, ointments, or home remedies on the incision |
Call your vet if the incision looks worse | Wait to call your vet about problems |
Standard Healing Timelines
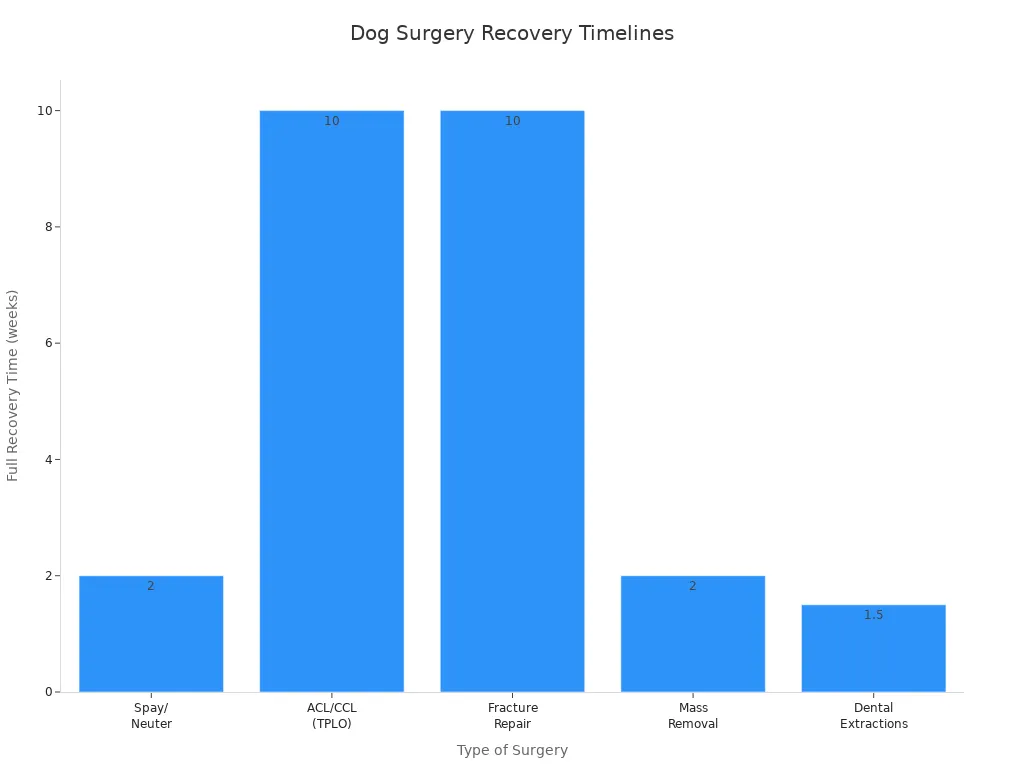
Most dogs need to rest and wear protective gear for about 10–14 days after surgery. Suture or staple removal usually happens during this time. Always follow your veterinarian’s instructions for your dog’s surgery.
Type of Surgery | Typical Full Recovery Time | Key Recovery Milestone |
|---|---|---|
Spay/Neuter | 2 Weeks | Suture removal and return to normal activity |
ACL/CCL (TPLO) Repair | 8–12 Weeks | Cleared for gradual return to off-leash activity after follow-up X-rays |
Fracture Repair | 8–12+ Weeks | Bone healing confirmed on X-ray, start of physical therapy |
Mass Removal | 2 Weeks | Biopsy results are back, and the incision is fully healed |
Dental Extractions | 1–2 Weeks | Return to eating normal food (soft diet at first) |
Following these dog surgery incision care do and don’ts helps you avoid problems like licking, infection, and slow healing. You help your dog recover safely and avoid extra trips to the vet by using the right gear and checking the fit every day. If you are not sure or see the incision getting worse, call your veterinarian for help.
Protective gear options
Picking the right protective gear helps your dog heal. It keeps your dog safe after surgery. There are many choices. Each one works best for certain incision spots and dog types.
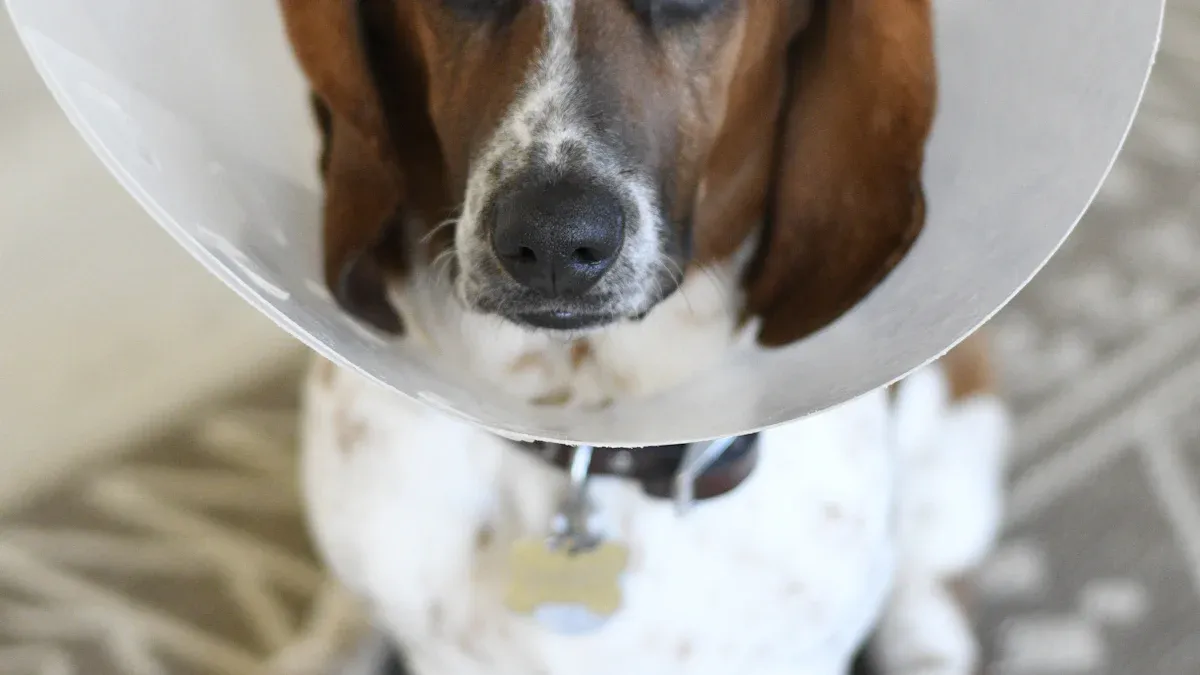
E-collar (cone)
The E-collar, or “cone,” is used a lot after surgery. It blocks your dog from licking or biting the incision. This keeps the wound safe and lowers infection risk. Many owners sleep better when their dogs wear the collar early. Dogs also rest better with the cone on. The cone fits most injuries but can be tricky sometimes:
Eating and drinking may be tough with a big cone.
Your dog might move less and feel uncomfortable.
Some dogs need time to get used to the cone.
Tip: Make sure the cone fits right. The edge should go two inches past your dog’s nose. If your dog feels stressed or cannot eat, talk to your veterinarian.
Recovery suit
A recovery suit covers your dog’s body like a onesie. It works well for belly, side, or back incisions. The suit feels soft and helps your dog stay calm. Dogs move easier and feel less stress than with a cone. Daily life changes very little with the suit. For wounds on the body, the suit works better than a cone. For leg injuries, the cone is a better choice.
Aspect | Recovery Suit (Dog Onesie) | Traditional Cone (E-Collar) |
|---|---|---|
Effectiveness for Torso | More effective | Less effective |
Effectiveness for Limbs | Less effective | More effective |
Comfort Level | Higher | Lower |
Impact on Daily Activities | Minimal disruption | Significant disruption |
Stress Level | Lower | Higher |
Safety Reminder: Always check the suit fits well. It should not rub or stop your dog from moving.
Sleeves and booties
Sleeves and booties help protect leg and paw incisions. They keep wounds safe from licking, dirt, and slipping. Your dog walks better and does not reopen the incision. Some good choices are PawZ Boots, Sport Pawks, Wear Power Paws, and GlideWear Sleeves. Booties help with grip and keep paws warm. Sleeves lower rubbing and keep the area clean.
Product Name | Description |
|---|---|
PawZ Boots | Waterproof boots that keep paws safe from outside things. |
Sport Pawks | Give grip and shield paws from cold, slippery floors, and dirt. |
Wear Power Paws | Add grip, warmth, and wound care for all weather. |
Slip Grip Slippers | Non-slip booties help dogs stand on slick indoor floors. |
GlideWear Sleeves | Lower rubbing and heat, making recovery more comfortable. |
Surgi-Sox Torso | Gives gentle pressure to help stop swelling after surgery. |
Note: If you see redness, swelling, or the incision looks worse, call your veterinarian right away.
You keep your dog safe and stop licking by picking gear that fits and matches the incision spot. Check gear every day and ask your vet if you have questions.
Gear by incision location

Choosing the right gear depends on where your dog’s incision is. The right barrier keeps your dog from licking, helps wounds heal, and lowers the risk of infection. Use the table below to match gear to incision spots and see common problems.
Incision location | Best first barrier | Reach-test result | Common failure mode | Safer backup option |
|---|---|---|---|---|
Belly/flank | Recovery suit | Passes if suit covers and dog cannot reach | Loose fit, dog slips paw inside | E-collar (cone) |
Legs/paws | Sleeve or bootie | Passes if dog cannot lick or chew area | Bootie slips off, sleeve bunches | E-collar or full-body suit |
Hard-to-cover | E-collar (cone) | Passes if cone blocks nose by 2 inches | Cone too short, dog escapes | Inflatable or padded cone |
Belly and flank
For belly and flank incisions, a recovery suit works well. It covers the whole torso and keeps the wound safe. Many dogs, like Bella the Beagle, heal without irritation when wearing a suit after spay surgery. For targeted wounds, such as on the side or chest, a dog vest can help. Always check the fit. The suit should not rub or feel tight. Use the two-finger rule at the straps.
Tip: If your dog can reach the incision while wearing the suit, switch to a cone for better protection.
Legs and paws
Leg and paw wounds need special gear. Sleeves and booties protect these spots and stop licking. Full-body recovery suits work for widespread wounds. Sleeveless suits give more movement for small injuries. For example, the Cover Me suit uses soft cotton and no zippers, making it comfortable. Booties should fit snugly and not slip off. Always check that your dog cannot chew through the gear.
Hard-to-cover areas
Some incisions are hard to protect. Use a traditional clear plastic cone to block access. Foam-padded nylon cones add comfort and stay secure with Velcro. Inflatable cones look like neck pillows and keep your dog from reaching the wound. Make sure the cone extends two inches past the nose. If your dog still reaches the incision, call your veterinarian for advice.
Safety Reminder: If the incision looks worse instead of better, always call your vet.
Mobility and activity support
Helping your dog move after surgery keeps the incision safe. It also helps healing go faster. Special gear can stop strain and slips. These tools make daily life easier for you and your dog.
Harnesses and slings
Pick a harness instead of a collar when your dog is healing. A harness does not press on your dog’s neck. It helps keep your dog’s body steady. Some harnesses have a handle on top. This handle lets you help your dog move. Harnesses that spread weight help dogs with spine or leg problems. Here is how to use a harness or sling:
Put the harness gently under your dog’s chest or hips.
Buckle the straps. Use two fingers to check comfort.
Hold the handle to help your dog stand or walk.
Check the harness fit every time. Make sure it does not rub.
If you see redness or the incision looks worse, call your veterinarian.
Tip: Support harnesses let you guide your dog without hurting the neck or incision.
A harness is better than a collar after surgery.
It keeps your dog’s body steady and helps healing.
Some harnesses spread weight for dogs with spine or leg problems.
A harness with a handle gives you more control and support.
Traction aids
Slippery floors can make your dog fall and hurt the incision. Traction boots or socks help your dog grip the floor. Nail grips might help, but studies show they do not always work. Check traction aids every day for fit and comfort. Change them if they slip off or cause problems.
Safety Reminder: Watch your dog when using traction aids. If your dog limps or the incision looks worse, call your veterinarian.
Ramps and gates
Ramps and gates help you control where your dog goes. Ramps help your dog get on beds, sofas, or into cars. Gates block stairs and keep your dog safe. These tools stop jumping and slipping. Set up ramps with a gentle slope and a surface that does not slip. Put gates at the top and bottom of stairs.
Mobility Aid | Purpose/Benefit |
|---|---|
Lifting harness | Stops your dog from putting weight on a sore leg |
Traction boots or socks | Help your dog grip slippery floors |
Rear support harness | Helps your dog build strength in back legs |
Dog wheelchair | Takes weight off a healing leg and protects the other leg |
Support harness | Helps your dog walk on rough ground and with tiredness |
Wheelchair | Lets your dog go on longer walks and stops tiredness or new injuries |
Note: If your dog has trouble with ramps or gates, change the setup or ask your veterinarian for help.
Using harnesses, slings, traction aids, ramps, and gates keeps your dog’s incision safe and helps healing. Always check the gear fit and look for signs of pain. If the incision looks worse, call your veterinarian.
Fit checks and reach test
How to check gear fit
You need to check your dog’s gear every day to keep the incision safe. Start by measuring your dog’s weight and length from the base of the neck to the base of the tail. Use a size chart to pick the right gear. Make sure the recovery suit fits snugly but does not squeeze. Your dog should move and breathe easily. For male dogs, adjust the suit along the perforation if needed. Always check the fit every morning and night. If you see swelling or your dog seems uncomfortable, call your vet.
Step | Description |
|---|---|
1 | Remove the gear and check your dog’s skin for redness or swelling. |
2 | Clean under the gear with mild antiseptic or saline. |
3 | Dry the skin with a soft towel. |
4 | Use ointment only if your vet recommends it. |
5 | Change bedding often to keep it dry. |
6 | Stop your dog from licking or scratching. |
7 | Reposition your dog every 2–3 hours if resting long. |
Tip: Watch your dog walk and sit with the gear on. Look for shifting, twisting, or new red spots. Adjust straps so they are snug but not tight.
Spotting rubbing or discomfort
Check for these signs that gear may cause rubbing or discomfort:
Redness that lasts longer than 20–30 minutes after removing the gear
Swelling or open sores
Hair loss or exposed skin
Excessive licking or grooming
Skin calluses or discoloration
Fluid-filled spots or open wounds
If you see any of these, remove the gear and call your veterinarian.
When to switch gear
You should switch or adjust gear if you notice:
Chafing or rashes around the neck or body
The collar or suit is too tight or too loose
Your dog cannot eat, drink, or lie down comfortably
Always check the fit daily. If the incision looks worse instead of better, call your veterinarian.
Red flags and troubleshooting
Signs of infection or poor healing
You need to watch your dog’s incision closely every day. Some signs show that healing is not going well. Look for these red flags:
Increased swelling or spreading redness
Thick discharge or pus from the wound
Fever above 103°F
Limping, stiffness, or joint swelling
Wound reopening or active bleeding
Sudden tiredness, vomiting, or refusal to eat
Warmth, pain, or tenderness at the site
Foul or unusual odor
Excessive licking or chewing
Hair loss near the wound
If you see any of these, your dog may need help right away.
What to do if gear fails
If your dog gets past the protective gear and reaches the incision, act fast:
Check the incision right away for redness, swelling, or bleeding.
Adjust or replace the gear so your dog cannot reach the wound.
Call your veterinarian if you see any signs of infection or if the wound looks worse.
Proper fit checks and quick action help prevent licking setbacks and keep healing on track.
When to call the vet
You should call your veterinarian if you notice:
Continuous or heavy bleeding
Blood seepage that lasts more than 24 hours
Excessive swelling or redness
Bad smell or discharge
Any sign the incision looks worse instead of better
Safety Tip: If you feel unsure, always call your vet. Quick action can prevent bigger problems.
Troubleshooting Table
What you notice | Likely cause | Gear adjustment | When to stop and call the vet |
|---|---|---|---|
Redness, swelling, or warmth | Early infection | Check fit, adjust gear | If redness spreads or swelling grows |
Discharge or pus | Infection | Replace gear, keep area clean | If discharge thickens or smells bad |
Dog licking or chewing wound | Gear too loose/short | Use longer cone or suit | If wound opens or bleeds |
Gear leaves marks or sores | Poor fit/rubbing | Loosen or pad gear | If sores do not heal in 1 day |
Wound reopens or bleeds | Licking/chewing | Add or change barrier gear | If bleeding does not stop in minutes |
Following dog surgery incision care do and don’ts helps you spot problems early and keep your dog safe.
You help your dog heal by picking the right gear. Follow the daily care steps every day. Make sure the incision stays clean and dry. Look for swelling or any discharge. Use tables and checklists to keep track of care. Doing the same routine each day lowers stress and infection risk. If the incision gets worse, call your veterinarian. Each dog is different.
FAQ
How long should my dog wear protective gear after surgery?
Most dogs need gear for 10–14 days. Your veterinarian will tell you when it is safe to remove it. If the incision looks worse, call your vet.
What if my dog keeps escaping the cone or suit?
Try a different style or size. Check the fit using the two-finger rule. If your dog still reaches the incision, call your veterinarian for advice.
Can I let my dog outside without a leash during recovery?
No. Keep your dog on a leash and limit activity for 10–14 days. This prevents over-activity and protects the incision. Always follow your vet’s instructions.
