
Every dog gets better in its own way. You want to keep your dog’s wound safe. When considering a recovery suit vs e collar for dogs, it’s essential to base your choice on the location of the injury. Additionally, you need to check if your dog can reach the wound by performing the reach test. Remember, your veterinarian’s directions are more important than general tips, so always listen to your veterinarian.
Key Takeaways
Pick the right gear by looking at where your dog’s wound is. Do the reach test to make sure the gear protects the wound well.
Look at your dog’s gear every day to make sure it fits right. This helps stop problems that could slow down healing.
Always listen to your veterinarian’s advice before using general tips. This keeps your dog safe and comfortable while healing.
Why Gear Matters for Licking Prevention
Risks of Licking and Chewing Wounds
You want to help your dog heal after an injury. Licking or chewing can slow healing and cause self-trauma. Dogs often try to reach their wounds, especially if they feel pain or itchiness. If your dog gets to the injury, you risk infection or reopening the wound. Gear like recovery suits and e-collars helps in preventing access to sutures and protects against self-trauma. Your veterinarian’s instructions override general guidance. Always follow their advice for your dog’s safety.
Comfort and Compliance in Recovery
Comfort matters for your dog during recovery. If gear fits well, your dog feels less stress and is more likely to leave the injury alone. Owner surveys show that 77.4% of dogs have a poorer quality of life while wearing an e-collar, but many still need it to stop self-trauma. You want to balance canine comfort with protection. Your veterinarian’s instructions override general guidance. Check your dog’s gear often to make sure it stays in place.
Coverage vs Product Type
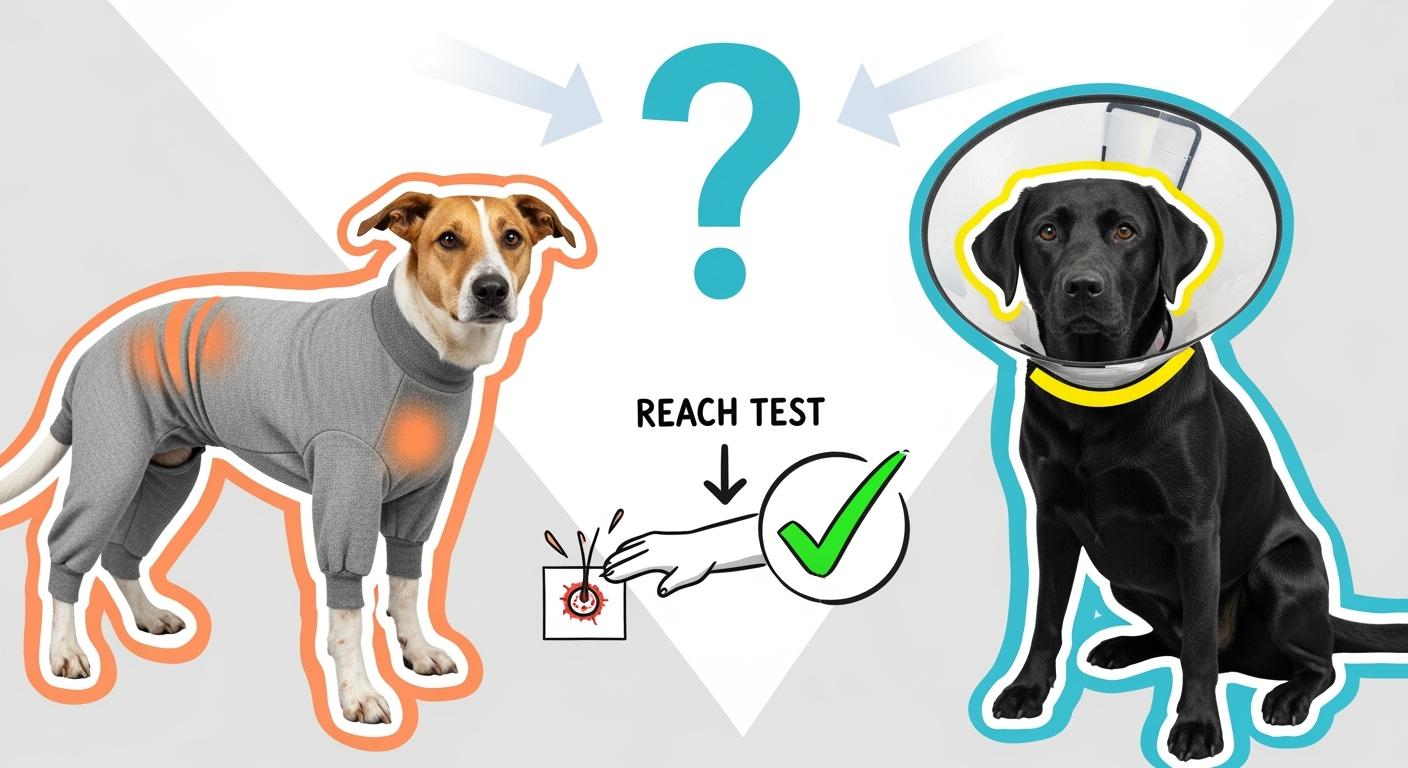
Different gear covers different parts of your dog’s body. A recovery suit works well for chest or belly injuries. An e-collar is best for wounds on the legs, paws, or tail. If your dog can reach the injury with a suit, you need extra protection. Use the reach test to decide which gear works best. Choose gear that fits your dog’s needs and keeps the injury safe.
Quick Decision Guide: Recovery Suit vs E Collar for Dogs
Choosing between a recovery suit vs e collar for dogs starts with a simple process. You want to keep your dog safe and comfortable. Follow these four steps to make the best choice for your dog’s healing.
Using the Reach Test for Gear Choice
Step 1: Identify the Wound Location
Look at where your dog’s wound is. Common locations include the belly, chest, back, legs, paws, tail, or ears. Wounds can come from surgery, injuries, hot spots, or skin irritations. You need to know the exact spot before you pick any gear.
Step 2: Perform the Reach Test
Watch your dog when they try to lick or chew the wound. If your dog can reach the area with their mouth or paw, the gear does not protect enough. The reach test helps you see if a recovery suit or e-collar will work. If your dog can reach the wound with a suit, you need extra protection.
Tip: Your veterinarian’s instructions override general guidance. Always check with your vet if you are unsure.
When a Suit Is Not Enough
Step 3: Use the Decision Table
The table below matches wound location to the best first-choice gear. It also shows backup gear, common failure points, and what you should do next.
Wound Location | Best First-Choice Gear | Backup Gear | Common Failure Point | What to Do Next |
|---|---|---|---|---|
Belly/Chest/Back | Recovery suit | E-collar | Dog reaches with mouth/paw | Add e-collar or consult vet |
Legs/Paws/Tail | E-collar | Suit + sleeve/cover | Suit slips, dog chews area | Use e-collar, check fit daily |
Ears/Face/Head | E-collar | Soft cone/inflatable | Collar too short, dog reaches | Adjust collar, ask vet for advice |
Surgical Incision | E-collar | Suit (if on torso) | Suit not snug, wound exposed | Switch to e-collar, check wound |
Hot Spots/Rashes | E-collar | Suit (if on body) | Dog scratches or chews | Use e-collar, monitor behavior |
Your veterinarian’s instructions override general guidance. If you see any signs of gear failure, call your vet.
When an E-Collar Is Best
Step 4: Check Fit Rules for Both Gear Types
Proper fit keeps your dog safe and comfortable. Use these rules to check your gear:
E-collar fit:
The collar should fit snugly around your dog’s neck.
You must be able to fit two fingers between the collar and neck.
The collar must extend past your dog’s muzzle so they cannot reach the wound.
Check the collar every day for slipping or discomfort.
Recovery suit fit:
The suit should cover your dog’s torso and allow natural movement.
The fabric must be breathable and include leg holes and a flap for potty breaks.
Make sure the suit does not rub or cause irritation.
Check the suit twice daily to ensure it stays in place.
Recommended Time Windows for Gear Use:
E-collar: Your dog should wear the collar until the wound has fully healed. This can be as short as a few days or as long as a few weeks, depending on the injury.
Recovery suit: Use as directed by your veterinarian. The suit helps prevent licking or scratching, but always check if your dog can reach the wound.
Always follow your veterinarian’s instructions for time windows and gear use. Daily checks help you catch problems early.
Surgical Suit: Pros and Cons
Best Uses by Body Area
You can use a surgical suit to cover your dog’s chest, belly, or back. The dog recovery suit works best for wounds on the torso. It acts like a onesie, protecting the incision while leaving your dog’s head free. If your dog has a wound on the legs, paws, or tail, the dog recovery suit may not give enough coverage. In these cases, you may need to use an e-collar or a sleeve. Your veterinarian’s instructions override general guidance.
Common Suit Failures
Sometimes, a surgical suit does not stop your dog from licking or chewing the wound. Here are some common problems you might see:
Your dog licks or chews the incision, which can bring bacteria to the area.
Persistent licking can remove sutures and slow healing.
Loose or baggy fabric can let your dog reach the wound.
If you neglect the incision site, infections or poor healing can happen.
The main challenge is stopping your dog from licking or chewing the area.
If you notice any of these problems, talk to your veterinarian. Your veterinarian’s instructions override general guidance.
Hygiene and Comfort Tips
Keeping your dog comfortable and clean helps healing. The table below shows why the right dog recovery suit matters:
Aspect | Why comfortable clothing helps | Risk if the clothing is wrong |
|---|---|---|
Stress and confidence | Acts like a wearable hug, helps dogs relax | Tight or fussy suits can cause anxiety |
Warmth and protection | Keeps your dog cozy and covered | Overheating in thick-coated or warm-natured dogs |
Handling and hygiene | Keeps fur clean and shields wounds | Baggy fabric can tangle or hide wounds |
Check the dog recovery suit twice a day. Make sure it fits well and stays dry. Always keep the incision clean and dry for the best healing.
E-Collar: Why Vets Recommend It
Protection Advantages
You want your dog to heal without licking or chewing the wound. The e-collar creates a barrier that keeps your dog from reaching injuries on the legs, paws, tail, or face. This gear helps protect stitches and skin during post-surgery recovery. Many veterinarians choose the e-collar because it works for most wound locations. Your veterinarian’s instructions override general guidance. The e-collar supports healing and lowers the risk of infection.
Fit and Daily Checks
You need to check the e-collar every day to keep your dog safe and comfortable. Use these steps to make sure the collar fits well and does not cause problems:
Place the collar snugly behind your dog’s ears. You should fit two fingers under the strap.
Rotate the collar’s position each day to keep your dog’s skin healthy.
Inspect your dog’s neck before and after use for redness or irritation.
Remove the collar after swimming or wet conditions. Let the skin dry before putting it back on.
Dogs can wear the collar for 8–10 hours daily without skin issues. Change the collar’s position after a few hours.
Your veterinarian’s instructions override general guidance. Daily checks help you spot problems early and keep your dog comfortable during post-surgery recovery.
Reducing Stress and Bumping
Some dogs feel stress when wearing an e-collar. You can help your dog adjust by introducing the collar during meals or calm play. Give praise and treats to build positive feelings. Make sure your dog can move around the house without bumping into furniture. Choose the right size to reduce stress and keep your dog safe. Comfort matters for healing, so watch your dog’s behavior and adjust the collar if needed.
Cone Alternatives and Combinations
Soft Cones and Inflatable Collars
You might want to use something different than a regular cone for your dog. Soft e-collars are made from gentle materials. They feel more comfortable and look less scary to dogs. Inflatable collars look like travel pillows. They let your dog move around more easily. Flat frisbee-type collars help your dog see better. They do not get in the way as much during daily life. Each type has good and bad points. Your veterinarian’s instructions are always most important.
Type of Alternative | Pros | Cons |
|---|---|---|
Soft E-Collars | More comfortable, less intimidating | Less durable, may not stop all licking |
Inflatable Collars | Lightweight, better mobility and visibility | Limited protection, can be chewed or punctured |
Flat Frisbee-type Collars | Less interference, better visibility | May not protect every wound |
Combining Suit and Collar
You can use a recovery suit and a cone together for more safety. This is helpful if your dog tries to reach wounds on the belly or chest. It also helps if your dog uses their paws or mouth. Using both types of gear blocks your dog from different angles. Always check that the gear fits well. Watch your dog to make sure they are safe. Your veterinarian’s instructions are always most important.
Targeted Sleeves and Covers
Targeted sleeves and covers protect wounds on the legs or paws. You can use these with a suit or cone for better safety. Some dogs need extra layers to stop licking or chewing. Pick gear that fits well and does not slip off. Check the wound and gear two times each day to keep your dog safe.
Tip: Always ask your veterinarian before you change gear or use more than one product.
Licking Risk: Traffic-Light Table
You want to check your dog’s risk level every day during recovery. The traffic-light system helps you see if your dog’s gear is working. Use this table to rate your dog’s licking control today:
Checkpoint | 🟢 Green: No Risk | 🟡 Yellow: Warning Signs | 🔴 Red: High Risk |
|---|---|---|---|
Access to wound | No access | Tries to reach, but blocked | Can reach and lick wound |
Licking attempts | Calm, no attempts | Occasional attempts | Persistent licking or chewing |
Gear slipping | Gear stays in place | Gear shifts sometimes | Gear off or loose, wound exposed |
Skin irritation | Skin healthy | Mild redness or rubbing | Sores, swelling, or bleeding |
Eat/drink normally | Eats and drinks well | Hesitates, but manages | Cannot eat or drink with gear |
Your veterinarian’s instructions override general guidance.
Green: No Access, Calm Dog
You see your dog resting and ignoring the wound. The gear fits well and does not slip. Your dog eats and drinks as usual. Most dogs move into this green zone during recovery. Clinical data shows that 96% of dogs reach a relaxed state, so you can expect improvement with proper gear.
Yellow: Gear Slipping or Attempts
You notice your dog tries to lick or scratch, but the gear blocks access. The suit or collar may shift a little. You see mild redness or rubbing. Watch your dog closely. Adjust the gear if needed. Many dogs move between yellow and green as they heal.
Red: Wound Access or Persistent Chewing
You see your dog reach the wound or chew at the area. The gear slips off or exposes the wound. Your dog cannot eat or drink with the gear on. This is a high-risk situation. Call your veterinarian right away. Your veterinarian’s instructions override general guidance.
Daily Protection Routine
You want your dog to heal safely and comfortably. A daily protection routine helps you catch problems early and keeps your dog’s wound clean. Your veterinarian’s instructions override general guidance.
Twice-Daily Incision Checks
Check your dog’s incision two times each day. Look for redness, swelling, or warm skin near the surgery spot. Watch for pus, bad-smelling fluid, or pain that gets worse after two days. Feel for big or sore lymph nodes near the wound. If you see any of these signs, call your veterinarian.
Tip: Use Quick Reference Card math—2 checks per day for 14 days equals 28 total checks. This routine helps you spot trouble before it gets serious.
Keeping Gear and Wound Clean
Remove the brace or suit and check your dog’s skin for irritation. Clean under the gear with mild antiseptic or saline. Dry the skin with a soft towel. Change bedding often to keep it dry. Stop your dog from licking or scratching. Reposition your dog every few hours if resting for long periods. Always follow your veterinarian’s instructions for wound care timelines.
Step | Action | Quick Reference Card # |
|---|---|---|
1 | Remove gear and inspect skin | 2 |
2 | Clean with antiseptic or saline | 2 |
3 | Dry skin with towel | 2 |
4 | Change bedding | 2 |
5 | 1 | |
6 | Reposition dog if resting | 2 |
When to Call the Vet
Call your veterinarian if you notice fever, spreading redness, swelling, pus, or pain that gets worse. Your veterinarian’s instructions override general guidance. Never wait if you feel unsure about your dog’s recovery.
Printable Daily Routine Checklist
Inspect incision (2x/day for 14 days = 28 checks)
Clean and dry skin under gear
Change bedding daily
Prevent licking or scratching
Watch for warning signs (fever, swelling, pus)
Call your veterinarian if you see problems
Safety first: This routine supports healing and comfort for your dog.
Clinic and Retailer Advice
Fast Sizing and Fit Script
You want your dog to heal safely. Clinics and retailers recommend measuring your dog from the base of the neck to the base of the tail. This helps you choose the right recovery suit size. Use the table below to match your dog’s length and weight to the best size.
Size | Length (inches) | Weight (lbs) | Example Breeds |
|---|---|---|---|
XS | 12.5–14.5 | 8–16 | Toy Poodle, Pug, Yorkshire Terrier |
S | 14.5–20.5 | 18–25 | Beagle, French Bulldog, Shih Tzu |
M | 20.5–25.5 | 30–60 | Husky, Cocker Spaniel, Bulldog |
L | 25.5–30.5 | 65–90 | Labrador, Golden Retriever, German Shepherd |
If your dog is between sizes, size down for a snug fit.
The suit should wrap your dog gently, giving light compression.
Avoid suits that are too tight or too loose.
The recovery suit should wrap your pup gently, giving light compression (which actually helps calm them and promote rest), without restricting movement or breathing. If it looks like a sausage casing, it’s too tight. If it’s sagging like a hoodie on laundry day, too loose.
Product Bundles by Wound Site
Clinics and retailers often suggest bundles based on wound location. You can choose a recovery suit for belly or chest wounds. For leg, paw, or tail wounds, you should use an e-collar or add a sleeve. Some bundles include both a suit and a cone for extra protection. Always check that the gear blocks your dog from reaching the wound. Your veterinarian’s instructions override general guidance.
Follow-Up for Owner Compliance
You need to check your dog’s gear every day. Clinics and retailers recommend daily follow-up calls or texts to help you stay on track. If you notice your dog can reach the wound, switch to an e-collar. Remember, if you can reach it, you can damage it. Only use a suit when it truly blocks access. Otherwise, default to an e-collar. Your veterinarian’s instructions override general guidance.
Top Mistakes and FAQs
Common Mistakes List
You want your dog to heal quickly and safely. Many owners make simple mistakes that slow recovery. Here are the most common errors:
Choosing a suit when the dog can still reach the wound.
Using a collar that is too short or loose.
Forgetting to check the gear twice a day.
Ignoring signs of redness or swelling.
Allowing the dog to lick or chew through the suit.
Picking the wrong size for the recovery suit.
Not following the reach test before deciding on gear.
Removing gear too soon before the wound heals.
Overlooking daily cleaning of the wound and gear.
Not calling the veterinarian when problems appear.
Letting the dog swim or bathe before the wound heals.
Using only a sleeve or cover for leg wounds without a collar.
Your veterinarian’s instructions override general guidance.
FAQ Block: Suits, Cones, Reach, Fit
You may have questions about recovery suits, cones, and fit. Here are answers to the most common questions:
Will my dog need a cone or any protective gear?
How do I know if the suit or collar fits my dog?
Can you show me how to give medications or change bandages?
How long before my dog can return to normal activity?
What should I do if my dog keeps trying to reach the wound?
Is it safe to use both a suit and a cone together?
How often should I check my dog’s wound and gear?
What signs mean I should call my veterinarian?
Your veterinarian’s instructions override general guidance.
Quick Buyer Recap
You want to choose the best gear for your dog’s recovery. Always match the gear to the wound location and use the reach test. Check fit every day. If your dog can reach the wound, switch to an e-collar. Clean the wound and gear twice daily. Call your veterinarian if you see any warning signs. Safety comes first for your dog.
You can help your dog heal by picking gear for the wound spot and doing the reach test.
Checking your dog every day keeps them safe after surgery.
Always follow your veterinarian’s instructions, not just general advice.
Your veterinarian’s instructions are most important. The right gear helps your dog feel better and heal. You keep your dog safe each day.
FAQ
How do I know if my dog needs an e-collar or a recovery suit?
You should check if your dog can reach the wound. Your veterinarian’s instructions override general guidance. Always ask your vet before choosing gear.
What should I do if my dog keeps trying to lick the wound?
You need to check the fit of the gear. If your dog still reaches the wound, switch to an e-collar. Your veterinarian’s instructions override general guidance.
Can my dog wear a recovery suit and an e-collar at the same time?
Yes, you can use both for extra protection. This helps if your dog is very determined. Always check that your dog stays comfortable and safe.
