
You need a TPLO recovery week by week checklist to ensure proper care for your dog after surgery. This checklist will guide you in using slings, harnesses, and traction socks, which are essential tools to prevent slips and complications immediately following the procedure. Remember, your surgeon’s plan takes precedence over general advice, so always consult with your veterinarian and adhere to these important tips:
Ask questions before the surgery.
Follow all instructions for home care.
Call the clinic if you notice any issues.
Attend all follow-up visits.
Key Takeaways
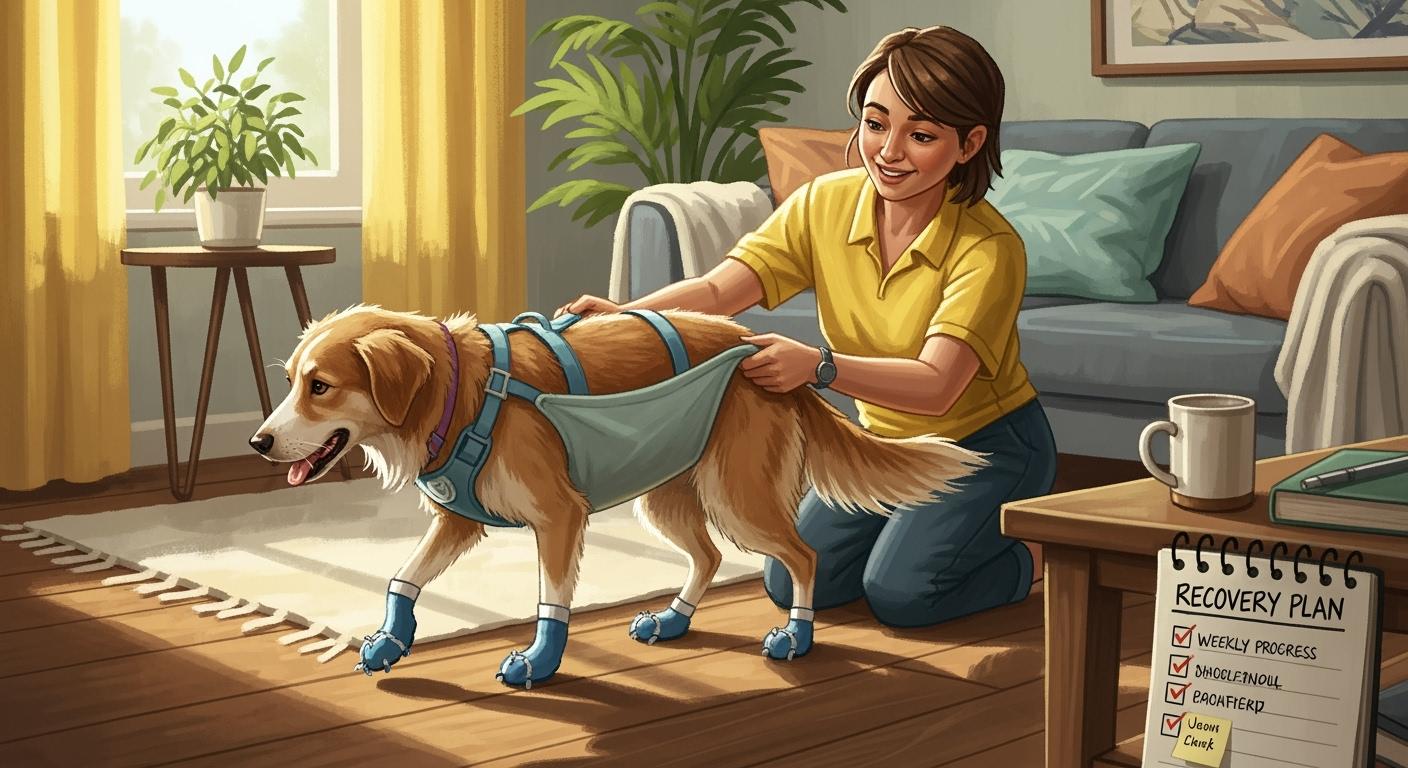
Use slings, harnesses, and traction socks to stop slips. These tools help your dog move safely during recovery. They also protect the surgical spot.
Look at your dog’s incision two times each day. Watch for redness, swelling, or any discharge. Finding problems early can stop bigger issues.
Follow your veterinarian’s discharge plan very carefully. This plan gives special steps for your dog’s needs. It is more important than general advice.
TPLO recovery guide: why gear matters
Preventing slips and setbacks
You want your dog to get better after TPLO surgery. The right gear helps stop common problems. If you do not use slings, harnesses, or traction socks, your dog might slip, fall, or jump. This can hurt or even mess up the surgery. Here are some problems that happen when you do not use the right gear:
Dogs can slip on smooth floors and hurt their knee again.
Pets might jump on furniture or go up stairs before the bone is healed.
Incisions can get licked or scratched, which can cause infection.
If your dog does too much too soon, it can swell or limp.
You need to keep your dog calm for at least 8 weeks. Your surgeon’s plan is more important than general advice.
Controlled rehab at home
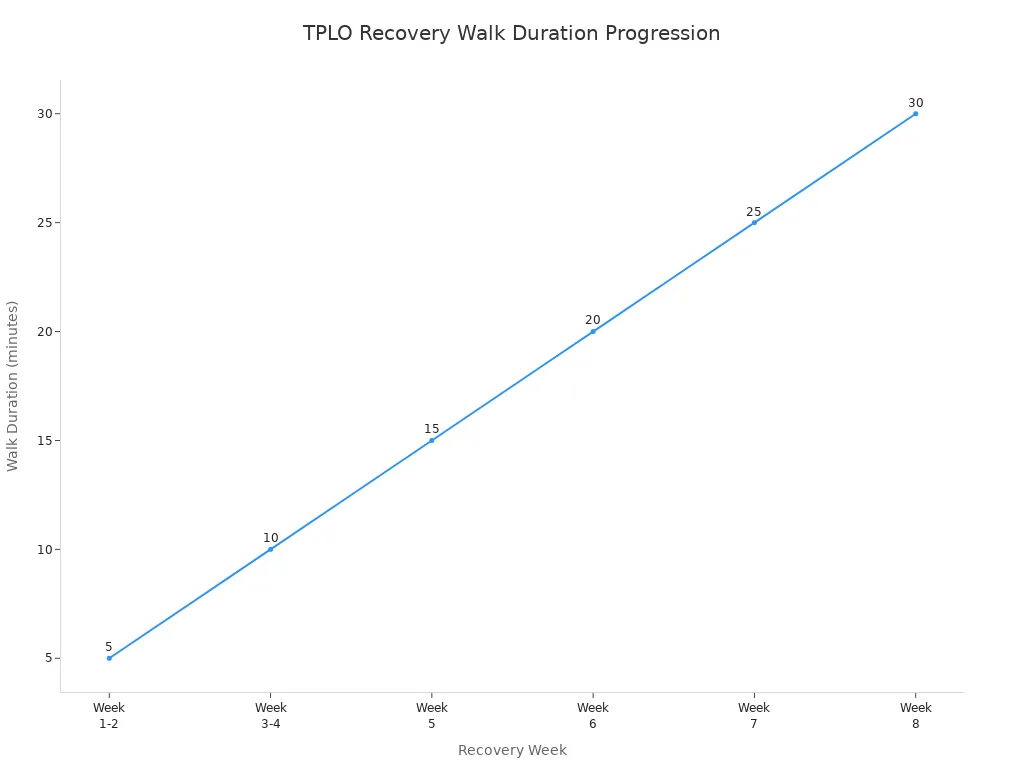
A tplo recovery guide helps you know what to do at home. You use gear to control your dog and keep the incision safe. The table below shows a normal home rehab plan:
Week | Activity | Details |
|---|---|---|
1-2 | PROM | 8–10 reps, 4 times daily, start 3 days after surgery |
3-4 | Up to 15 minutes for potty breaks, always controlled | |
5-8 | Leash Walks | Up to 30 minutes, still on leash, no running or stairs |
8-12 | Radiographs | Vet checks healing before off-leash activity |
Your surgeon’s plan is more important than general timelines.
Gear roles in TPLO recovery
Slings and harnesses help your dog go outside and walk a little. Traction socks stop slips on tile or wood floors. Recovery suits or cones keep your dog from licking and protect the incision. You need to check the incision two times each day for 14 days. Anti-lick gear is needed until the vet takes out sutures or staples, usually 10–14 days after surgery. The tplo recovery guide helps you use each piece of gear at the right time.
Daily decision table for TPLO recovery
You want to make safe choices each day during your dog’s TPLO recovery. Use this traffic-light table to help you decide what to do if you notice changes in your dog’s movement or comfort. Your surgeon’s discharge plan overrides general timelines.
Zone | What You See | What You Should Do |
|---|---|---|
🟢 Green | Mild soreness, steady progress | Continue with the current plan and gear use |
🟡 Yellow | Increased limp, swelling, or yelping | Rest for 1 day, return to the previous activity |
🔴 Red | Sudden pain, discharge, or refusal to walk | Call your clinic right away |
Green zone: normal soreness
You may see your dog move slowly or show mild soreness. This is normal in the first weeks after TPLO surgery. Keep using your sling, harness, and traction socks as directed. Stick to short, controlled walks and check the incision two times each day. Your surgeon’s discharge plan overrides general timelines.
Yellow zone: increased limp
If your dog starts to limp more, shows swelling, or whines when walking, you need to act. Follow the “setback rule”:
Rest your dog for 1 day
Go back to the last safe activity level
If your dog does not improve in 2–3 days, call your clinic
Watch for these warning signs:
Increased swelling or redness near the incision
Persistent lameness
Sudden reluctance to walk after improvement
Yelping or whining when bearing weight
Red zone: urgent concerns
If you see yellow or bloody discharge, severe swelling, or your dog refuses to walk, this is urgent. Call your veterinary clinic right away. Do not wait or try to fix these problems at home. Your gear helps prevent many issues, but some signs need fast action.
TPLO recovery week by week checklist
You need a clear tplo recovery week by week checklist to help your dog heal after tibial plateau leveling osteotomy. This guide shows you when to use slings, harnesses, and traction socks. It also tells you when to use other gear. Your surgeon’s discharge plan is more important than general advice.
Tip: Always walk your dog on a leash during recovery. Do not let your dog off-leash until your veterinarian says it is okay.
Week 1: incision care and support
In the first two weeks, you need to protect the incision and help your dog move. Use a sling or lift harness for bathroom trips, about 3–4 times each day. Traction socks stop slips on smooth floors. Check the incision two times each day for redness, swelling, or discharge. Anti-lick gear like a recovery suit or cone keeps your dog from licking the incision.
Daily checklist:
Use sling or harness for all walks (5–10 minutes, 3 times/day).
Check incision two times/day (total 28 checks in 14 days).
Use traction socks indoors.
Keep anti-lick gear on until suture removal (10–14 days).
Do passive range of motion (PROM): 10 slow reps, 3 times/day.
Use ice therapy (if your vet says it is okay): 10 minutes, 3 times/day, for the first 3 days.
Common mistakes and fixes:
Letting your dog walk without support. Fix: Always use a sling or harness.
Forgetting to check the incision. Fix: Set reminders for morning and evening.
Taking off anti-lick gear too soon. Fix: Wait until your vet removes sutures.
Worked example:
If you check the incision two times each day for 14 days, you do 28 checks. This helps you find problems early.
Weeks 2–4: controlled activity and traction
Your dog starts to move better, but you must keep activity safe. Keep using the harness for all walks. Walk for 5–10 minutes, two times each day. Massage the leg three times each day for four weeks. Traction socks are still important, especially on slippery floors.
Daily checklist:
Controlled leash walks (5–10 minutes, 2 times/day).
Keep doing massage (3 times/day).
Use harness and traction socks for all walks.
Stop PROM when your dog can move the leg all the way.
Keep anti-lick gear on until suture removal.
Common mistakes and fixes:
Letting your dog run or jump. Fix: Keep your dog on leash at all times.
Skipping massage. Fix: Make it part of your daily routine.
Not using traction socks. Fix: Use socks in places where your dog might slip.
Note: Your surgeon’s discharge plan is more important than general timelines.
Week 5: strength and safe movement
Your dog needs to get stronger and move safely. Walk for 20–30 minutes, two to three times each day. Start sit-to-stand exercises (10 reps, 3 times/day). Keep using the harness for support. Traction socks help your dog walk safely inside.
Daily checklist:
Leash walks (20–30 minutes, 2–3 times/day).
Sit-to-stand exercises (10 reps, 3 times/day).
Use harness and traction socks as needed.
Watch for more limping or swelling.
Common mistakes and fixes:
Skipping exercises. Fix: Track progress with a checklist.
Not watching for problems. Fix: Use the setback rule—rest for 1 day, go back to the last safe activity, call your clinic if your dog does not get better in 2–3 days.
Weeks 6–8: X-ray and progress
Your veterinarian will take X-rays to check bone healing. Walks get longer, up to 30–40 minutes, but always use a leash. Do not let your dog make sharp turns or run. Keep using gear for support and traction.
Daily checklist:
Leash walks (30–40 minutes, controlled pace).
Go to the X-ray appointment as planned.
Use harness and traction socks for safety.
Watch for pain or swelling.
Common mistakes and fixes:
Letting your dog off-leash before X-ray clearance. Fix: Wait for your vet’s approval.
Ignoring signs of pain. Fix: Tell your clinic if you see changes.
Weeks 9–12: gradual return
After your veterinarian checks the X-rays, you can slowly let your dog do more. Start with short off-leash times (5–20 minutes) and increase as your vet says. Keep watching for problems. Use gear if needed, especially in risky places.
Daily checklist:
Slowly increase off-leash time (5–20 minutes).
Keep doing leash walks if needed.
Use traction socks and harness in slippery or busy places.
Watch for limping or swelling during recovery.
Common mistakes and fixes:
Going too fast with activity. Fix: Increase activity slowly and follow your vet’s advice.
Stopping gear use too soon. Fix: Use gear until your dog moves well and steady.
TPLO recovery timeline overview
Here is a summary table of the tplo recovery week by week checklist. It shows what your dog can do and what to avoid:
Week Range | Activities and Limitations |
|---|---|
Weeks 1 and 2 | Recheck at two weeks, suture removal at 10–14 days. Use sling/harness, traction socks, anti-lick gear. |
Weeks 3 and 4 | Walks get longer (8–10 minutes), keep activity controlled, massage, no off-leash. |
Weeks 5 through 8 | Walks get longer (12–20 minutes), sit-to-stand exercises, no off-leash activity. |
Weeks 8 through 12 | X-rays at 8 weeks, start off-leash time (5–20 minutes) slowly. |
You can see how walk time goes up each week in the chart below:
Gear is important in every step of tplo recovery. Use slings and harnesses for support, traction socks for safety, and recovery suits for the incision. Always follow your tplo recovery week by week checklist and change things if your dog needs it. Your surgeon’s discharge plan is always most important.
Using slings and harnesses after TPLO surgery
Balance and support tips
You want your dog to feel safe and steady after tplo surgery. Use a sling or harness every time your dog goes outside, especially during the first week. Hold the sling under your dog’s belly to give gentle support. Do not lift all your dog’s weight. Let your dog use its own legs while you guide and steady movement. Short walks for bathroom trips help your dog stay calm and avoid slips. Try these steps for each trip:
Clip the leash to the harness.
Place the sling under your dog’s belly.
Walk slowly to the bathroom spot.
Keep walks brief and controlled.
Your surgeon’s discharge plan overrides general timelines.
Stairs and slippery floors
Stairs and smooth floors can be risky for any dog after tplo surgery. Always use a sling or harness when your dog needs to go up or down stairs. If possible, block off stairs until your dog gets stronger. Traction socks help your dog grip slippery floors. Lay down runners or mats in busy areas. Guide your dog with the harness and keep bathroom trips short, about three to four times each day.
Tip: Use traction socks and a harness together for extra safety on tile or wood floors.
When to upgrade gear
Watch your dog’s progress each week. If your dog struggles to walk or balance, consider a sturdier harness or a new sling. Upgrade gear if your dog grows, loses weight, or if the old gear wears out. Add anti-lick gear and traction solutions to your tplo recovery kit. Optional knee braces may help if your veterinarian recommends them. Your surgeon’s discharge plan overrides general timelines.
TPLO Recovery Kit Steps | Gear to Include |
|---|---|
Step 1: Support for walks | Sling, harness |
Step 2: Traction for safety | Traction socks, runners |
Step 3: Incision protection | Recovery suit, cone |
Step 4: Optional knee support | Vet-approved brace |
Check your dog’s comfort and adjust gear as needed. Safety comes first during every stage of tplo recovery.
Incision protection and anti-lick gear
Recovery suits vs cones
You want to protect your dog’s incision after TPLO surgery. Recovery suits and cones both help, but each has different benefits. Recovery suits feel more comfortable and let your dog eat, drink, and move easily. Dogs wearing suits often stay calmer and less stressed. Cones cover more areas and work better for injuries on the legs, face, or tail. Some dogs feel anxious or struggle with daily tasks when wearing a cone. You should choose the gear that fits your dog’s needs and comfort. Your surgeon’s discharge plan overrides general timelines.
Keeping gear clean and dry
Clean gear helps prevent infection and keeps your dog safe. Check the recovery suit or cone every day for dirt or moisture. Wash the suit as needed, following the instructions on the label. Dry the gear completely before putting it back on your dog. If the cone gets dirty, wipe it with a damp cloth and let it air dry. Always make sure the incision stays dry and covered. Your surgeon’s discharge plan overrides general timelines.
Signs to report to your vet
You need to check the incision site two times each day for changes. Look for redness, swelling, discharge, or a bad smell. If you see any of these signs, call your veterinarian right away. Use anti-lick gear until the vet removes sutures, usually 10–14 days after surgery. The table below shows how often to check and protect the incision:
Aspect | Recommendation |
|---|---|
Incision Protection | Use an e-collar or surgical suit to prevent licking. |
Daily Monitoring | Check the incision site every day for changes in color, warmth, or texture. |
Tip: Set reminders for morning and evening checks to help you remember.
Traction strategies for TPLO recovery
Traction socks and runners
You want to keep your dog safe from slips after TPLO surgery. Traction socks help your dog grip smooth floors. You should put traction socks on your dog before walks inside the house. Runners and mats add extra grip in busy areas. Place them in hallways, near doors, and in rooms with tile or wood floors.
Tip: Check traction socks each day for wear or dirt. Replace them if they lose grip.
Checklist for traction gear:
Put traction socks on your dog before indoor walks.
Lay runners or mats in high-traffic areas.
Clean socks and mats often.
Your surgeon’s discharge plan overrides general timelines.
High-risk areas in the home
Some places in your home are more dangerous for your dog during recovery. Stairs, kitchens, and entryways often have slippery surfaces. Block off stairs with gates. Move furniture to create clear paths. Use mats in places where your dog likes to rest.
High-Risk Area | Safety Action |
|---|---|
Stairs | Use gates, always assist with a sling or harness |
Kitchen/Entryway | Place mats or runners |
Living Room | Clear clutter, add rugs |
When more support is needed
If your dog slips or struggles to stand, you need more support. Add extra mats or upgrade traction socks. Use a harness or sling for extra balance. Watch your dog’s movement every day. If you see limping or swelling, rest your dog and call your clinic if it does not improve in 2–3 days.
Safety first: Your surgeon’s discharge plan overrides general timelines.
Step-by-step support:
Check traction socks and mats daily.
Use a harness or sling for bathroom trips.
Add more mats if your dog slips.
Contact your clinic if problems continue.
Vet-approved knee brace use
When braces are recommended
Sometimes, your dog may need a knee brace after tplo surgery. This is usually for dogs that are very active or need extra support. Your veterinarian might say a brace will help keep the knee steady while healing. You still need to keep your dog calm and limit activity for 8–12 weeks. Only use a brace if your vet says it is okay. Your surgeon’s discharge plan is always most important.
Use a brace if your dog is very active.
Add a brace if your dog has trouble staying steady.
Always listen to your veterinarian.
Break-in and skin checks
You need to let your dog get used to the knee brace slowly. Start with short times, about 30–60 minutes, three to five times each day. If your dog’s skin and walk look good, add more time every few days. Check under the brace before and after each use for red spots, swelling, or sore areas. The brace should fit tight but not rub or pinch. Watch for the brace slipping or bunching up, especially in the first week. Do these checks two times each day. Your surgeon’s discharge plan is always most important.
Look at your dog’s skin before and after using the brace.
Change the brace if you see any sore spots.
Watch for slipping or bunching.
Troubleshooting fit and gait
You might see problems with the knee brace during tplo recovery. Skin irritation is the most common problem. Sometimes the brace slips or breaks. A good fit helps stop these problems. Measure your dog carefully and use the sizing chart. Some dogs need a custom brace if their legs are shaped differently. Your veterinarian should check the brace often to make sure it works well.
Watch for red or sore skin.
Check if the brace slips.
Ask your vet for help if you have problems.
Tip: Make a checklist for brace use and skin checks. This helps you see progress and find problems early.
TPLO recovery gear checklist and top mistakes
Recovery gear checklist for discharge
You need the right gear at home to help your dog heal. Use this checklist to get ready before your dog comes home:
Item | Description |
|---|---|
Comfortable Bedding | Soft bed or crate cushion for rest. |
Ramp or Steps | Help your dog reach favorite spots safely. |
Safety Gates | Block off stairs and risky areas. |
Food and Water Bowls | Place bowls within easy reach. |
Medication and Supplements | Keep all prescribed items close by. |
Leash and Harness | Use for controlled bathroom breaks. |
Toys and Chews | Offer safe comfort toys (no jumping). |
Recovery Suit or Cone | Prevent licking or chewing at the surgery site. |
Slippery Surface Protection | Non-slip mats for floors. |
First-Aid Kit | Prepare for unexpected issues. |
Your surgeon’s discharge plan is more important than general advice.
Top 12 mistakes to avoid
Try not to make these mistakes so your dog can heal well:
Letting your dog get on furniture or use stairs.
Walking your dog without a leash outside.
Skipping bathroom breaks.
Leaving your dog alone.
Not using ramps or gates for stairs.
Ignoring changes in how your dog acts.
Missing steps for after-surgery care.
Forgetting to keep the wound clean.
Not noticing limping or swelling.
Skipping rehab or therapy.
Missing vet checkups.
Not making a safe place for your dog to recover.
Your surgeon’s discharge plan is always most important.
Comparison table: sling, harness, suit, socks, brace
Product | Best for | Limits | Fit Risks | When to Upgrade |
|---|---|---|---|---|
Sling | Bathroom trips, stairs | Not for long walks | Too tight/loose | Dog grows or gear wears |
Harness | Daily walks, control | May not fit all dogs | Rubbing, slipping | Dog changes size |
Recovery Suit | Incision protection | Not for leg wounds | Too hot, tight | After suture removal |
Traction Socks | Slippery floors | Wear out quickly | Lose grip | Socks lose traction |
Brace | Extra knee support | Vet must approve | Skin irritation | Fit changes, vet advice |
You help your dog heal by picking the right gear and using it the right way. Watch your dog and change gear if needed so your dog can get better.
TPLO recovery FAQs and troubleshooting
Quick Reference Card for owners
You need simple answers when your dog is healing from surgery. The table below gives you quick facts about TPLO recovery gear, activity, and safety. Your surgeon’s discharge plan is always the most important.
Question | Summary |
|---|---|
How long till my dog fully recovers from TPLO? | Recovery takes 16–20 weeks. The first 8 weeks have strict activity limits. |
Are follow-up x-rays a must? | Yes, they are needed to check healing at 8 and 16 weeks after surgery. |
Does the e-collar really need to stay on? | Yes, it stops licking and helps prevent infection at the surgery spot. |
What’s “activity restriction?” | It means only calm leash walks. No jumping or running is allowed. |
My dog had TPLO and there’s swelling. Should I be concerned? | Some swelling is normal after surgery. If it does not go away or hurts, call your vet. |
Common gear questions
You might have questions about using gear for safe walks and traction. Here are answers to common questions about TPLO recovery:
How do I know if my dog needs traction socks inside?
When should I change from a sling to a harness?
Can my dog wear a recovery suit instead of a cone?
How often do I check the incision site?
What is the best way to help my dog during bathroom trips?
Is physical therapy and strengthening needed at home?
How do I start rehab at home after surgery?
What signs mean I should call my veterinarian?
Tip: Always use gear the way your vet says. Check that it fits and is comfortable. Your surgeon’s discharge plan is always most important.
Troubleshooting setbacks
If your dog has trouble during recovery, you can help. Use this checklist for common problems:
Watch your dog for pain or changes in how they move.
Get follow-up x-rays before letting your dog do more.
Use sedative medicine if your dog cannot stay calm (ask your vet).
Keep doing physical therapy and strengthening as your vet says.
Help your dog at home with gentle walks and gear.
If swelling or limping does not get better, call your clinic.
Safety first: Never skip gear checks or activity rules. Physical therapy and rehab at home help your dog heal.
You help your dog get better by using the TPLO recovery checklist. Use gear the right way every day. Watch how your dog is doing and change activities if needed. Your surgeon’s discharge plan is more important than general advice. The table below can help you know what to do:
Progress Check | Why It Matters |
|---|---|
Daily checks | Find pain or swelling early |
Vet visits | Change plans for safe healing |
Your surgeon’s discharge plan is always most important. Celebrate each step your dog takes. Write notes in a journal and talk to your vet often. Being patient helps your dog heal well!
FAQ
How do you know if traction socks are needed indoors?
You see your dog slip or struggle on smooth floors. Traction socks help prevent falls. Your surgeon’s discharge plan overrides general timelines.
When should you switch from a sling to a harness?
You switch when your dog walks steadily and bears weight. Use a harness for longer walks. Your surgeon’s discharge plan overrides general timelines.
What is the safest way to help your dog walk after TPLO surgery?
You use a sling or harness for support. Keep walks short and controlled. Always check gear fit before each walk.
