
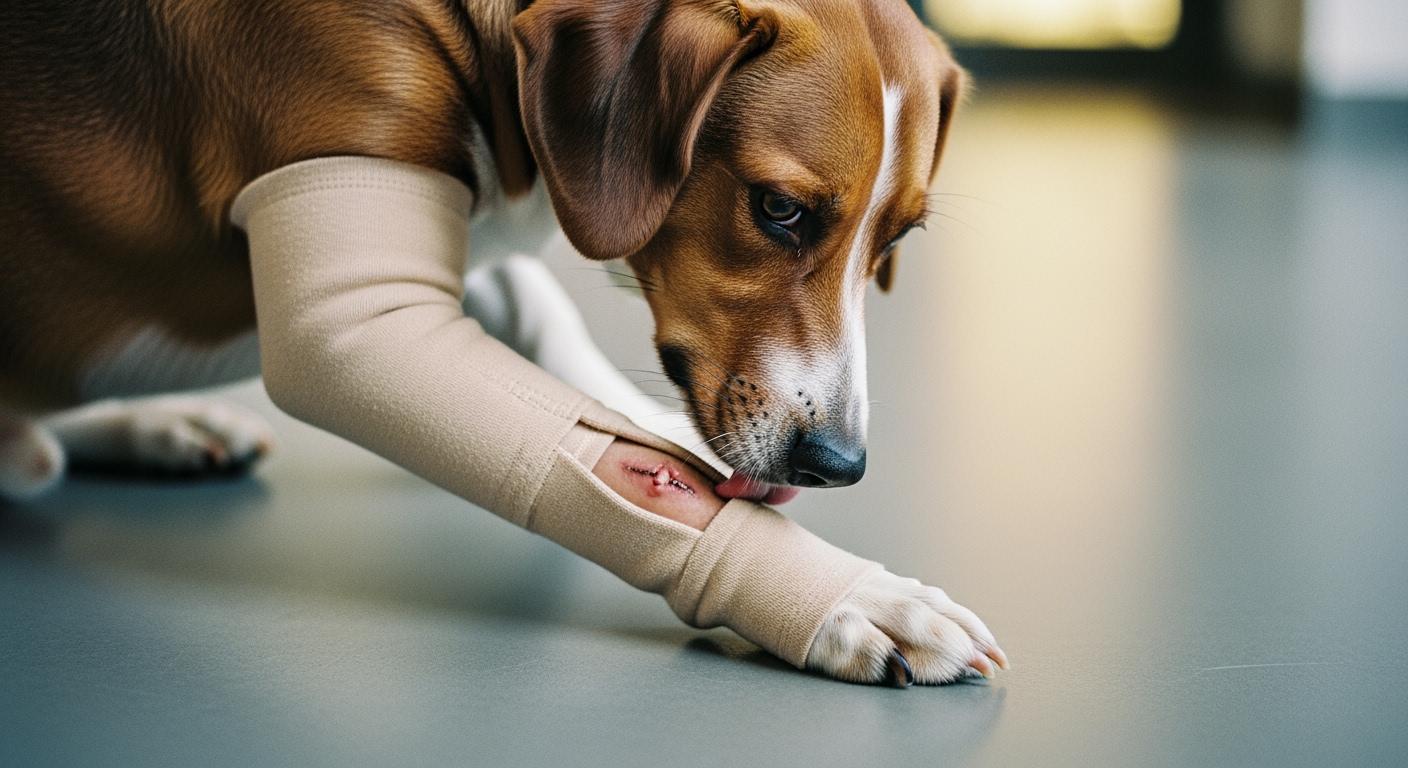
A front-leg lick sleeve may fully cover an incision while a dog is standing, yet expose a narrow section of the incision edge when the dog walks, sits, lies down, or bends the elbow. This often happens when the incision sits too close to the sleeve’s upper or lower coverage boundary, leaving too little margin for cuff movement, fabric pull, or rotation.
Check the cuff line after a short walk and again after the dog changes position. If the incision edge becomes reachable, recheck the sleeve length, coverage margin, and anchoring rather than simply tightening the cuff. When the sleeve cannot maintain stable coverage during normal movement, follow the veterinary team’s recommended barrier plan.
Where the Incision Edge Gap Opens First
Three gap patterns repeat across front-leg sleeves, and each starts from a different structural limitation. The first is the upper cuff gap. When the incision sits within an inch of the top cuff, the edge peeks out as soon as the dog lowers its head or bends the leg. The cuff rolls because the foreleg tapers from elbow to wrist. A narrow cuff band riding a tapered surface has almost no rotational resistance—when lateral leg movement pushes against one side of the cuff, there is no counter-surface wide enough to keep it flat. The edge catches fur, rolls inward, and the incision margin disappears under the fold. Tightening the cuff does not stop this. It only deepens the pressure mark.
The second pattern is the inner elbow pull. As the dog bends the leg, the fabric spanning the elbow joint goes slack on the outer side and draws tight across the inner crease. If the incision sits near that crease, the tension pulls the sleeve edge away from the skin. A gap opens at the exact spot where the leg folds most—and that gap widens every time the dog lies down. The third pattern is rotation after walking. A sleeve without an anchor point above the elbow tends to twist around the leg axis with each stride. After a dozen steps, the sleeve has rotated far enough that the incision—once centered—now sits at the edge of coverage. The dog finds it.
The fix is never more tension. Each of these failures originates in coverage geometry and cuff structure, not in how hard you pull the straps. A recovery sleeve that fits well on a standing dog can fail the moment the dog changes position if the cuff width, sleeve length, and anchor point were not designed for the range of motion a front leg goes through during ordinary rest and walking.
| Where the gap appears | Why it happens | Why tightening fails | Better design or product choice |
|---|---|---|---|
| Upper cuff gap | Incision too close to cuff edge | Cuff rolls or pulls during motion | Longer sleeve, flat anti-roll cuff |
| Inner elbow gap | Fabric pulls away when bending | Pressure causes marks, not coverage | Overlap beyond joint, flexible anchoring |
| Lower sleeve edge gap | Incision sits near lower edge | Tightening causes discomfort | Longer sleeve, better edge control |
| Twisting after walking | Sleeve rotates with movement | Tightening restricts movement | Body-anchored or anti-twist design |
| Closure-side pulling | Closures shift or bunch | Tightening increases pressure | Low-profile, stable closures |
| Incision between zones | Incision not fully in coverage area | Tightening does not add coverage | Choose sleeve with correct coverage zone |
In practice: Walk the dog ten steps, then place a finger at the original cuff line. If the cuff edge has migrated more than half an inch from that mark, the sleeve is rotating during stride and will expose the incision within minutes of unsupervised wear.
Design Features That Hold the Edge During Movement
Closing an incision-edge gap starts with coverage length—not tightness. A sleeve that only touches the incision edge when the dog stands still has zero margin for movement. Extending coverage by two to three centimeters beyond the visible wound edge creates a buffer. When the dog bends the leg or shifts weight, the incision migrates under the fabric but does not reach the boundary. The gap never opens because the edge never gets close enough to the wound.
Flat anti-roll cuffs solve the rolling problem at the structural level. A cuff that is sewn as a wide, flat band with interior grip stitching resists folding because the fabric width itself becomes the anti-rotation surface. The wider the cuff band relative to the leg circumference, the more lateral force it takes to initiate a roll. This is a geometry problem, not a material problem—and it is why a sleeve with flat cuffs at both ends tends to hold its edge position through sitting, lying, and rising cycles that would fold a narrow rolled-edge cuff within seconds.
Low-profile closures matter for a different reason. A bulky zipper or Velcro seam sitting on the inner leg gives the dog something to bite or paw at. If the closure sits in the bite path—the arc the dog’s mouth can reach when the head drops to the leg—the dog will work at it. The fabric does not need to tear. A closure that shifts even a few millimeters under repeated pawing creates a new gap at the seam. Closures placed on the outer leg surface, with flat seam construction, remove that target.
For incisions high on the foreleg, near the shoulder, a basic sleeve often cannot anchor well enough. The bicep area tapers sharply and the shoulder joint moves through a wider arc than any cuff can track. A sleeve that connects to a chest panel or harness distributes the anchoring load across the torso. The sleeve moves with the body, not against it, and twisting near the shoulder becomes much harder to initiate. This is not about making the sleeve tighter—it is about moving the anchor point to a surface that does not change shape with every step.
| Situation | Front leg sleeve may work when | Better alternative when | What to check next |
|---|---|---|---|
| Front Leg Recovery Sleeve | Incision sits in the center of coverage | Edge gap appears in motion | Try longer or anchored sleeve |
| Longer front-leg sleeve | Extra margin covers incision edge | Sleeve still shifts or rolls | Try body-connected or suit style |
| Body-connected sleeve or suit | High or moving incision area | Dog escapes or chews at anchor | Try cone or vet plan |
| Cone or e-collar | Sleeve cannot cover or dog chews sleeve | Dog cannot tolerate cone | Vet-directed plan |
| Veterinary bandage/dressing | Open, infected, or complex wounds | Bandage slips or causes swelling | Return to vet for new plan |
Tip: After fitting a sleeve with flat anti-roll cuffs, have the dog lie down and stand up three times. The cuff should return to within a quarter-inch of its starting position each cycle. If it creeps, the cuff design cannot hold the edge through repeated position changes, and the incision will be exposed during overnight rest.
When a Front-Leg Sleeve Cannot Protect the Incision
Some wound locations and conditions push past what any sleeve design can manage. The table below maps the boundaries. A sleeve works best when the incision sits in the middle third of the foreleg, on a straight section of the limb, away from high-motion joints. The further the incision is from that zone, the more a sleeve becomes the wrong barrier choice—not because the sleeve is poorly made, but because the mechanical demands of that wound location exceed what a fabric tube can deliver.
| Wound Location | Decision Direction | Main Limitation | Better Option if Sleeve Fails |
|---|---|---|---|
| Knee or Stifle | Often suitable with careful edge monitoring | Edge gap opens when sitting or bending | Cone or vet-approved wrap |
| Hock or Ankle | Sometimes suitable if sleeve stays centered | Bunching, sliding, pressure on bony points | Cone, boot, or custom wrap |
| Lower Leg | Often the best match for a sleeve | Twisting, riding up, strap loosening | Cone, boot, or vet plan |
| Paw / Toe / Pad | Rarely enough on its own | Dog can bend and reach paw past sleeve opening | Boot, bandage, cone, or vet plan |
| Open/Infected Wound | Not suitable for sleeve use | Traps moisture, hides infection progression | Vet-directed wound care only |
An open or infected wound is the clearest contraindication. A sleeve traps moisture against the wound bed, hides the early signs of infection progression, and turns a manageable wound into a sealed problem. A dog that licks persistently through a sleeve is not being stubborn—it is signaling that the barrier has already failed. When licking continues despite full coverage, assume moisture, pressure, or irritation is driving the behavior, and remove the sleeve to inspect.
Disclaimer: This check assumes a short-coated dog where skin and incision edges are visible on inspection. Double-coated or very dense-furred breeds may show subtler rub marks that require hand-checking rather than visual inspection—run your fingers along the cuff line and closure path after each wear period. Dogs with angular limb deformities or very deep chests may fall outside the conformation this sleeve pattern was built around, and the standard fit checks described here may not catch every pressure point.
What Skin Inspection Reveals After Removal
Remove the sleeve after each wear period and look at the skin, not the fabric. The sleeve can look clean and well-positioned while the skin underneath tells a different story. Skin signals fall into three categories, and acting on the wrong one delays the decision that matters: keep using, adjust, or stop.
| Status | What You See | What To Do |
|---|---|---|
| Green | Fading redness, swelling decreases, wound edges closing | Continue using sleeve, monitor twice daily |
| Yellow | Mild redness, mild swelling, edges stable | Adjust fit, check coverage margin, retest movement |
| Red | Deepening redness, swelling increases, heat, discharge, odor, wound edges pulling apart | Stop using sleeve, contact veterinarian |
Green signals mean the sleeve is working. The wound environment is stable and the barrier is holding. Yellow means the sleeve is marginal—the incision is not getting worse but the fit or coverage is borderline, and a small adjustment may be enough. Red means the sleeve is no longer protecting anything. Heat at the wound site, new discharge, or a spreading redness signal that moisture or friction has tipped the wound environment in the wrong direction. Pulling the sleeve off at the first red signal prevents the most common cascade: a small gap turns into licking, licking turns into infection, and a healing incision becomes an open wound.
The key distinction is between marks that fade and marks that deepen. Pressure marks from a cuff that sits in one place for hours will look pink and uniform, and they should lighten within ten minutes of removal. Marks that stay red or grow darker after removal indicate sustained friction or trapped moisture—not just pressure. That distinction matters because pressure can be normal. Friction and moisture are not.
Note: Press your palm against the inner lining immediately after removing the sleeve. If the lining feels damp or cool to the touch, moisture is not escaping the fabric. A dry lining after twenty minutes of wear signals adequate breathability. Damp lining after the same period means the sleeve is trapping sweat and wound exudate against the skin, and a different material or more frequent changes are needed.
FAQ
Why does the sleeve cover the incision when my dog stands but not when he lies down?
Standing extends the foreleg and pulls the skin taut. The sleeve sits over a straight, narrow surface. Lying down flexes the elbow and wrist, shortens the effective leg length, and bunches skin near the joints. The sleeve does not shorten with the leg—it slides or folds. If the sleeve length was matched to the standing leg, it will be too long for the flexed leg and the excess fabric either bunches at a joint or rides up, exposing the lower edge. A sleeve that cannot handle both positions needs more than a size adjustment—it needs a different anchoring strategy or a longer coverage zone that keeps the incision centered through the full range of motion.
Can I tighten the straps to stop the gap?
Tightening cannot create coverage where fabric is absent. If the incision sits near the cuff edge or between two coverage zones, pulling the straps harder only increases pressure at the contact points without extending the fabric. You will see deeper strap marks but the same edge gap. The problem is coverage geometry, not tension. A longer sleeve or one with an anchor point above the incision zone addresses the root cause.
How do I check whether the sleeve is truly protecting the incision?
Mark the incision position on the outside of the sleeve with a small piece of tape. Walk the dog for two minutes, then have the dog sit and lie down. Check whether the tape mark has drifted relative to the actual incision underneath. If the mark has moved by more than half an inch in any direction, the sleeve is shifting during normal movement. Remove the sleeve and inspect the skin at the original cuff line and closure path for deepening redness, moisture, or fabric imprints that do not fade within ten minutes.
When should I switch from a sleeve to a cone?
Switch when the incision edges show any deepening redness, swelling, heat, or discharge after sleeve wear—these signal that moisture or friction is compromising the wound. Switch when the dog chews through or removes the sleeve despite correct fit. Switch when the incision is on the paw, toe, or pad, where a sleeve cannot block access because the dog can bend around it. A sleeve and a cone solve different problems—a sleeve blocks direct tongue contact to a specific leg zone, while a cone blocks reach to any part of the body, at the cost of comfort and spatial awareness. The right choice depends on whether the wound location is sleeve-accessible.
A front-leg anti lick sleeve fails at the incision edge, not in the middle of the fabric. The edge is where cuffs roll, where joints pull fabric away from skin, and where rotation during walking shifts the coverage zone off target. Checking the sleeve only while the dog stands still misses every failure mode that actually matters. Walk the dog. Bend the leg. Watch the cuff line. If the edge moves, the barrier is gone—even if the sleeve still looks perfectly placed from across the room.
