
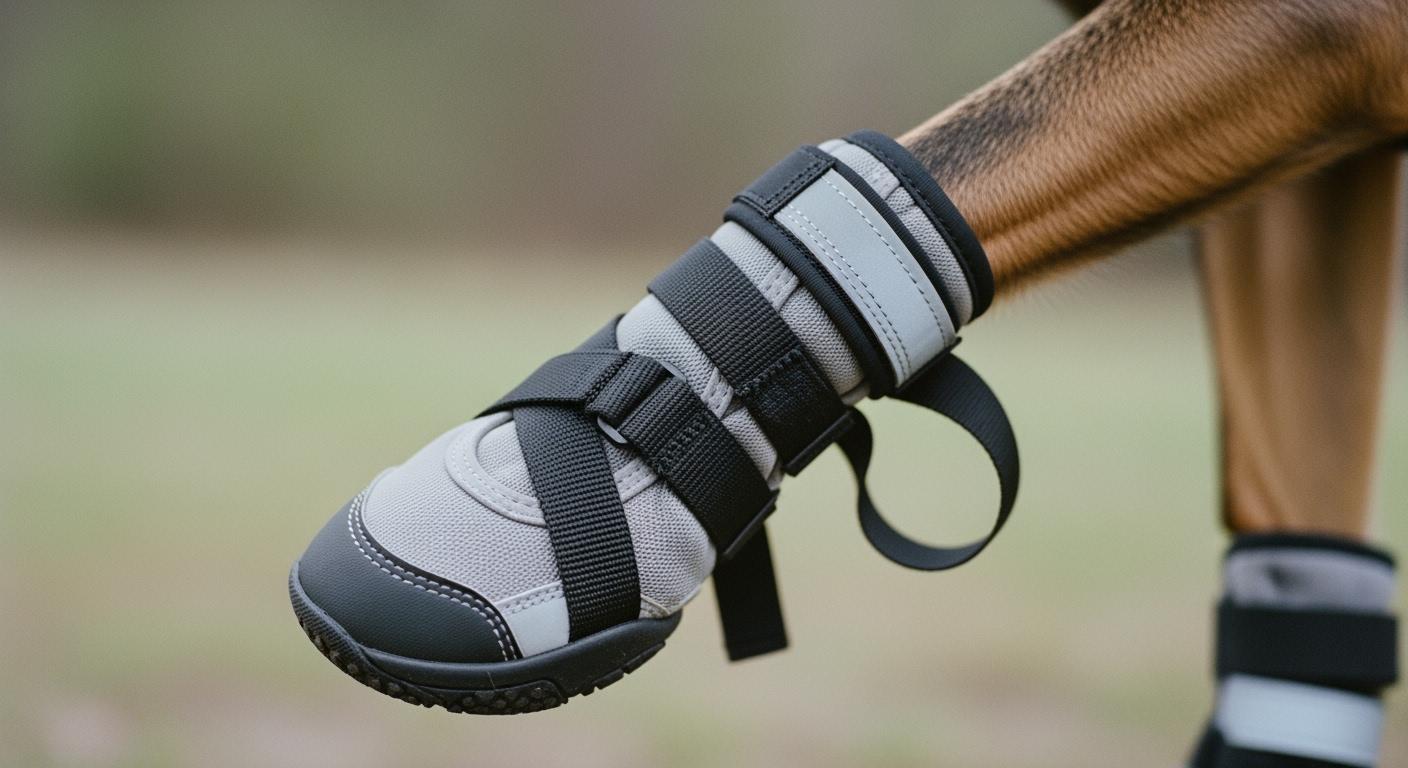
A dog walks across the floor wearing a no-knuckling boot. The outside toe cap looks intact. The straps appear snug. But with every step there is a scraping sound — nails grinding the inside front wall of the boot. After a short walk, the lining shows fresh wear marks. The assumption is usually that the boot is too small. Most of the time, it is not. The real problem is that the straps are not controlling forward paw slide, the toe box lacks clearance, or the outsole traction is too low to prevent dragging.
Inside nail scraping is a motion-control failure disguised as a fit problem. What a no-knuckling boot brace does to the outside of the paw matters far less than what it lets the paw do on the inside.
When a No-Knuckling Boot Protects the Outside but Scrapes the Inside
A clicking or scraping sound during walking is the most common first signal. The dog may begin to hesitate, high-step, or kick the paw outward on each stride. New wear marks appear on the boot lining, concentrated near the front inner wall. Some dogs stop mid-walk to chew or lick at the boot. None of these signs point to the toe cap being too small — they point to the paw traveling forward inside the boot shell with every push-off.
Tip: Walk the dog indoors on a non-slip surface for five to ten minutes, then remove the boot and check for any fresh lining marks or nail dust near the front seam. No marks and no sound is the pass signal.
Inside scraping versus outside toe scuffing
Inside scraping happens when the nails grind against the boot’s front lining. Outside toe scuffing happens when the ground wears down the outer toe cap. The two are unrelated. Outside scuffing often means the toe cap is absorbing abrasion as intended. Inside scraping means the paw is not held in place — it can cause nail-bed irritation, cracked nails, and enough discomfort that the dog refuses to walk. A boot can pass the external durability test and still fail the internal motion-control test badly.
The failure chain runs deeper than most product descriptions acknowledge. When a dog with knuckling pushes off, proprioceptive deficits mean the paw does not self-correct its position. If the strap layout relies on a single anchor point or a narrow band across the mid-paw, lateral forces concentrate along the strap edge. The strap edge rolls. That rolling motion releases tension unevenly, and the paw slides forward incrementally with each step. After ten or fifteen strides the paw has migrated far enough that the nails contact the front wall. The outer toe cap still looks pristine. The inner lining is taking all the damage. This is why a foot brace designed with multi-point strap routing changes the outcome — distributing the hold across two or three anchor points prevents that single-edge roll from cascading into forward migration.
Strap Angle, Toe-Box Clearance, and the Real Cause of Nail Grinding
The toe-up strap is often treated as a lift aid. In practice its angle determines whether the nails are pulled away from the front wall or driven into it. A strap that pulls straight upward creates a vertical force vector. A strap routed forward through a D-ring at the front of the boot and angled slightly ahead of vertical creates both lift and a rearward component — the paw is pulled up and back simultaneously. That half-inch difference in strap routing changes the nail position inside the toe box by enough to eliminate grinding. Walk the dog for ten minutes with the strap adjusted one way, then the other. After each walk, remove the boot and look at the front lining under direct light — any fresh nail tracks mean the angle needs correction. No tracks at all is the pass signal.
| Failure sign | Likely cause | Better design feature | What to check next |
|---|---|---|---|
| Nails scraping the front lining | Paw slides forward | Deeper toe-box clearance | Nail position in toe box |
| Paw sliding forward | Loose straps, poor traction | Multi-point strap layout | Strap tension and outsole grip |
| Boot rotating during turns | Weak anti-rotation support | Wrap-around strap design | Boot fit during turns |
| Toe-up strap over-pulling | Wrong strap angle | Adjustable lift angle | Strap angle and paw position |
| Toe cap feels hard, lining wears | Lining compresses too much | Reinforced soft lining | Lining thickness after walking |
| Dog kicks or chews the boot | Pain or pressure | Roomy toe box, soft lining | Check for redness or swelling |
Toe-box depth and lining compression under load
A shallow toe box leaves the nails pressed against the front wall even at rest. When the dog pushes off, the paw naturally spreads — and with nowhere to go, the nail tips dig into the lining. Lining material choice compounds this. A soft foam lining that feels plush in hand can compress to near-zero thickness under a dog’s body weight, leaving the nails grinding against the hard shell beneath the fabric. What passes a finger-press test in a clinic fails the loaded-walk test on pavement.
The observable check is simple. After a walk, pull the boot off and look at the lining’s front inner face. If the lining shows a permanent depression or the fabric fibers are flattened in a crescent-shaped pattern matching the nail profile, the toe-box depth plus the lining compression rate together are insufficient for this dog’s gait. A boot with adequate clearance leaves the lining surface uniform — no crescent marks, no fiber damage, no visible deformation at the front wall. This check works regardless of breed or nail length, which matters because early knuckling signs often go unnoticed until nail wear patterns become obvious.
Fit Checks That Reveal the Real Problem
Before concluding the boot material or design is at fault, three checks isolate whether the issue is fit, strap routing, or something deeper. Each check is independent — pass one, move to the next.
Paw-width measurement under load
Measure paw width while the dog is standing, bearing full weight. A sitting or lying measurement understates the spread by enough to choose a boot that is too narrow. Measure across the widest point of the weight-bearing paw. A boot that matches this dimension with the lining uncompressed gives the paw room to spread during push-off without the nails driving into the side walls.
Nail-position check inside the toe box
Place the paw fully back into the heel area of the boot. Before fastening straps, look at where the nail tips sit relative to the front wall. The nails should have visible clearance — even an eighth of an inch matters. If the nails touch or press into the front before the dog takes a single step, the toe box is too shallow for this paw, and no amount of strap adjustment will fix the grinding. This check flips the typical sizing logic: the important dimension is not paw length from heel to toe tip, but the distance from the heel pocket to the front inner wall of the toe box versus the nail projection under load.
Walk test and post-wear inspection
- Check the nails and paw before putting the boot on.
- Place the paw fully back into the heel area.
- Fasten straps evenly without crushing the toes.
- Walk indoors for five to ten minutes on a non-slip surface.
- Remove the boot and inspect the lining, nails, toe tips, and skin.
- Adjust only one variable at a time: size, strap tension, toe-up angle, or walking surface.
- Stop use if there is pain, bleeding, swelling, heat, or repeated distress.
A boot that passes all three checks consistently is one where the paw stays anchored. When a toe-up control brace holds the paw in position through the full stride cycle, the nails never make contact with the front wall — and the lining stays clean walk after walk.
When the Boot Is Not the Right Tool
A no-knuckling boot controls paw position during walking. It does not treat the underlying neurological condition that causes the knuckling. Distinguishing a boot-fit problem from a condition that needs veterinary assessment prevents weeks of frustration and avoidable paw damage.
| Signal level | What it looks like | Action |
|---|---|---|
| Green | No scraping sound, no lining marks, dog walks calmly | Continue use and monitor fit |
| Yellow | Light scraping sound, mild lining mark, boot shifts slightly | Adjust straps or check toe-box clearance |
| Red | Nail bleeding, toe swelling, heat, pain, dog refuses to walk, boot rotates every few steps | Stop use and consult a veterinarian |
Red signals — bleeding, swelling, heat, persistent pain — mean the boot is causing harm, not preventing it. Continuing to use the boot when these signs are present can worsen nail-bed damage and create sores that take weeks to heal. A dog that repeatedly kicks, chews, or freezes when the boot goes on is communicating that something is wrong, and forcing continued wear is not a fit problem to solve with adjustment — it is a stop signal.
Disclaimer: The fit checks described here assume a short-coated dog where lining marks and skin redness are visible on inspection. Double-coated breeds may show subtler rub marks that need hand-checking rather than visual inspection — run fingers along the paw edges and between toes after each session. If the dog’s leg conformation falls outside the breed norms this boot was patterned for — particularly angular limb deformities or very deep chests that alter weight distribution across the paw — the pressure-point checks described may not catch every problem area.
Sometimes a boot is simply the wrong category of support. When paw drag is severe enough that a rear paw drag brace with full-coverage outsole traction and reinforced toe protection becomes necessary, a no-knuckling boot alone cannot provide enough surface protection. Similarly, when proprioceptive loss has progressed to the point that the dog stands on the top of the paw continuously rather than knuckling intermittently, the boot’s lift mechanism may not overcome the constant folding. A knuckling support solution that spans the carpus or tarsus provides the broader stabilization a foot-only boot cannot.
Persistent red signals that do not resolve with fit changes warrant veterinary evaluation — not because the boot caused the underlying condition, but because worsening proprioceptive deficits change what any boot can accomplish. The product’s job is to support the paw when support is mechanically possible. Recognizing when that boundary has been crossed is part of using the product correctly.
FAQ
Why do my dog’s nails scrape inside the no-knuckling boot?
Nails scrape when the paw slides forward inside the boot during push-off. The most common causes are straps that do not control forward motion, a toe box too shallow for the nail projection under load, or a toe-up strap pulling at an angle that drives the paw forward rather than lifting it up and back.
How do I tell if the problem is fit or strap routing?
Check nail position with the paw seated in the heel before fastening straps. If nails touch the front wall at rest, the toe box is too shallow regardless of strap routing. If nails have clearance at rest but the lining shows fresh marks after a walk, the straps are not controlling forward slide — adjust strap tension and toe-up angle before changing boot size.
What design features reduce nail scraping most?
Multi-point strap anchoring that prevents single-edge strap roll, toe-box depth that accommodates nail projection under load, lining that resists full compression under body weight, and outsole traction that reduces the paw-drag impulse on each stride. A single strap across the mid-paw cannot control rotation and forward slide simultaneously — at least two anchor points are needed to separate those forces.
When should I stop using the boot and see a veterinarian?
Stop immediately if there is bleeding, swelling, heat, or the dog refuses to walk. These are not fit problems — they are injury signals. Persistent nail-bed redness after fit correction, a dog that repeatedly chews or kicks the boot despite passing all fit checks, and any sign that knuckling severity is increasing warrant veterinary evaluation.
