
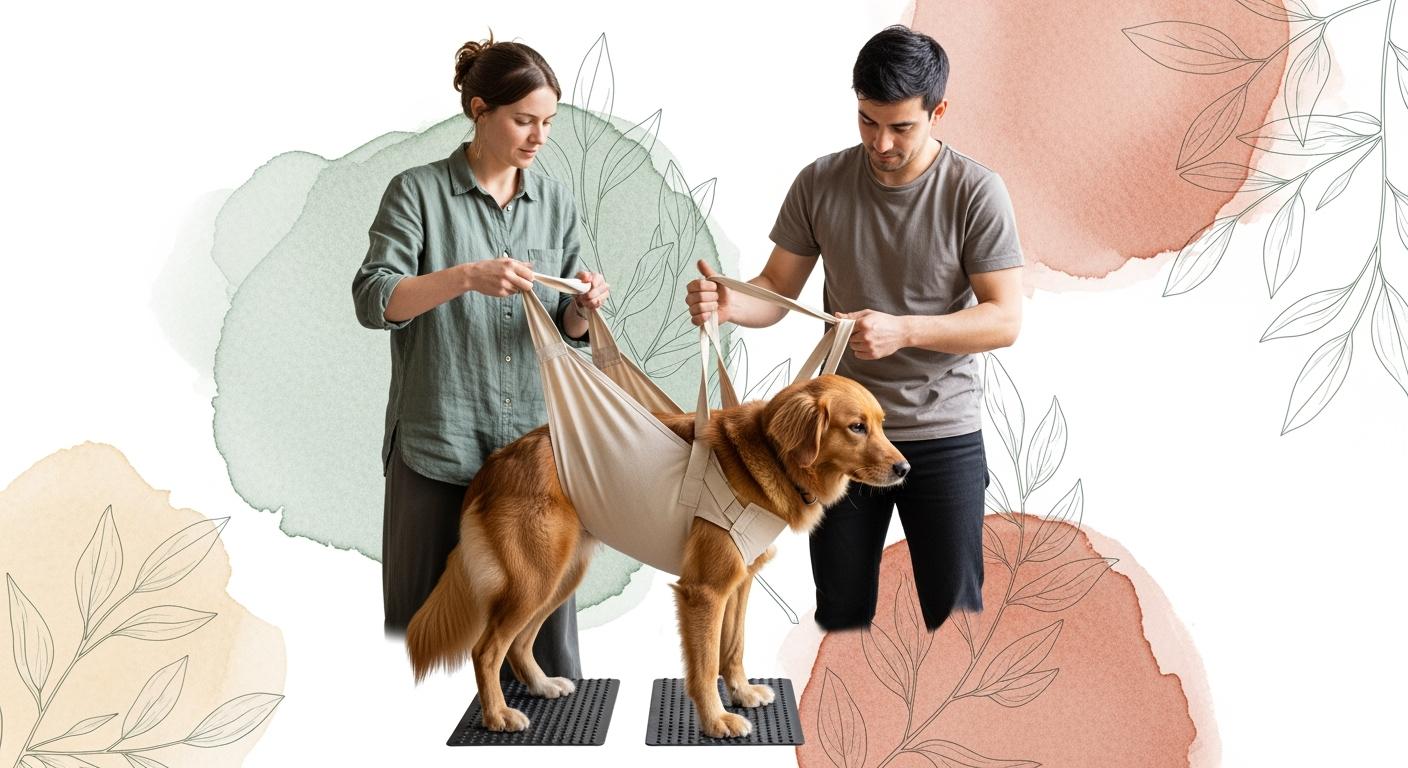
The two-point lifting technique for dogs uses support at both the front and rear of the body during short, controlled transfers. A properly fitted support sling or full-body lift harness may help a handler steady a dog that has difficulty standing, crossing a slippery floor, or moving between a bed, vehicle, and potty area.
This technique is not appropriate for every dog or every injury. The amount of assistance, permitted activity, and safest support position should follow the veterinarian’s or rehabilitation professional’s instructions. For a broader overview of braces, lift harnesses, anti-lick protection, and movement support, see the Dog Recovery Support Guide.
Key Takeaways
Two-point support assists the chest and rear body at the same time, which may provide better balance than lifting only one end.
Use only the amount of lift needed for a short transfer. Do not suspend a dog high off the floor or force movement.
Prepare a clear route with non-slip runners, check sling placement, and agree on handler cues before moving the dog.
Stop if the dog shows new pain, panic, breathing difficulty, collapse, sudden weakness, or refusal to bear weight.
What Is the Two-Point Lifting Technique for Dogs?
The two-point lifting technique supports the dog at two body zones: one under the chest or front torso and one under the abdomen near the rear legs. The goal is controlled assistance during a necessary transfer—not lifting by the neck, limbs, or collar and not carrying the dog farther than needed.
Two handlers may use separate front and rear supports. One handler may use a properly fitted full-body harness with front and rear handles when the dog’s size, condition, and the surrounding space make that practical. Large dogs or dogs with unpredictable weakness usually require a second handler.
One-Point vs Two-Point Support
One-point support assists only the front or rear of the body. A rear sling, for example, may be sufficient when the front legs remain stable and the dog needs limited help during a potty break. Two-point support may be more appropriate when both ends are unstable, the dog tips or rotates with rear-only assistance, or a short transfer requires better front-to-rear control.
Two-point support should not automatically be treated as the stronger or better option. The correct setup depends on the affected body area, the dog’s ability to bear weight, the transfer distance, and professional guidance.
When Two-Point Support May Be Considered
A veterinarian or rehabilitation professional may recommend front-and-rear assistance for situations such as:
Short transfers between a bed, floor, crate, or vehicle
Controlled potty breaks when the rear legs buckle or the dog cannot remain steady
Crossing a short section of slick flooring after non-slip runners have been placed
Assisting a dog whose front and rear body both need stabilization
Moving through an unavoidable threshold or low step under an approved recovery plan
For rear-support scenarios that do not require front lifting, see the guide to using a dog rear lift harness for potty breaks.
When Not to Continue Lifting
Stop the transfer and seek veterinary guidance if the dog develops new or severe pain, panic that does not settle, sudden weakness, collapse, breathing difficulty, uncontrolled movement, or an inability to bear weight that is new or worsening. Do not continue simply because the harness is already in place.
If spinal injury, fracture, major trauma, or another unstable condition is suspected, avoid unnecessary repositioning and contact a veterinary professional for handling instructions.
Essential Gear for Two-Point Lifting

The setup should match the dog’s body shape, support needs, and transfer route. Padding alone does not guarantee a safe fit; strap position, handle balance, clearance around the armpits and groin, and resistance to slipping also matter.
Rear Support Sling
A rear support sling is positioned under the abdomen near the hind legs and is intended to assist the rear body. It may be suitable when the front legs remain stable. The sling should not press into the groin, genitals, inner thighs, or incision area, and it should not slide forward during movement.
Front Support or Full-Body Lift Harness
Front support should distribute assistance across the chest or torso without tightening around the neck or pulling directly through the armpits. A full-body design with separate front and rear support zones may allow one coordinated setup instead of two loose slings. Review the structure of a lift harness for front and hind legs when comparing support zones and handle placement.
Non-Slip Runners and Traction Support
Place non-slip runners or secured mats along the transfer route before moving the dog. Loose rugs can bunch or slide and create another hazard. Traction socks or paw grips may be useful for some dogs, but they should fit securely and should not replace environmental control or hands-on support when the dog remains unstable.
Safety principle: Assist only as much as needed. Keep the dog close to the floor, move slowly, and stop to reset if the equipment shifts or the dog shows distress.
Rear Sling vs Full-Body Harness vs Two-Sling Setup
Support Setup | Primary Role | Key Limitation | Typical Short-Distance Use |
|---|---|---|---|
Rear Support Sling | Assists the hindquarters | Does not stabilize the front body | Potty breaks or brief standing support |
Full-Body Lift Harness | Connects front and rear support zones | Requires careful sizing and strap adjustment | Controlled transfers and short assisted movement |
Separate Front and Rear Supports | Allows two handlers to control each end | Requires coordinated timing and stable equipment placement | Large dogs or dogs unstable at both ends |
How long a dog needs assistance, whether stairs are allowed, and how much weight the dog may place on the limbs depend on the diagnosis, procedure, and individual recovery plan. Do not apply a fixed post-surgery timeline to every dog.
Step-by-Step Two-Point Lifting Technique
1. Prepare the Route
Confirm that the planned transfer is permitted under the dog’s care instructions.
Clear obstacles, secure doors, and prepare the destination before fitting the support equipment.
Place secured non-slip runners over slick flooring and check that they do not move under pressure.
Keep children and other animals away from the transfer route.
Have the second handler in position before asking the dog to stand.
2. Position the Support Zones
Place the rear sling or rear harness section under the abdomen near the hind legs, following the product instructions and avoiding sensitive anatomy.
Position the front support across the chest or front torso without pulling against the neck or armpits.
Check that straps lie flat and that no edge crosses an incision, wound, swollen area, or painful joint.
Apply light support while the dog stands. Watch for sliding, twisting, pressure concentration, or a sudden change in posture.
Readjust before moving if the front and rear handles do not share the load evenly.
3. Coordinate the Handlers
Agree on simple cues before the lift, such as “ready,” “stand,” “move,” “pause,” and “lower.” The front and rear handlers should move at the same pace and stop together. One person should not pull ahead while the other is still adjusting the support.
Begin with the dog standing or positioned as directed by the veterinary team.
Apply gradual upward assistance at both support points rather than jerking the handles.
Keep the dog close to the floor and allow safe weight bearing when permitted.
Move only along the prepared route and pause if the dog’s feet lose traction.
Lower the dog gradually, release tension, and check the support zones before removing the equipment.
4. Use Extra Caution on Steps and Vehicle Transfers
Avoid stairs whenever the dog’s care plan restricts them. When a step or vehicle threshold cannot be avoided and professional guidance allows the transfer, prepare traction, minimize the height difference where possible, and use two handlers for a large or unstable dog. A ramp may be preferable when it is stable, properly angled, and approved for the dog’s condition.
Example: Potty Break Across a Slippery Hallway
Before asking the dog to stand, place a secured non-slip runner from the resting area to the exit. Fit the rear and front support zones, confirm that neither section presses into the groin or armpits, and use one agreed cue to begin. Move slowly, provide only the assistance needed, and stop if the dog slips, freezes, panics, or shows new pain.
Common Mistakes to Avoid
Lifting by the collar, limbs, tail, or loose skin
Using a rear-only sling when the front body is also unstable
Pulling the support handles upward too quickly
Allowing straps to cross an incision, wound, groin, or armpit
Moving across slick flooring before traction has been prepared
Continuing after the dog shows pain, panic, collapse, or new weakness
Using a fixed schedule instead of the dog’s individual activity restrictions
Choosing a Setup for Common Transfers
Situation | Possible Support Setup | Handler Focus | Reason to Stop |
|---|---|---|---|
Short potty route on slick flooring | Rear sling or full-body support, depending on front-leg stability | Traction and controlled pace | New pain, buckling, or repeated slipping |
Transfer between bed and floor | Front-and-rear support when both ends are unstable | Even timing and low lift height | Panic, twisting, or equipment movement |
Vehicle entry or exit | Full-body harness or two-handler setup | Minimize height difference and avoid jumping | Refusal to bear weight or uncontrolled movement |
Aftercare and Fit Monitoring
After each assisted transfer, inspect the areas touched by the sling or harness. Look for redness, swelling, hair disturbance, moisture, tenderness, or an indentation that does not quickly fade. Repeated slipping or rotation also indicates that the setup needs reassessment.
Do not simply add more strap tension when equipment moves. Check whether the support zone, size, handle balance, or product type is unsuitable. The guide to preventing rubbing and pressure-related skin damage explains additional skin-check principles that also apply to lift harness contact zones.
Check Zone | What to Look For | Next Step |
|---|---|---|
Groin and inner thighs | Redness, pinching, swelling, or strap migration | Stop and reposition; reassess size and sling location |
Armpits and chest | Rubbing, hair loss, moisture, or restricted front-leg movement | Adjust front support placement or use a different structure |
Abdomen and belly strap line | Tenderness, pressure marks, or contact with an incision | Discontinue use until the setup is reviewed |
When to Contact a Veterinarian
Contact the veterinary team promptly if assisted movement is followed by new or worsening pain, collapse, breathing difficulty, sudden neurological changes, loss of bladder control, heavy bleeding, inability to stand, or a new refusal to bear weight. Follow emergency instructions when symptoms are severe or rapidly worsening.
For less urgent fit concerns, document what happened, where the equipment was positioned, and what changes appeared during or after the transfer. This information can help the veterinary or rehabilitation team determine whether the technique, activity level, or support equipment should be changed.
The two-point lifting technique for dogs can be a useful handling method when front-and-rear assistance is appropriate and the transfer is planned carefully. Its purpose is controlled support—not forced movement, high lifting, or replacing veterinary care. Prepare the route, use correctly positioned equipment, coordinate handlers, and stop when the dog’s response or the equipment fit indicates that the setup is not safe.
FAQ
How Do You Know If a Dog Needs Two-Point Lifting?
A dog may need front-and-rear assistance when rear-only support does not provide enough control, both ends are unstable, or the veterinary team recommends two support zones for a specific transfer. Difficulty walking alone does not determine the correct lifting method; the underlying condition and permitted activity also matter.
Can One Person Use the Two-Point Technique?
One person may be able to assist a smaller, cooperative dog with a properly fitted full-body lift harness. Large dogs, dogs with severe weakness, or dogs that may panic usually require a second handler. Do not attempt a solo lift when you cannot control both support zones without twisting or overexertion.
What Should You Do If the Dog Panics During Lifting?
Stop moving, lower the dog carefully if it is safe to do so, and check for pain, equipment pressure, or slipping. Do not immediately repeat the lift. Seek professional guidance if panic is severe, recurs, or is accompanied by pain, weakness, breathing changes, or collapse.
Should the Dog’s Full Weight Be Suspended?
Usually, the goal is to provide only the assistance needed for balance and a controlled transfer. Full suspension may be inappropriate or unsafe unless a veterinary professional has given specific instructions and the equipment is designed for that use.
