
You want to help your dog move in a safe way, especially when your dog is hurt or has trouble walking. The two-point lifting technique for dogs provides excellent support, reducing the chance of injury during transfers. Utilizing a support sling and non-slip runners enhances safety for both you and your dog, preventing many common injuries.
Common Injuries | Causes of Injury |
|---|---|
Back strain | Doing too much, bad posture, quick animal moves, lifting alone |
Herniated discs | Doing too much, bad posture |
Shoulder injuries | Lifting heavy or big dogs |
Repetitive strain injuries | Lifting the wrong way |
You can make things safer by using the right gear and employing the two-point lifting technique for dogs. Use kind training and handle your dog gently. Always listen to your vet’s advice and check if your dog feels okay before you lift.
Key Takeaways
Use the two-point lifting technique to help both ends of your dog. This way, your dog stays balanced and safe when you move them. It also lowers the chance of your dog getting hurt during transfers.
Always look at your dog’s condition and check the area before lifting. Take away things that could get in the way and make sure the space is safe. This helps stop accidents from happening.
Pick the right gear, like a rear sling and front harness, to keep your dog comfy and supported. Make sure the gear fits well so it does not rub or cause pain.
What is the two-point lifting technique for dogs
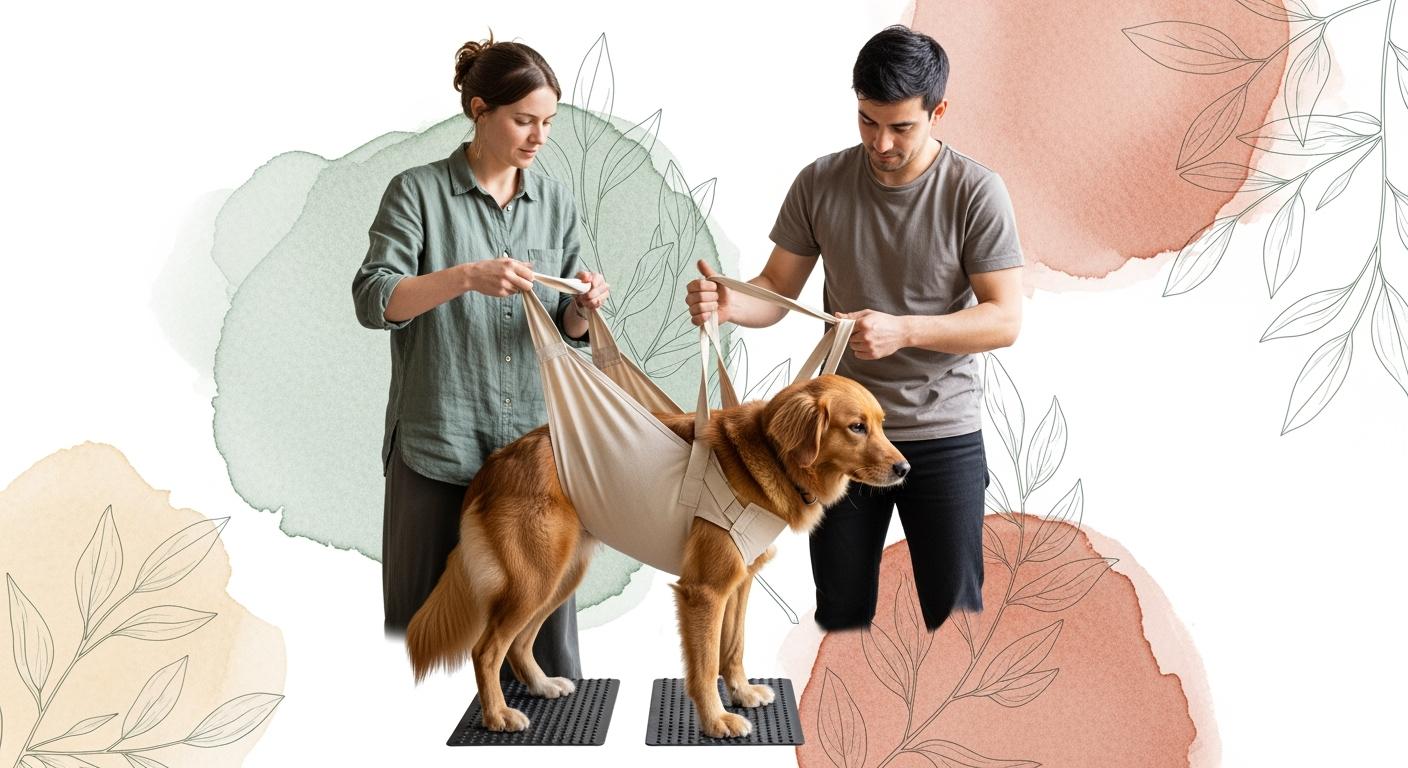
The two-point lifting technique for dogs helps you support both the front and rear ends of your dog at the same time. You use two points of contact: one under the chest and one under the belly, just in front of the hind legs. This method keeps your dog balanced and safe, especially when your dog has trouble standing or walking.
One-point vs two-point support
You may wonder about the difference between one-point and two-point support. One-point support means you only help one end of your dog, like lifting just the rear with a sling. This can cause your dog to tip or twist. The two-point lifting technique for dogs uses support at both ends, which keeps the spine level and reduces the risk of falls. You should use this method when you need to carry your dog up stairs or move your dog across slippery floors.
When to use two-point lifting for dogs
You can use the two-point lift technique in several situations:
Moving your dog up or down stairs
Helping with transfers from bed to floor or into a car
Assisting during potty breaks if your dog’s rear end collapses
Supporting unstable standing or walking
Crossing slick surfaces with non-slip runners
Training your dog to accept gentle handling and using proper gear makes these tasks safer.
When not to lift dogs
You should avoid lifting your dog if you notice pain spikes, panic, or neurological problems. In these cases:
Create a calm and safe environment
Limit movement to prevent more pain
Always support both the chest and hindquarters
Use a harness instead of a collar
Stop handling if your dog yelps or shows distress
Training helps you recognize when your dog feels uncomfortable. Always put safety first and ask your vet if you are unsure about lifting.
Essential gear for two-point lifting technique

Choosing the right gear helps you support dogs safely during transfers. You need to use equipment that fits well and keeps your dog comfortable. Good training makes handling easier and reduces stress for both you and your dog.
Rear lift sling and harness options for dogs
You can select from several rear support options for dogs:
Walkin’ Warrior Rear Harness gives mid-level support and works for longer use.
Help’Em Up Harness offers heavy support with a special Hip Lift design. Many veterinarians recommend it for dogs needing extra help.
A rear sling helps you lift the back end without putting pressure on sensitive areas. Always check the fit before each use.
Front support gear for dogs
Front support gear keeps the chest and shoulders steady. You can see the features and uses in the table below:
Harness Name | Features | Use Cases |
|---|---|---|
Web Master™ Harness | Multi-use, handle, foam padding | Hiking, mobility help |
Flagline™ Harness | Lightweight, handle, adjustable | Hiking, mobility help |
Switchbak™ Harness | Padded, pockets, two leash points | Everyday, hiking |
A lifting harness with front and rear handles gives you better control. Training your dog to accept the harness makes lifting easier.
Traction aids: non-slip runners and socks
Non-slip runners and traction socks help dogs walk safely on slick floors. These aids give secure footing and support weak joints. You can use paw grips for extra stability. Training your dog to walk on these surfaces helps prevent slips.
Safety Tip: Always follow the “assist-as-needed” rule. Support your dog’s balance but do not lift their full weight. Keep the spine level and check skin zones for rubbing. Stop and reset if you see slipping, panic, or pain.
Comparison Table: Rear Sling vs Full-Body Lift Harness vs Two-Sling Setup
Gear Type | Pros | Cons | Best Use Cases |
|---|---|---|---|
Rear Sling | Simple, quick to use | Less balance | Short transfers |
Full-Body Lift Harness | Most support, adjustable | Bulky, more setup | Stairs, car transfers |
Front+Rear Two-Sling | Custom support, flexible | Needs two handlers | Unstable standing |
You should cover slippery floors for about 8 weeks after surgery. Use a lifting harness during the first 2 weeks for post-op care. Always measure your dog for the right fit and let them move around to check comfort.
Step-by-step guide to lifting dogs safely
Preparing the area and calming your dog
You want to make sure the environment is safe before you lift your dog. Follow these steps to prepare:
Check your dog’s condition. Look for signs of distress, such as heavy panting or visible wounds.
Evaluate the area. Remove obstacles and clear a path to your destination.
Lay down non-slip runners or mats. Make sure the flooring is safe for your dog.
Open doors wide enough for easy passage.
Approach your dog calmly. Speak in a gentle, reassuring voice.
You can help your dog feel relaxed by understanding their body language. Offer treats or affection to reward calm behavior. Create a safe space where your dog can retreat if they feel anxious. You can use brain games or simple tricks to boost your dog’s confidence. Training helps your dog respond better during stressful moments.
Positioning the sling and fit checks
You need to position the sling correctly to use the two-point lifting technique for dogs. Choose two points of contact: one under the chest and one under the belly, just in front of the hind legs. This method keeps your dog balanced and prevents twisting.
Follow these steps for proper positioning:
Place the rear sling under the abdomen, just ahead of the hind legs.
Position the front support under the chest, between the front legs.
Check the fit. Make sure the sling does not rub against the groin, inner thighs, or armpits.
Adjust the straps so your dog’s spine stays level.
Test the setup by letting your dog stand with support. Watch for slipping or discomfort.
Training your dog to accept the sling makes the process smoother. Practice loose lead walking with the gear to help your dog get used to it.
Lifting technique and handler coordination
You need to use safe carrying techniques when lifting your dog. The two-point lifting technique for dogs works best with two handlers, but you can do it alone with a full-body lift harness.
Here are the steps for lifting:
Communicate with your helper. Use clear cues like “Ready, lift” or “Pause.”
Support both ends of your dog at the same time. Lift gently and keep the spine straight.
Avoid lifting too high. Only assist as needed to help your dog move.
Move slowly and keep your dog calm. Use loose lead walking to guide your dog.
If you need to carry your dog up stairs, use a rear sling and front support. One person lifts the rear, and the other lifts the front. Place a non-slip runner on the steps for traction.
Handler coordination is important. Always agree on cues before you start. Training helps both you and your dog work together safely.
Mini-Scenario: Potty Break on Slippery Floors
Imagine your dog needs a potty break but the hallway is slick. You set up traction socks, a rear sling, and front support. You guide your dog with loose lead walking, keeping two points of contact. You move slowly, supporting your dog’s balance. If your dog slips or panics, stop and reset.
Safety tips and common mistakes
You want to avoid common mistakes when using the two-point lifting technique for dogs. Here are safety tips to follow:
Always support your dog at two points of contact.
Do not lift your dog by the collar.
Keep the spine level and avoid twisting.
Stop if your dog shows pain, panic, or new weakness.
Check skin zones for rubbing after each lift.
Use training to help your dog stay calm and accept handling.
Below is a decision table to help you choose the best setup for different situations:
What you see | Best gear combo | Technique cue | Stop-and-call-the-vet trigger |
|---|---|---|---|
Slippery hall to potty | Rear sling + front harness | “Ready, walk slow” | Sudden pain or collapse |
Stairs you can’t avoid | Rear sling + front sling | “Step, pause” | Yelping or panic |
Car transfer | Full-body lift harness | “Lift, steady” | Refusal to bear weight |
You can use this table to guide your choices. Always put safety first and follow your vet’s advice. Training and loose lead walking help your dog move with confidence.
Aftercare and monitoring for dogs
Checking for stress or injury
You should check your dog after every lift. Look for discomfort, redness, or rubbing on the skin. Pay attention to the groin, inner thighs, armpits, and belly strap area. If you see redness or swelling, change how the sling or harness fits. Let your dog rest after each move. Use gentle training so your dog feels okay with handling. Watch for changes like limping or not wanting to walk. Training helps you spot small signs of pain. Keep your dog in a safe place with non-slip floors and little space. This helps stop injuries and helps your dog heal.
Tip: Dogs who had surgery need strict rest for 8-12 weeks. Do not let your dog jump, run, or go up stairs. Use training to help your dog stay calm and move safely.
Skin Check Zone | What to Look For | Adjustment Advice |
|---|---|---|
Groin/Inner Thighs | Redness, swelling | Loosen sling, add padding |
Armpits/Chest Strap | Rubbing, irritation | Reposition harness |
Belly Strap Line | Soreness, hair loss | Check fit, rest longer |
When to call the vet
Call your vet if you see any of these problems after lifting:
Sudden trouble breathing
Collapse or very bad pain
Seizures or possible poisoning
Can’t pee
Heavy bleeding
Won’t put weight on a leg or limps worse
Tell your vet what you see and how your dog acts. Listen to your vet or the emergency clinic. Use training to help your dog stay calm when stressed. If limping gets worse, let your dog rest for one day. If your dog does not get better in two or three days, call your vet.
You can help dogs move safely with the two-point lifting technique. Use the right gear and get ready before you lift. Training often helps your dog trust you and stay calm. Always look for signs your dog feels uncomfortable after lifting. Listen to your veterinarian’s advice for recovery. Training lets you notice problems early. Be patient and use training to keep your dog safe and comfortable. Safe lifting and training help your dog move, but they do not replace medical care.
FAQ
How do you know if your dog needs two-point lifting?
You see your dog struggling to stand, walk, or climb stairs. Use two-point lifting if your vet recommends extra support for safety.
Can you lift your dog alone using this technique?
You can lift a dog alone with a full-body harness. For large dogs, ask for help to keep your dog balanced and prevent injury.
What should you do if your dog panics during lifting?
Stop lifting right away. Calm your dog with gentle words. Check for pain or discomfort. Try again only when your dog feels safe.
