
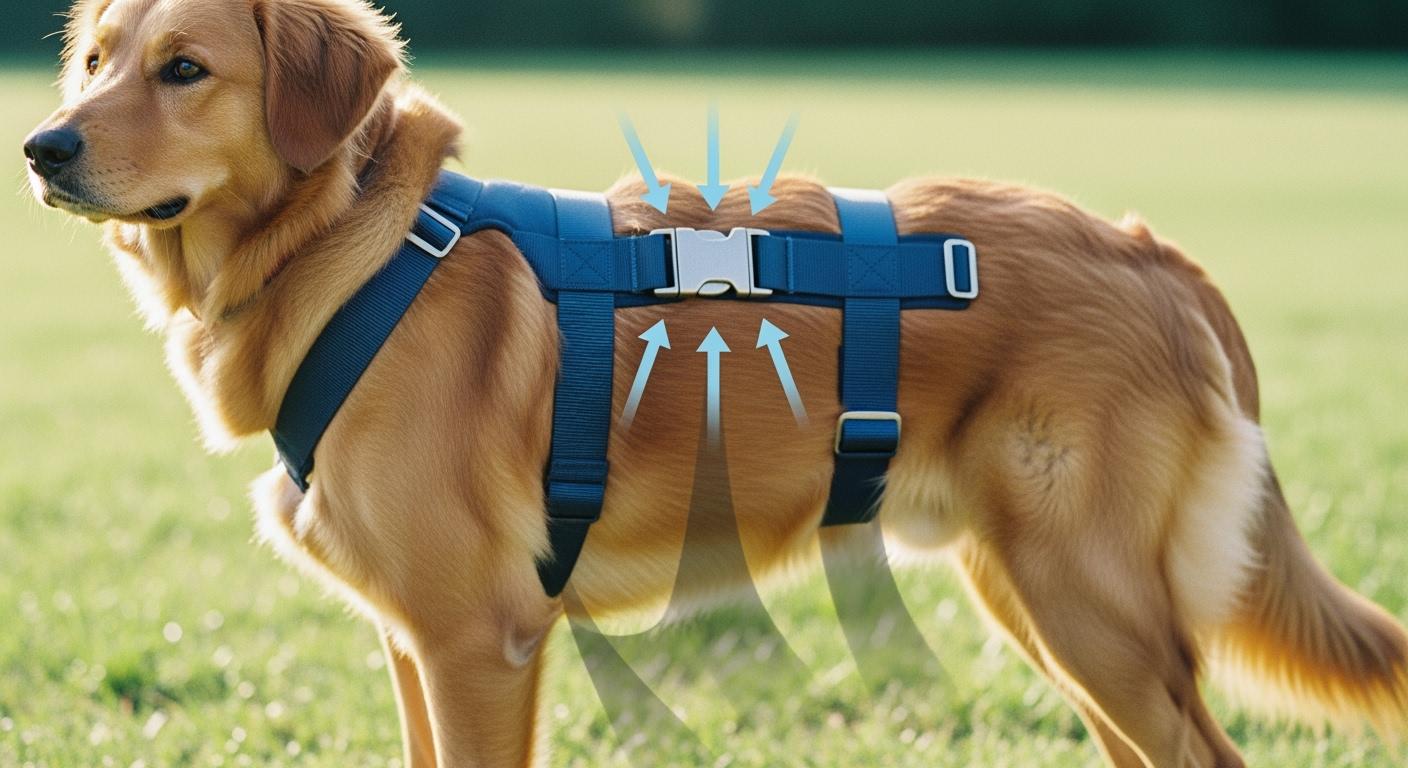
A harness that fits perfectly at rest can fail the moment you lift. The dog stands calmly, straps look even, buckles sit flat. Then you support your dog up a stair or into a car, and a buckle drives straight into the belly. That is not a sizing error. It is a load-path problem — the harness structure is routing force through a hard point onto soft tissue, and no amount of strap adjustment fixes it.
Dog lift harness buckles pressure under load reveals whether the harness spreads force across a wide panel or concentrates it through a narrow strap onto a single buckle. The difference between the two is not subtle once you know what to look for.
Why Standing Fit Tells You Nothing About Buckle Pressure
A harness at rest is a geometry problem solved on paper. A harness under load is a force-distribution problem playing out in real time on a moving dog. The two states have almost nothing in common.
When you lift, the dog’s weight shifts. The angle of each strap changes. The handle you grip becomes the single point through which the dog’s body mass transfers to your hand. Every strap between that handle and the dog’s body is now under tension. If a buckle sits anywhere along that tension line — and there is no wide panel between the buckle and the skin — the buckle becomes the endpoint of a concentrated force vector.
That is the core failure. A narrow strap pulls taut. The buckle at its end cannot spread what the strap delivers, so it transmits the force through its own small footprint into whatever soft tissue sits beneath it. The belly. The inner thigh. The rib edge where bone sits close to skin.
A loaded-fit check catches what a standing-fit check misses. Before trusting a harness for stairs or car transfers, run through six steps under real load: fit at rest, locate every buckle, support the dog for five to ten slow supported steps, watch for any buckle that rotates or digs, check the skin immediately after, and adjust or stop use if pressure marks appear. This sequence — not a standing two-finger clearance test — is what separates a harness that works from one that only looks right when nothing is asked of it.
The Strap-to-Buckle Load Path — Where Pressure Concentrates and Why
Now put that buckle over the belly, where the abdominal wall has no skeletal structure to distribute load. The force punches into soft tissue. The dog arches away. The handler feels the lift go uneven. The buckle, if the strap routing is even slightly asymmetrical, rotates from flat to vertical — halving its already small contact area and doubling the pressure per square inch.
This is why wide padded panels are not a comfort feature — they are a load-spreading structure. A panel that engages before the strap reaches the buckle takes the same lifting force and distributes it across a surface area that can be five to ten times larger. The buckle becomes a termination point, not a pressure point.
Three body zones take the worst of it when the panel-to-buckle sequence is reversed:
- Belly and rib edge. No skeletal frame underneath. A buckle here presses directly into organs and the thin muscles of the abdominal wall. The dog shortens stride or freezes because extending the abdomen into the buckle hurts.
- Groin and inner thigh. High-motion zones. A buckle near the groin rotates with every step, rubbing rather than just pressing. The skin here is thin and vascular — marks appear fast.
- Armpit and shoulder edge. When the harness twists from asymmetrical tension, buckles migrate forward. The armpit has major vessels and nerves running close to the surface. Pinching here produces an immediate refusal response.
Here is the failure pattern table that maps each problem to its structural cause and the design choice that prevents it:
| Failure pattern | Why it happens under load | What the dog or handler may notice | Better structure or design choice |
|---|---|---|---|
| Buckle directly under belly load | Strap tension pulls buckle into belly with no panel to spread force | Dog arches back, handler feels uneven lift | Move buckle off belly, use wide padded panel that engages first |
| Buckle near groin or inner thigh | Harness shifts, buckle rotates into groin during movement | Dog freezes, shortens stride, sits suddenly | Place buckle outside groin zone, extend padding coverage |
| Buckle flips vertical when lifted | Asymmetrical tension, unbalanced strap routing | Buckle digs in, harness twists, dog resists forward movement | Keep buckles flat under tension, balance left and right strap paths |
| One side strap tighter than other | Uneven adjustment, handler lifts consistently from one side | Harness pulls sideways, lift feels heavier on one arm | Adjust straps evenly, use dual handles to distribute lift force |
| Narrow strap carries load before panel engages | Padding positioned behind buckle rather than between buckle and skin | Buckle pressure, red marks, discomfort within minutes | Position wide padded panels to receive load before straps reach buckles |
| Rear-only support overloads back half | All lifting force concentrated through rear straps and buckles | Dog sits, yelps, handler feels heavy and uncontrolled lift | Use front and rear handles together to share load across body |
The table above is not theoretical. Each row describes a sequence you can observe. A harness that distributes load between front and rear support zones changes where buckles sit under tension and whether they remain flat or rotate. After a short supported walk, check whether any buckle has moved from its resting position by more than half an inch. If it has, the panel-to-buckle sequence is wrong, and the harness is concentrating rather than spreading.
When the Harness Is Not the Right Support Tool
Rear-only harnesses concentrate lifting force through the back half of the dog. If the dog has weak hind legs but strong front legs, that concentration is appropriate — the rear is where support is needed. But if the dog has weakness in both front and rear, or if the dog is large enough that rear-only lifting tilts the body backward, the buckles on a rear-only harness dig harder with every step. The load is asking more of the structure than it was designed to carry through that single zone. A full-body harness that routes load through both front and rear support panels changes the force distribution enough that buckles that previously dug in can stay flat under the same lifting scenario.
There are also cases where no harness configuration solves the problem and a different support approach is needed. If buckle pressure returns after repositioning, after switching to wider panels, and after confirming symmetrical strap tension, the issue may be that the dog’s body shape falls outside what the harness pattern was built to accommodate. Deep-chested breeds, dogs with angular limb deformities, or dogs whose weight distribution is heavily shifted forward or backward can create load paths the harness geometry cannot resolve.
Disclaimer: The fit checks and pressure-point assessments described here assume a short-coated dog where skin marks and buckle displacement are visually obvious. Double-coated breeds may show subtler rub marks — a hand-check running fingertips under each strap and buckle immediately after a supported session is more reliable than visual inspection alone for these dogs. If the dog’s leg or chest conformation falls well outside the breed norms this harness type was patterned for, particularly dogs with angular limb deformities or very deep chests, the fit checks described here may not catch every pressure point.
Use the signal table below to decide whether to continue, adjust, or stop. It turns subjective impressions into observable pass/fail signals:
| Signal level | What appears | What to do |
|---|---|---|
| Green | Buckle stays flat, dog moves with normal stride, no skin change after use | Continue use, check fit each session |
| Yellow | Mild rubbing line, small buckle shift from original position, dog hesitates, lift feels uneven | Adjust harness, verify panel engages before buckle, monitor closely |
| Red | Swelling, heat, chafing, pain response, repeated sitting, yelping, limping, open skin, or buckle pressure returning after adjustment | Stop use, reassess fit, consider different support configuration |
Stairs and car transfers amplify every weakness in buckle placement because the lift angle changes continuously throughout the movement. A buckle that tolerates a vertical lift may fail when the angle shifts forty-five degrees on an incline. After any session involving stairs or angled lifting, check that buckles have not rotated and that skin under every contact point is dry and mark-free.
A harness built with wide load-spreading panels, buckles placed outside soft-tissue zones, and symmetrical strap routing addresses the structural reasons buckle pressure develops. But no harness design eliminates the need to check. The load path changes every time the dog shifts weight, every time the lifting angle changes, every time the handler grips a different handle. Observing what the buckles do under those changing conditions — not what they look like at rest — is the only way to know whether the harness is spreading force or concentrating it.
FAQ
Why does the harness look fine at rest but dig in when I lift?
Because load changes geometry. At rest, straps follow the contours of a stationary dog. Under lift, tension pulls every strap tight along the shortest path between the handle and the dog’s body. Buckles that sat flat can rotate ninety degrees. Panels that covered soft tissue at rest can shift, exposing skin directly to strap edges. The only way to catch this is a loaded check — five to ten supported steps, then inspect.
Where should buckles sit on a properly designed lift harness?
Buckles should sit away from the belly midline, outside the groin crease, and clear of the armpit. More important than location alone is what sits between the buckle and the skin. A buckle positioned off the belly that still has only a narrow strap feeding it will concentrate force. A buckle with a wide padded panel between it and the dog can sit closer to load-bearing zones without creating a pressure point, because the panel spreads the force before it reaches the buckle.
How do I know if the pressure is from buckle placement or from a harness that is simply the wrong size?
Size problems show up at rest — the harness gaps, slides, or cannot achieve basic strap clearance. Buckle pressure problems show up only or primarily under load. If the harness passes a standing fit check but produces red marks, rotation, or digging during supported movement, the issue is structural — where the buckles sit and whether wide panels engage before narrow straps — not dimensional.
When should I switch from a rear-only harness to a full-body harness?
When rear-only lifting causes buckles to dig in despite correct adjustment, or when the dog shows weakness in both front and rear legs. A full-body harness routes lifting force through both the chest and rear panels, which changes where buckles sit under tension and reduces the load any single buckle must carry. If the dog hesitates, sits, or the lift feels uncontrolled with rear-only support, adding a front support zone often resolves the buckle pressure without any strap adjustment at all — the load path itself changes.
